Getting Started with Evercam Tutorial Guides
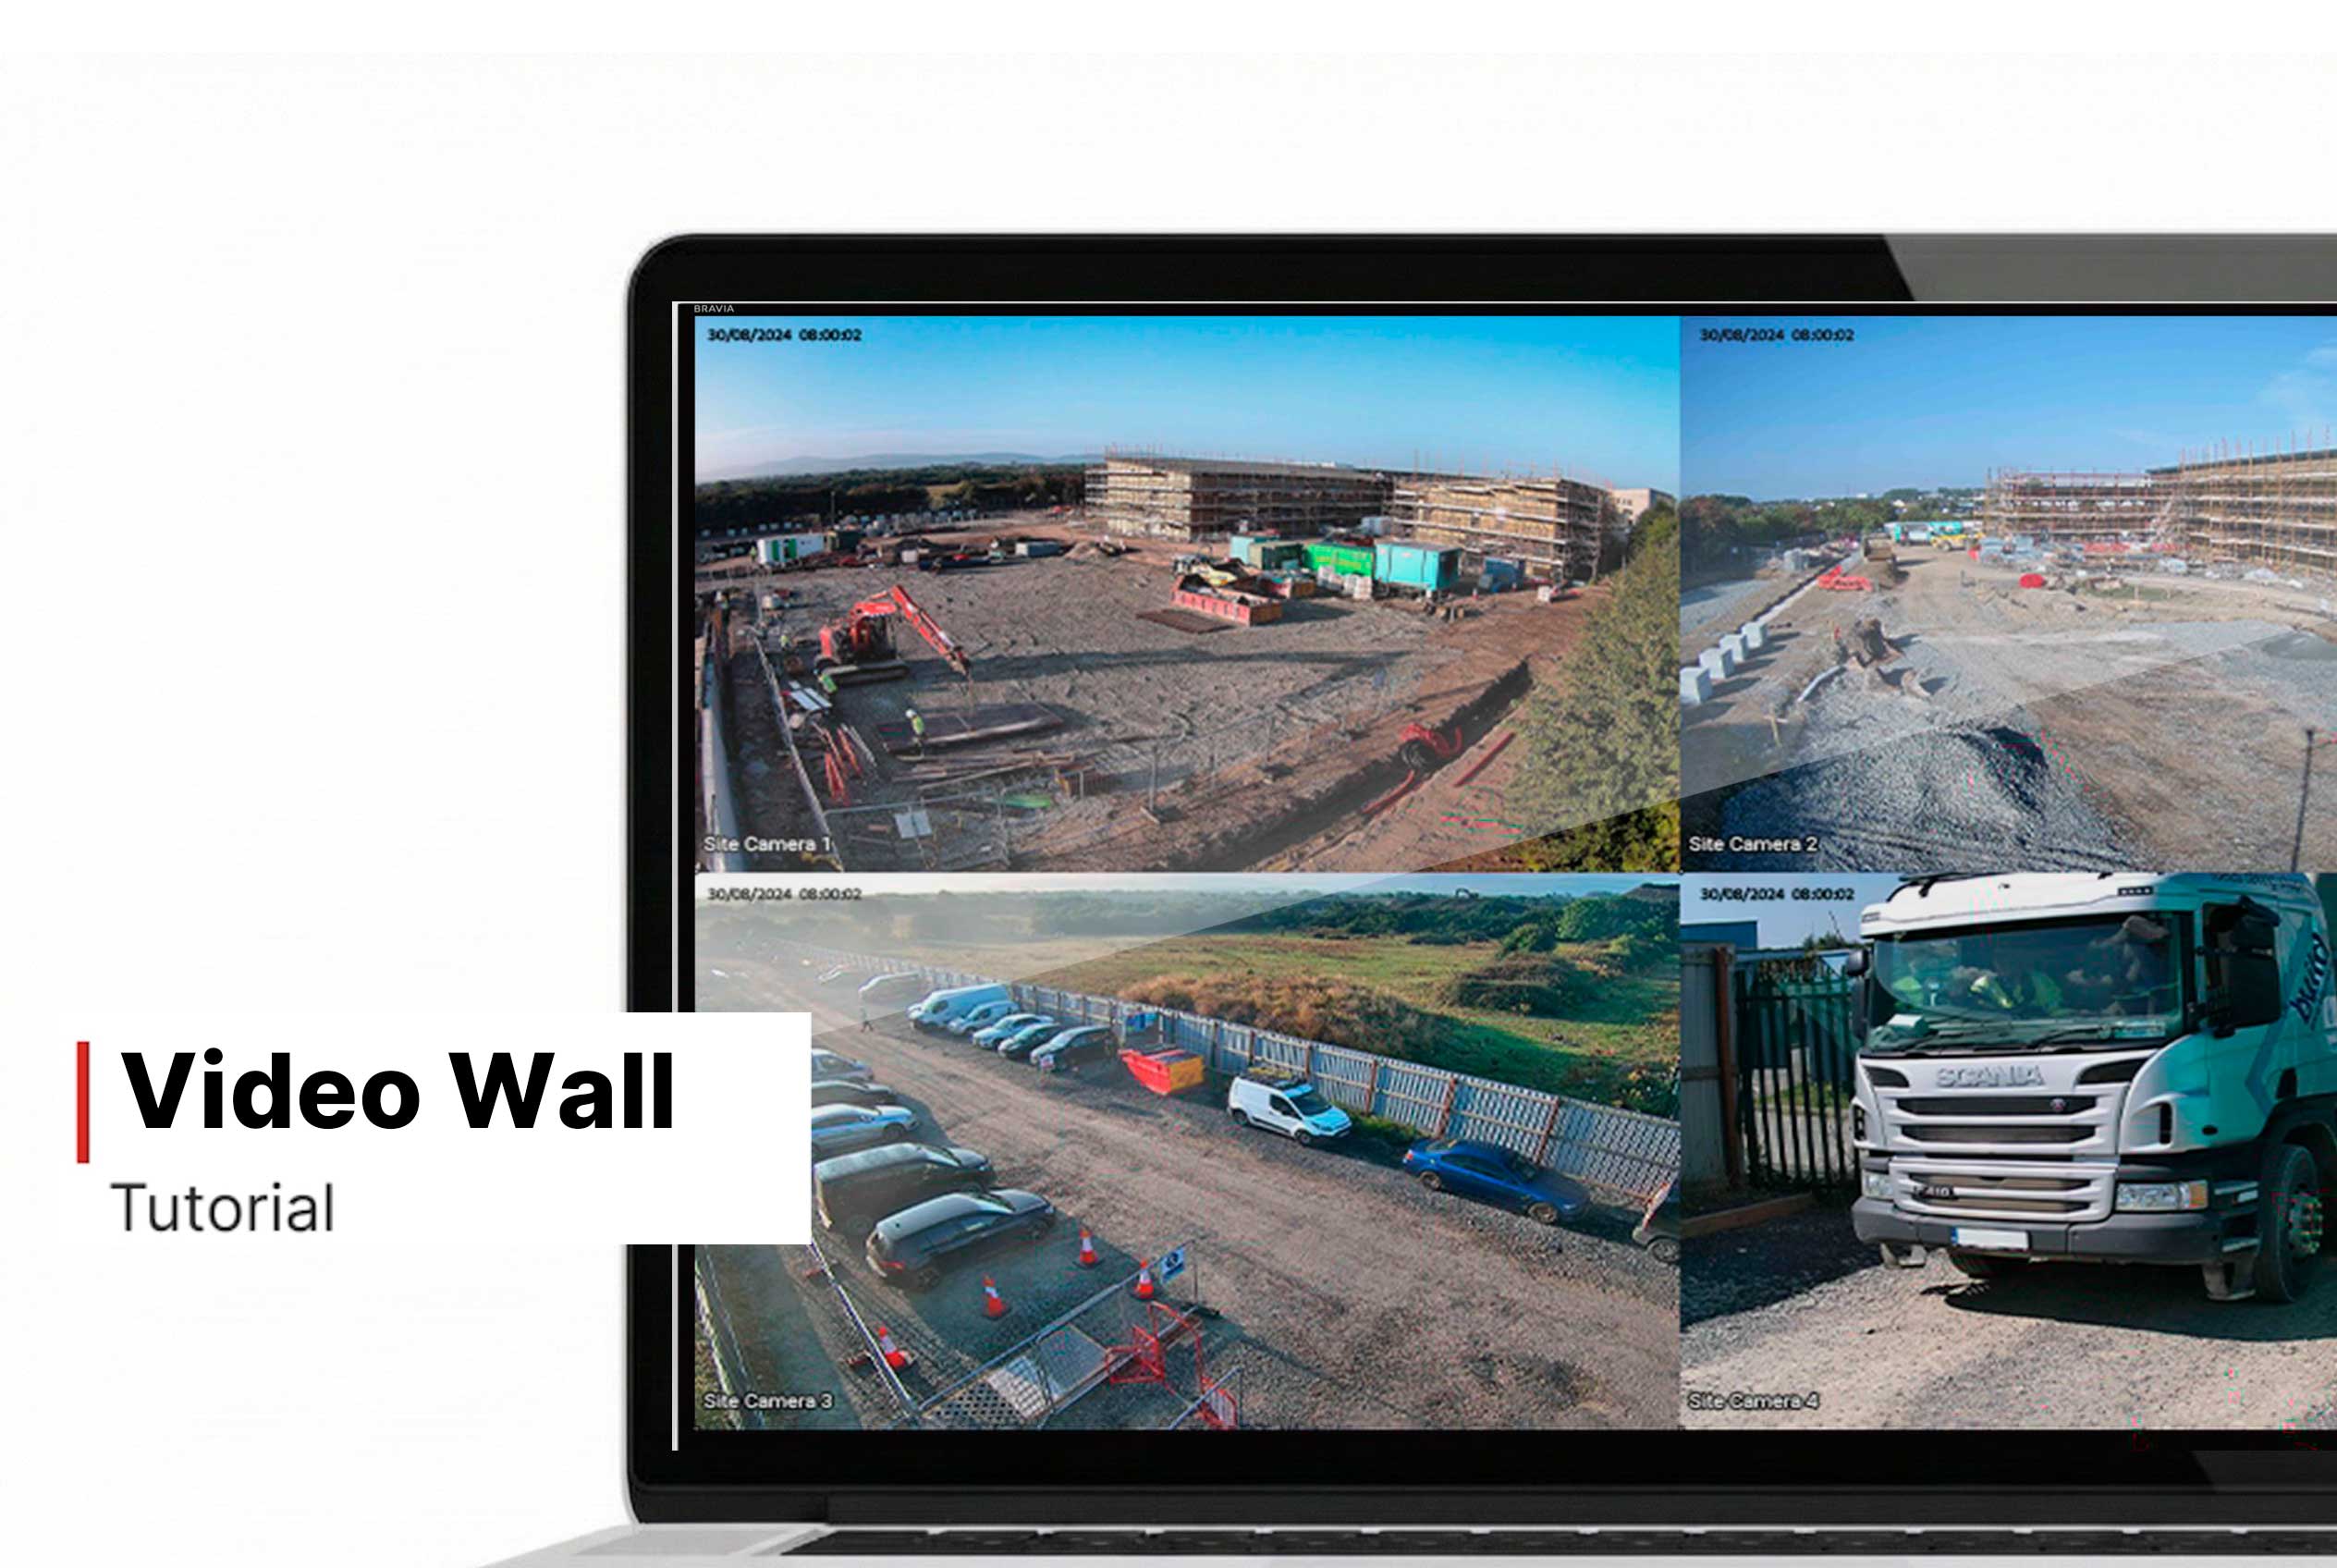
Video Wall
How to Use the Video Wall
1. Open the Video Wall
- Click the Video Wall tab in the left-hand navigation menu.
- This opens the wall view showing all cameras for either:
- All projects (if accessed from the dashboard)
- A specific project (if accessed from within a project)
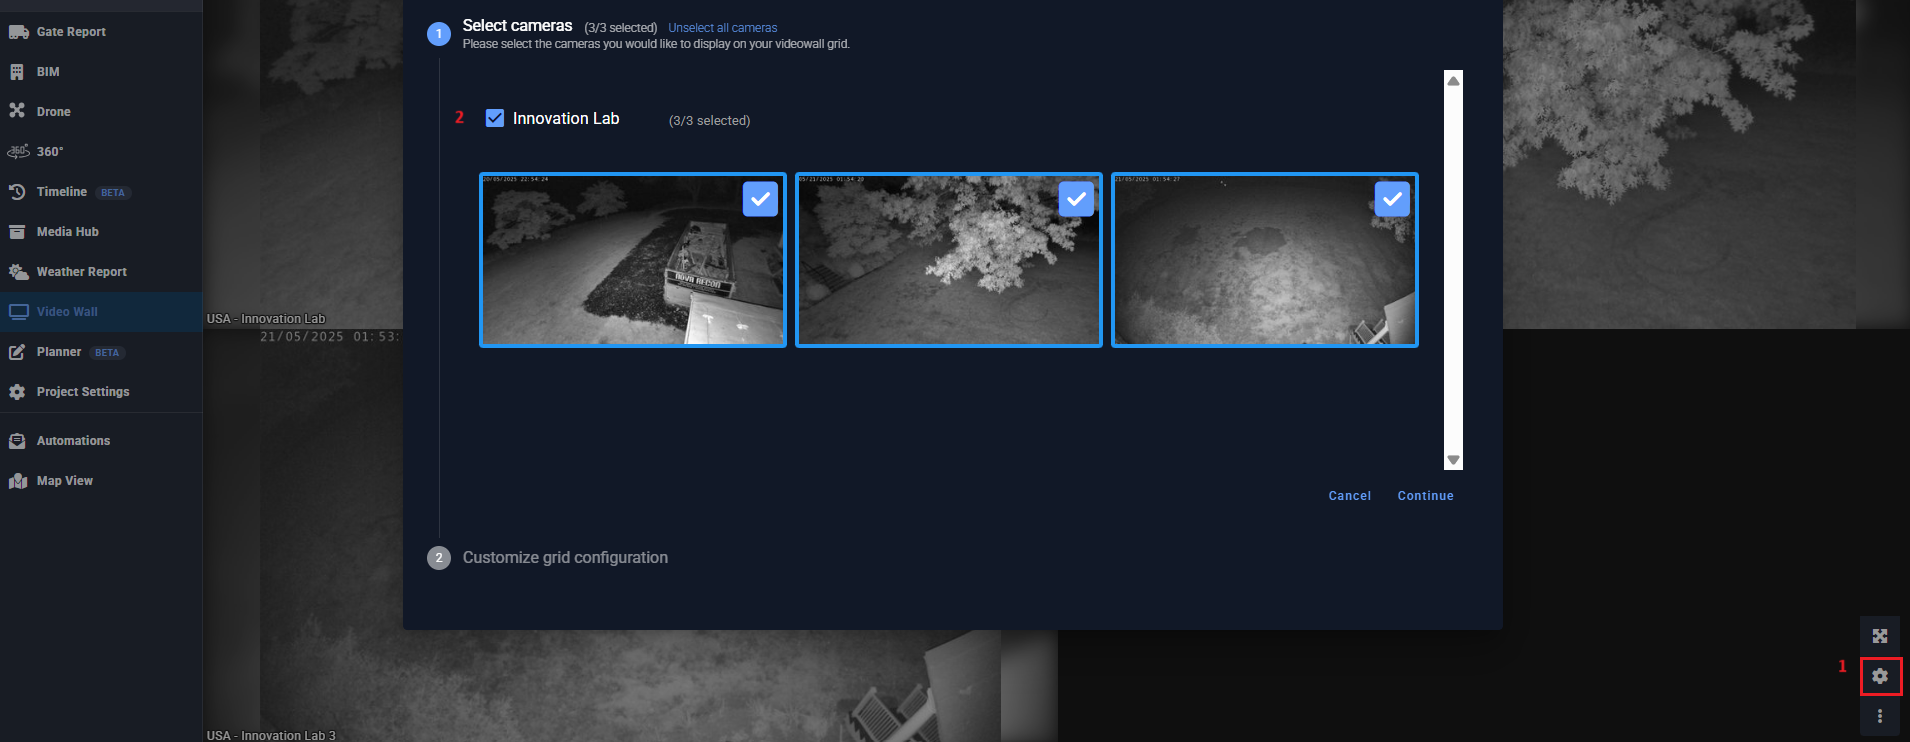
2. Configure the Video Wall
What it does: Lets you choose which cameras to display and how they are arranged.
How to use:
- Click the gear icon (Configure) at the bottom right corner of the Video Wall screen.
- In the configuration panel, you can:
- Select cameras from your project(s)
- Drag and drop cameras into position on the grid
- Resize and arrange views to fit your preferred layout
- Once done, click Save — the layout will update instantly.
3. Monitor Your Project
What it does: Provides live visual updates in a unified display.
How to use:
- After saving your configuration, the grid will refresh automatically.
- Use the wall to observe real-time conditions across multiple locations.
- Note: The images update every 50 seconds by default to maintain performance.
Access & Permissions
What it does: Ensures that the Video Wall is only visible to users with permission.
How to use:
- The Video Wall must be enabled per user.
- Contact your Evercam Account Manager to enable this feature.
- Once enabled, any device using that user’s login can access the Video Wall.
Notes & Expectations
- Image Quality: Slightly reduced compared to Live View, to optimize speed and performance.
- Refresh Rate: 1 new image (JPEG) every 50 seconds per camera.
- Visibility: Cameras shown depend on whether you access it from the overall dashboard (all projects) or within a specific project (only project cameras).
Need More Details?
Read the full guide in our User Manual.
[[cta]]
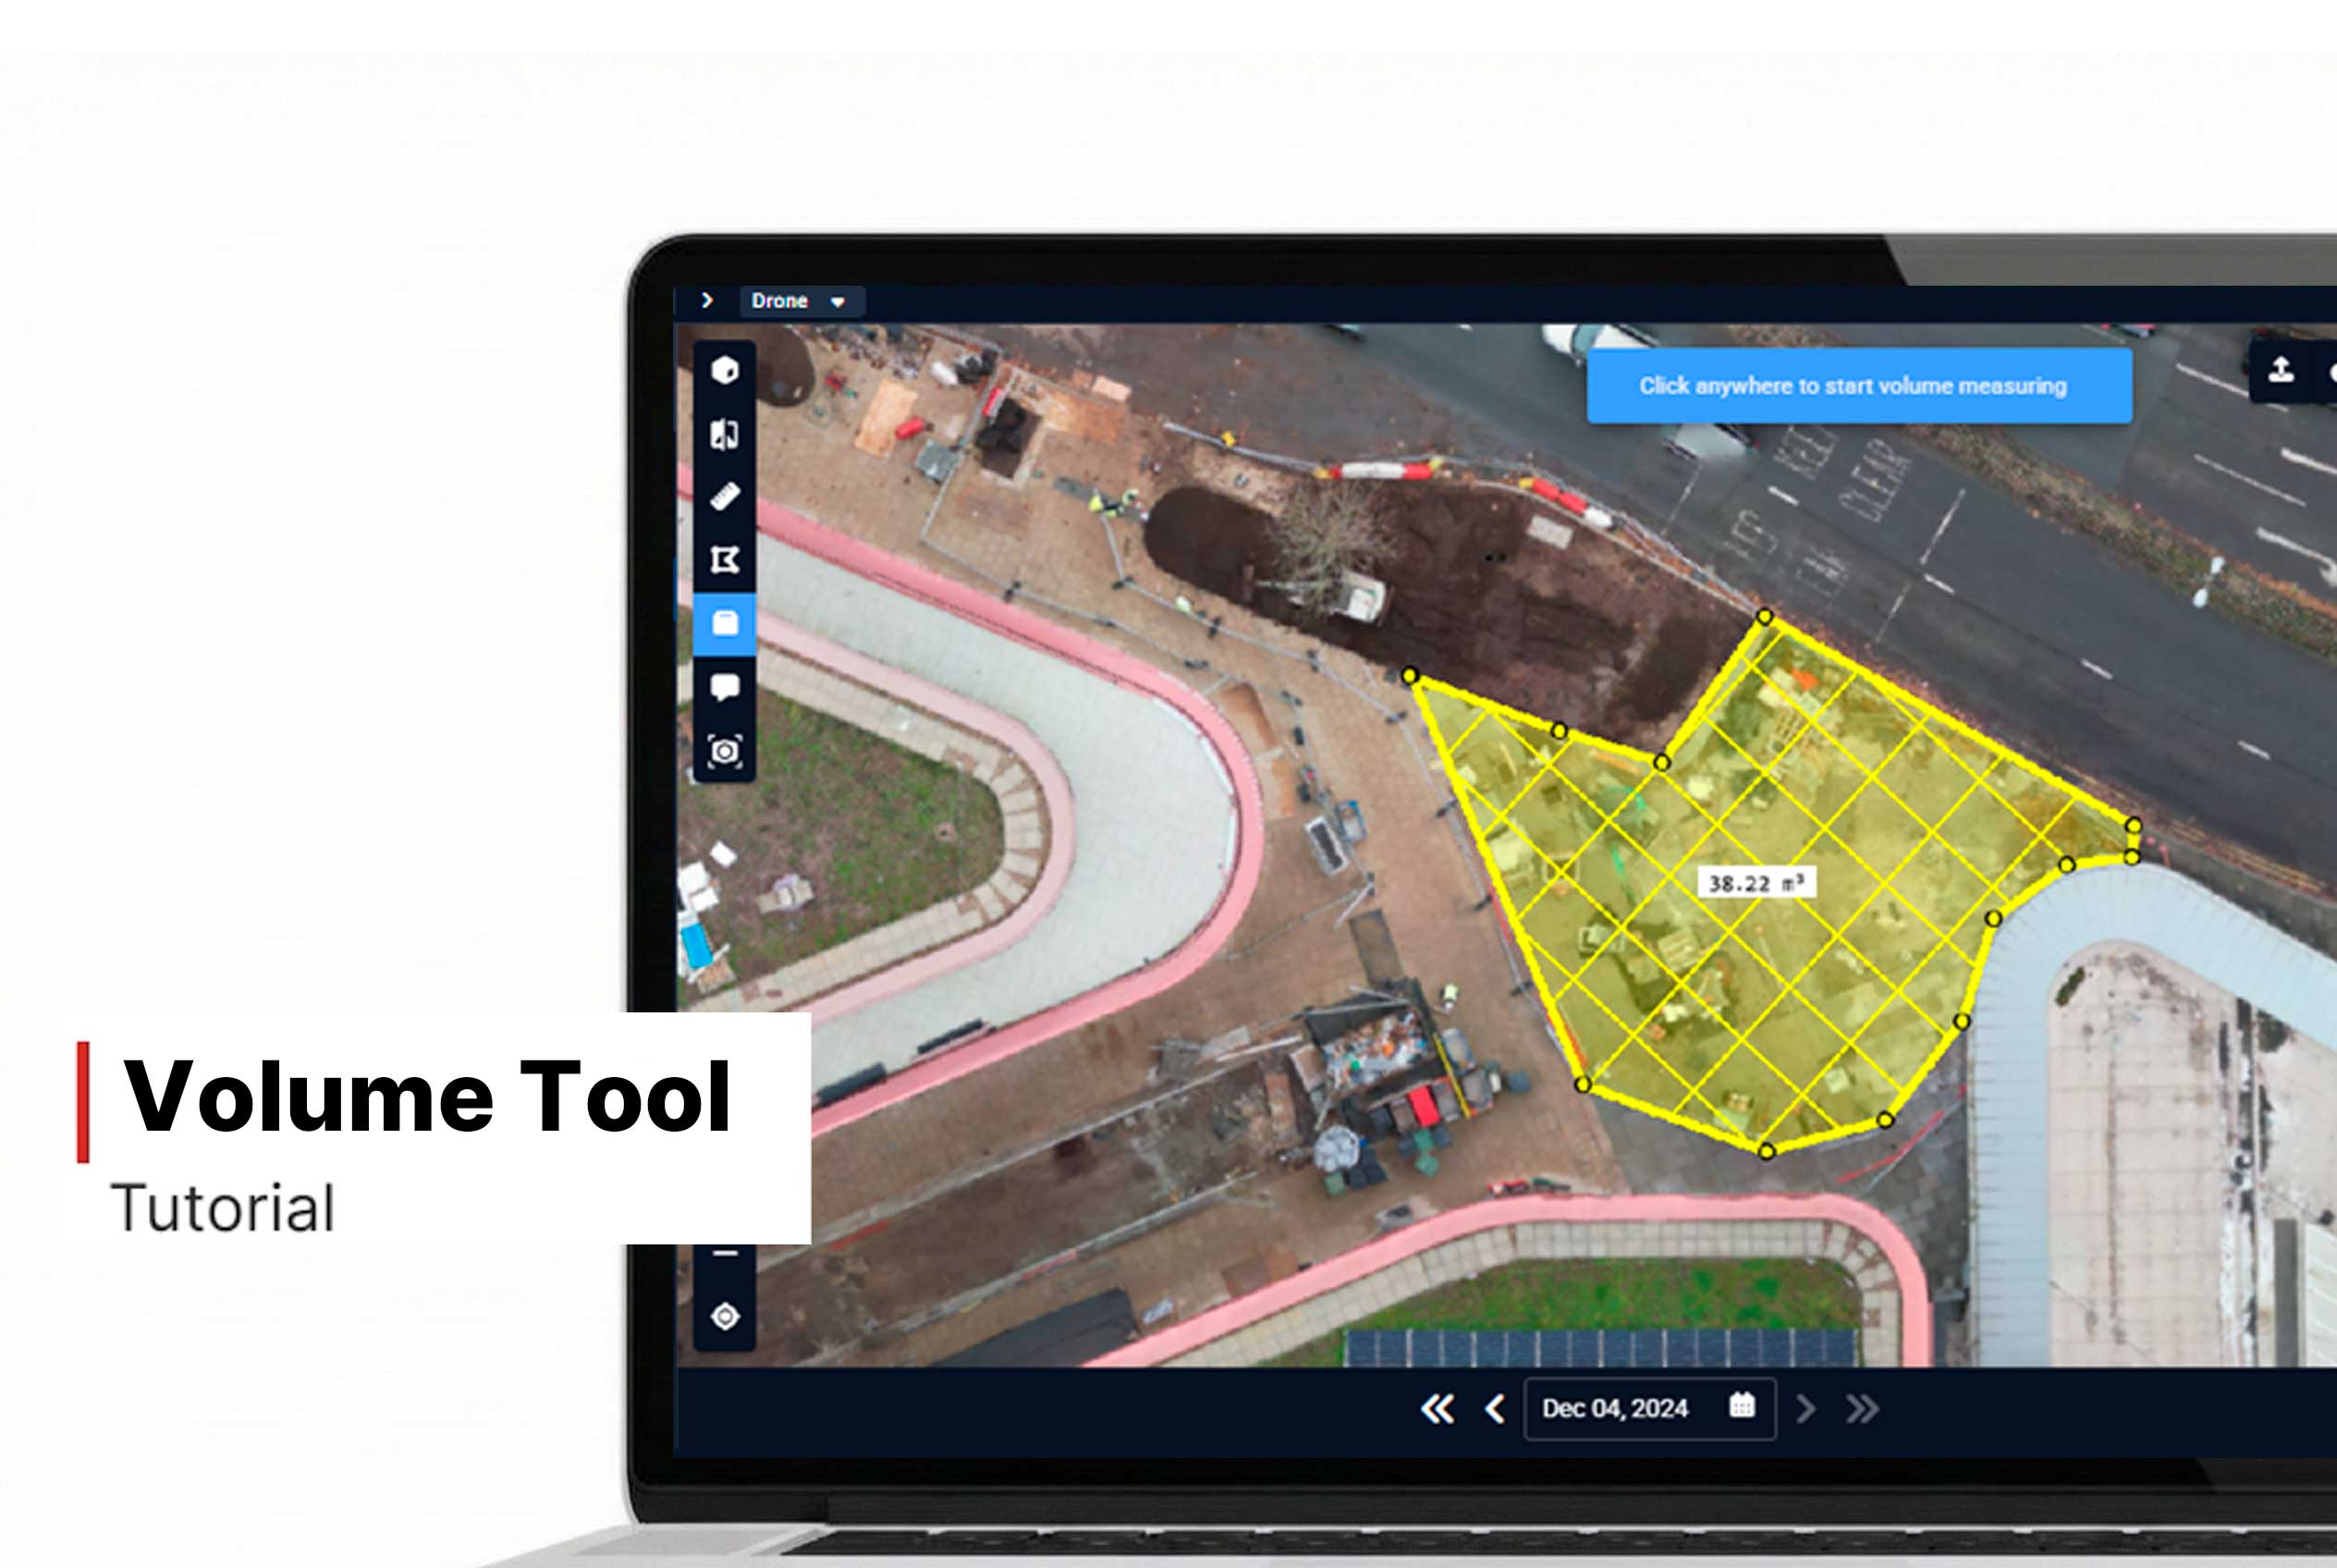
Volume Measurement
How to Measure Volume
- Click the Volume icon in the top left corner of the Drone view.
- This enables the base outline tool.
- Click to create the base shape.
- The system uses a Line of Best Fit method to calculate:
- Cut: Material above the base
- Fill: Material below the base
- For best accuracy, switch to 2D Mode before measuring.
- View the Cut, Fill, Difference, Area, and Perimeter in the top left corner of your screen.

Want More Details?
Read the full guide in our User Manual.
[[cta]]

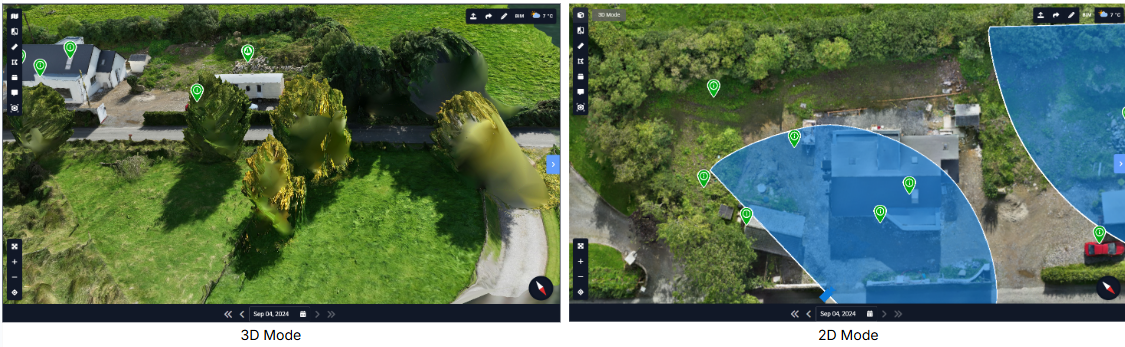
2D Mode
How to use 2D Mode:
- Click the 2D Mode icon in the top left corner of the Drone interface.
- The view will switch from 3D to a flat, overhead 2D representation.
- Use your mouse or trackpad to pan and zoom within the 2D view.
- Rotational controls are disabled to maintain a consistent top-down perspective.
- Perform area or volume measurements more precisely in 2D Mode.
- Align floor plans or other overlays accurately within this view.
Want More Details?
Read the full guide in our User Manual.
[[cta]]
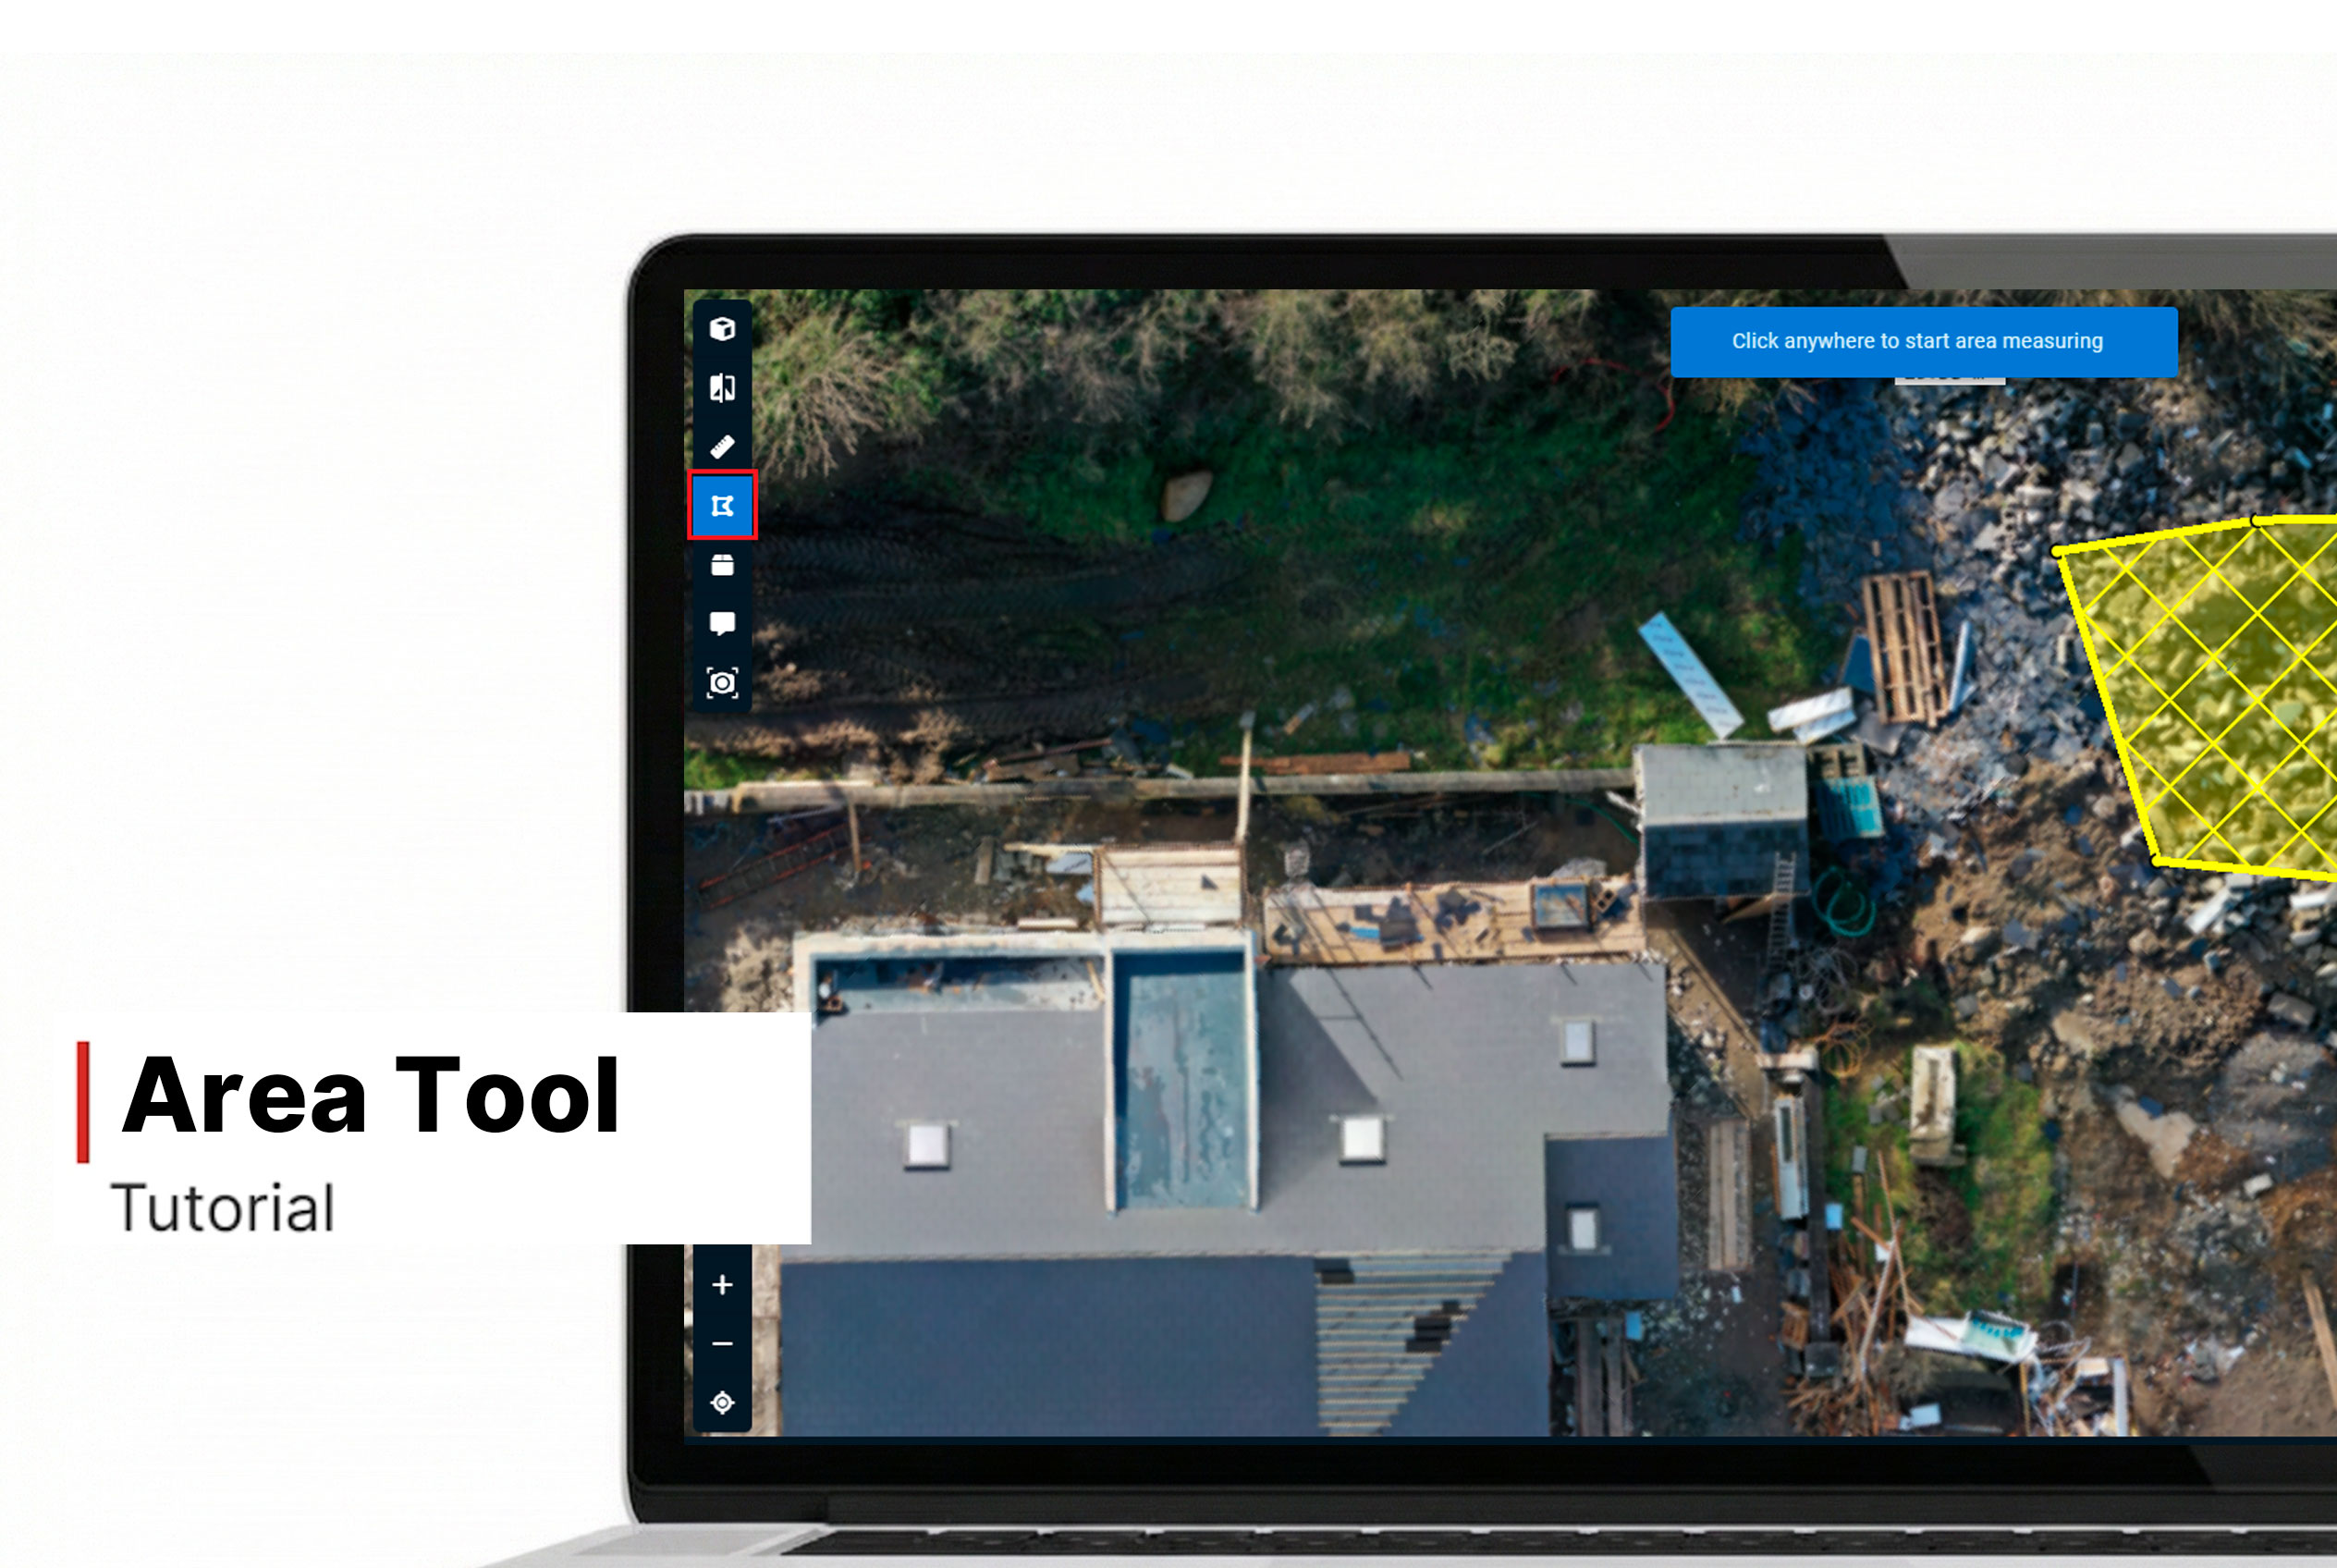
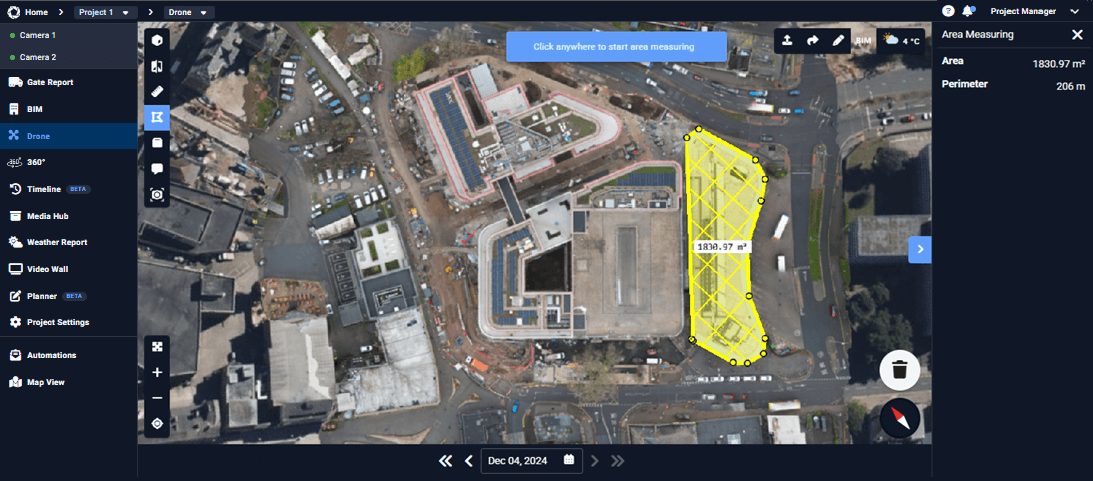
Area Measuring
How to Measure an Area
- Click the Area icon in the top left corner of the Drone interface.
- This activates polygonal measurement mode.
- Click three or more points to draw a closed shape.
- The calculated area will be displayed inside the polygon on the mesh.
- In the top right of your dashboard, you’ll see the total distance of your measured area.
- Rotate the model or zoom in to ensure accuracy.
- For better results, consider switching to 2D Mode.
Want More Details?
Read the full guide in our User Manual.
[[cta]]
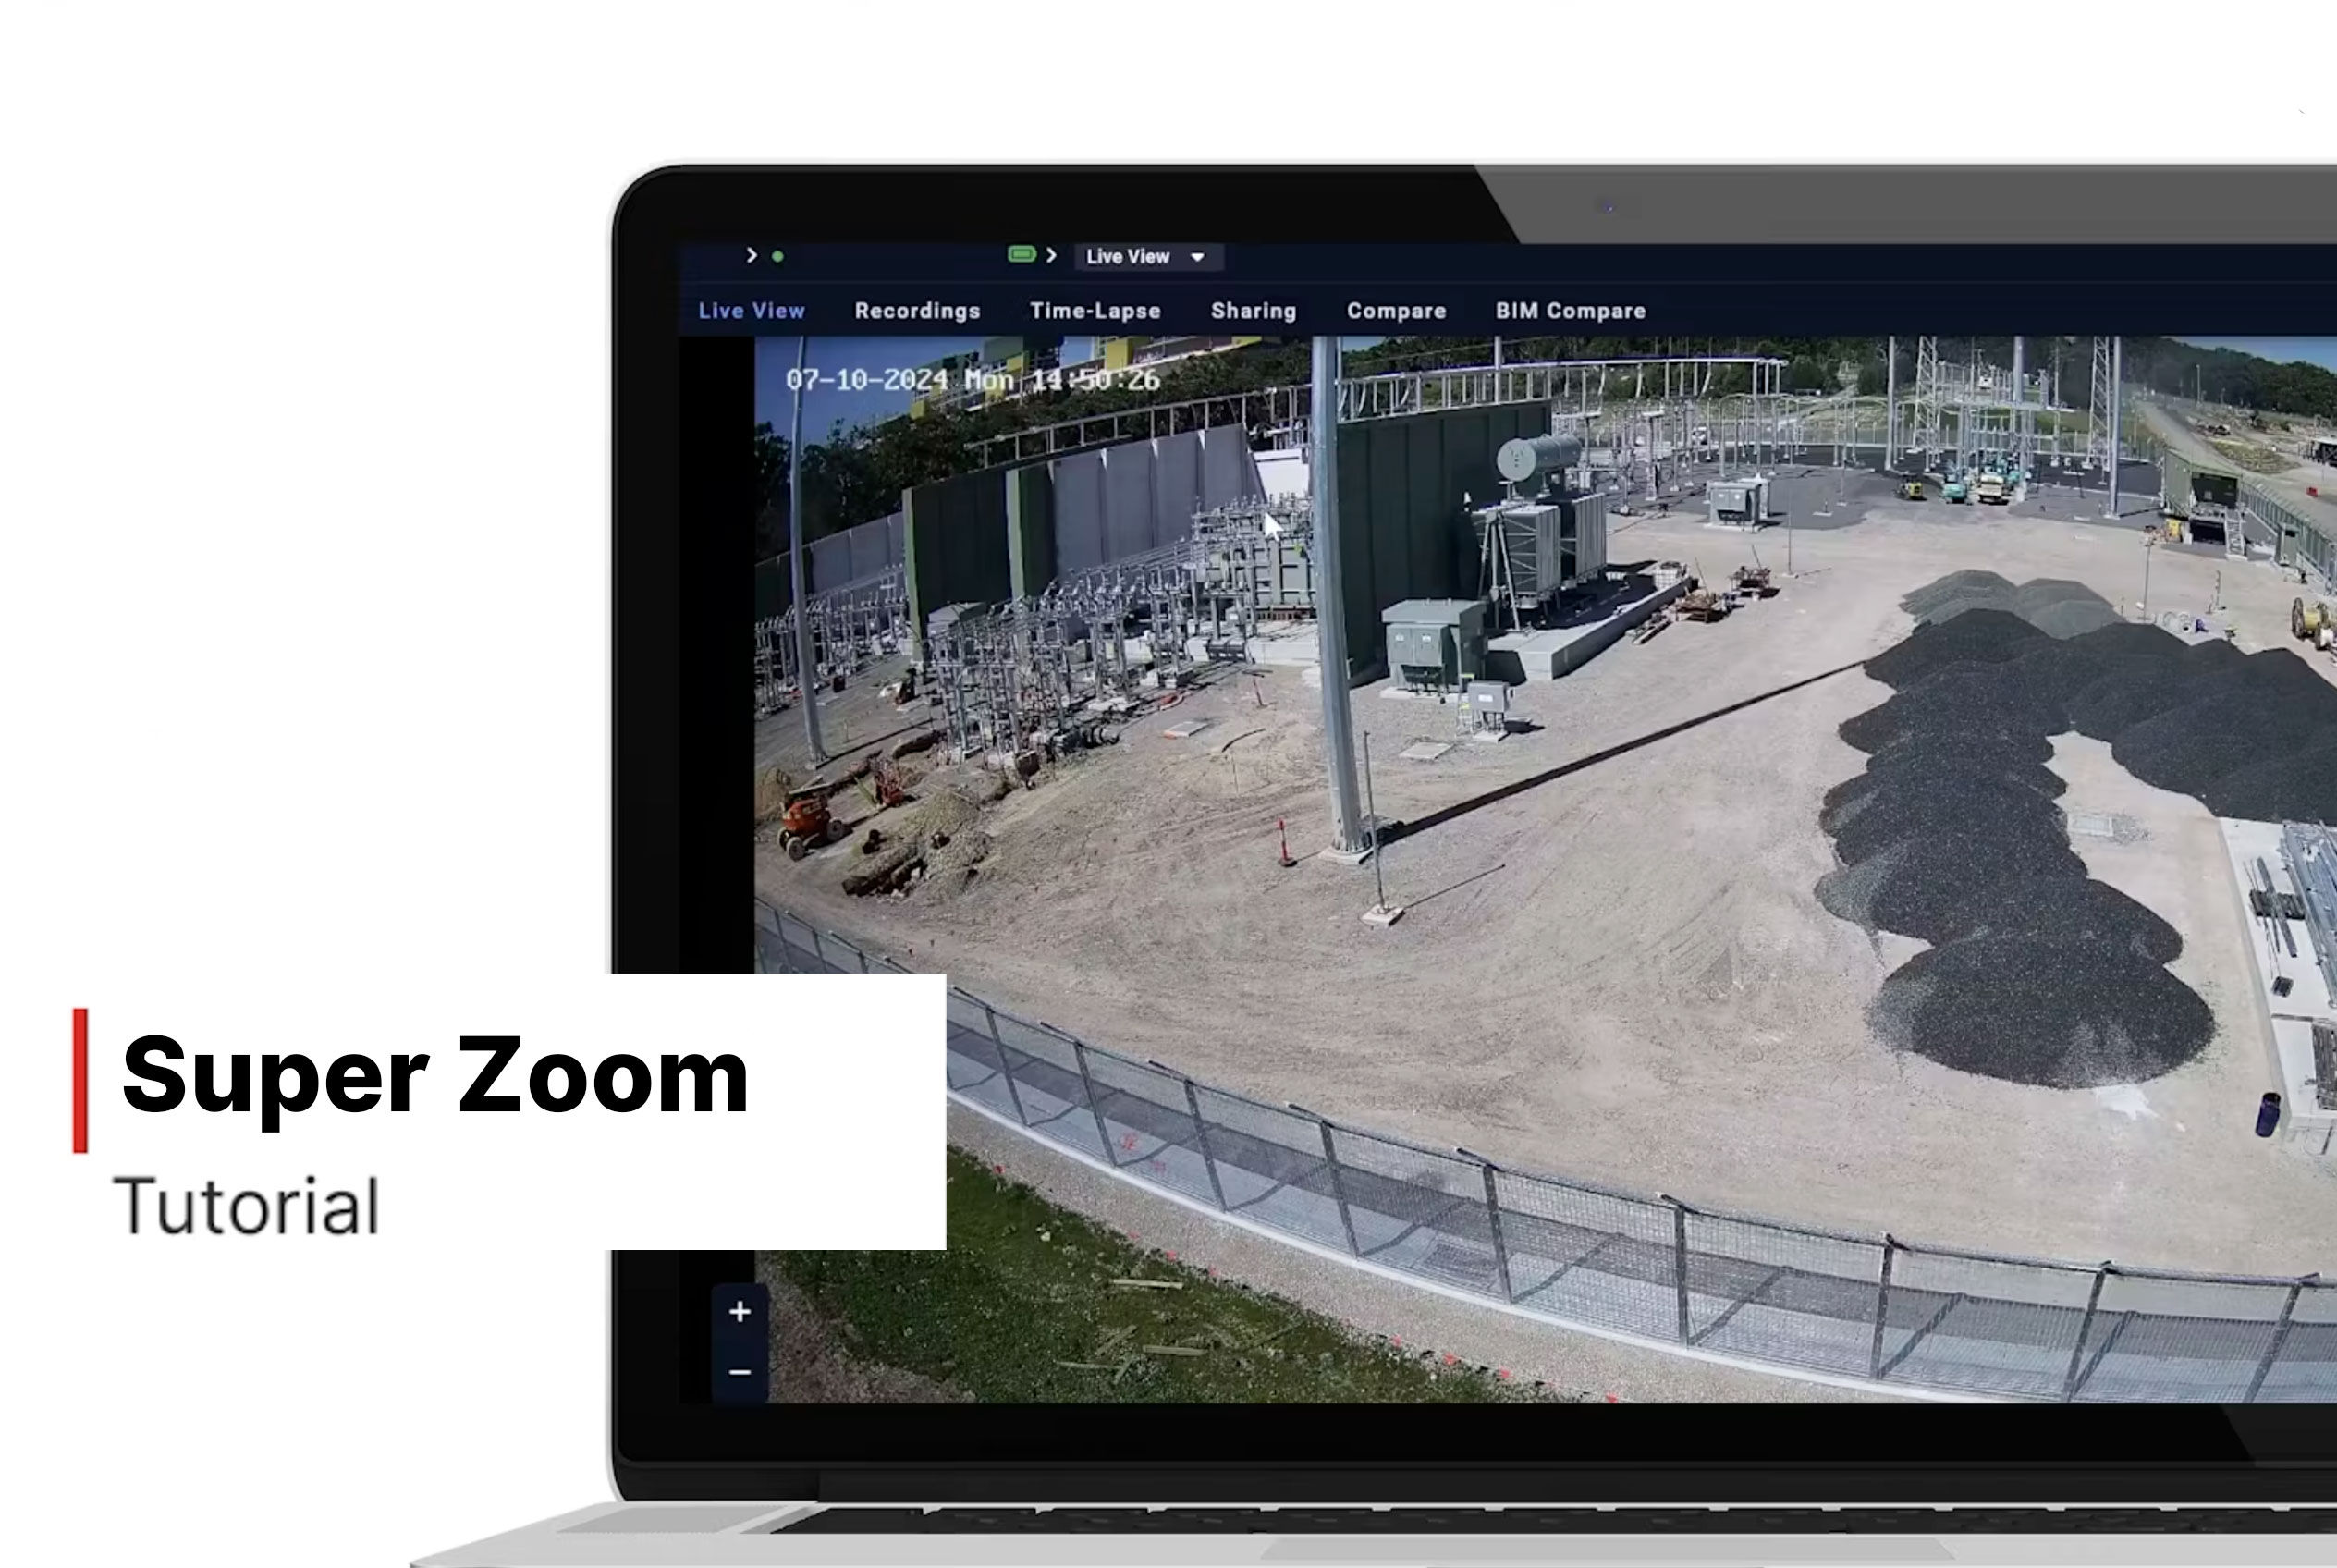
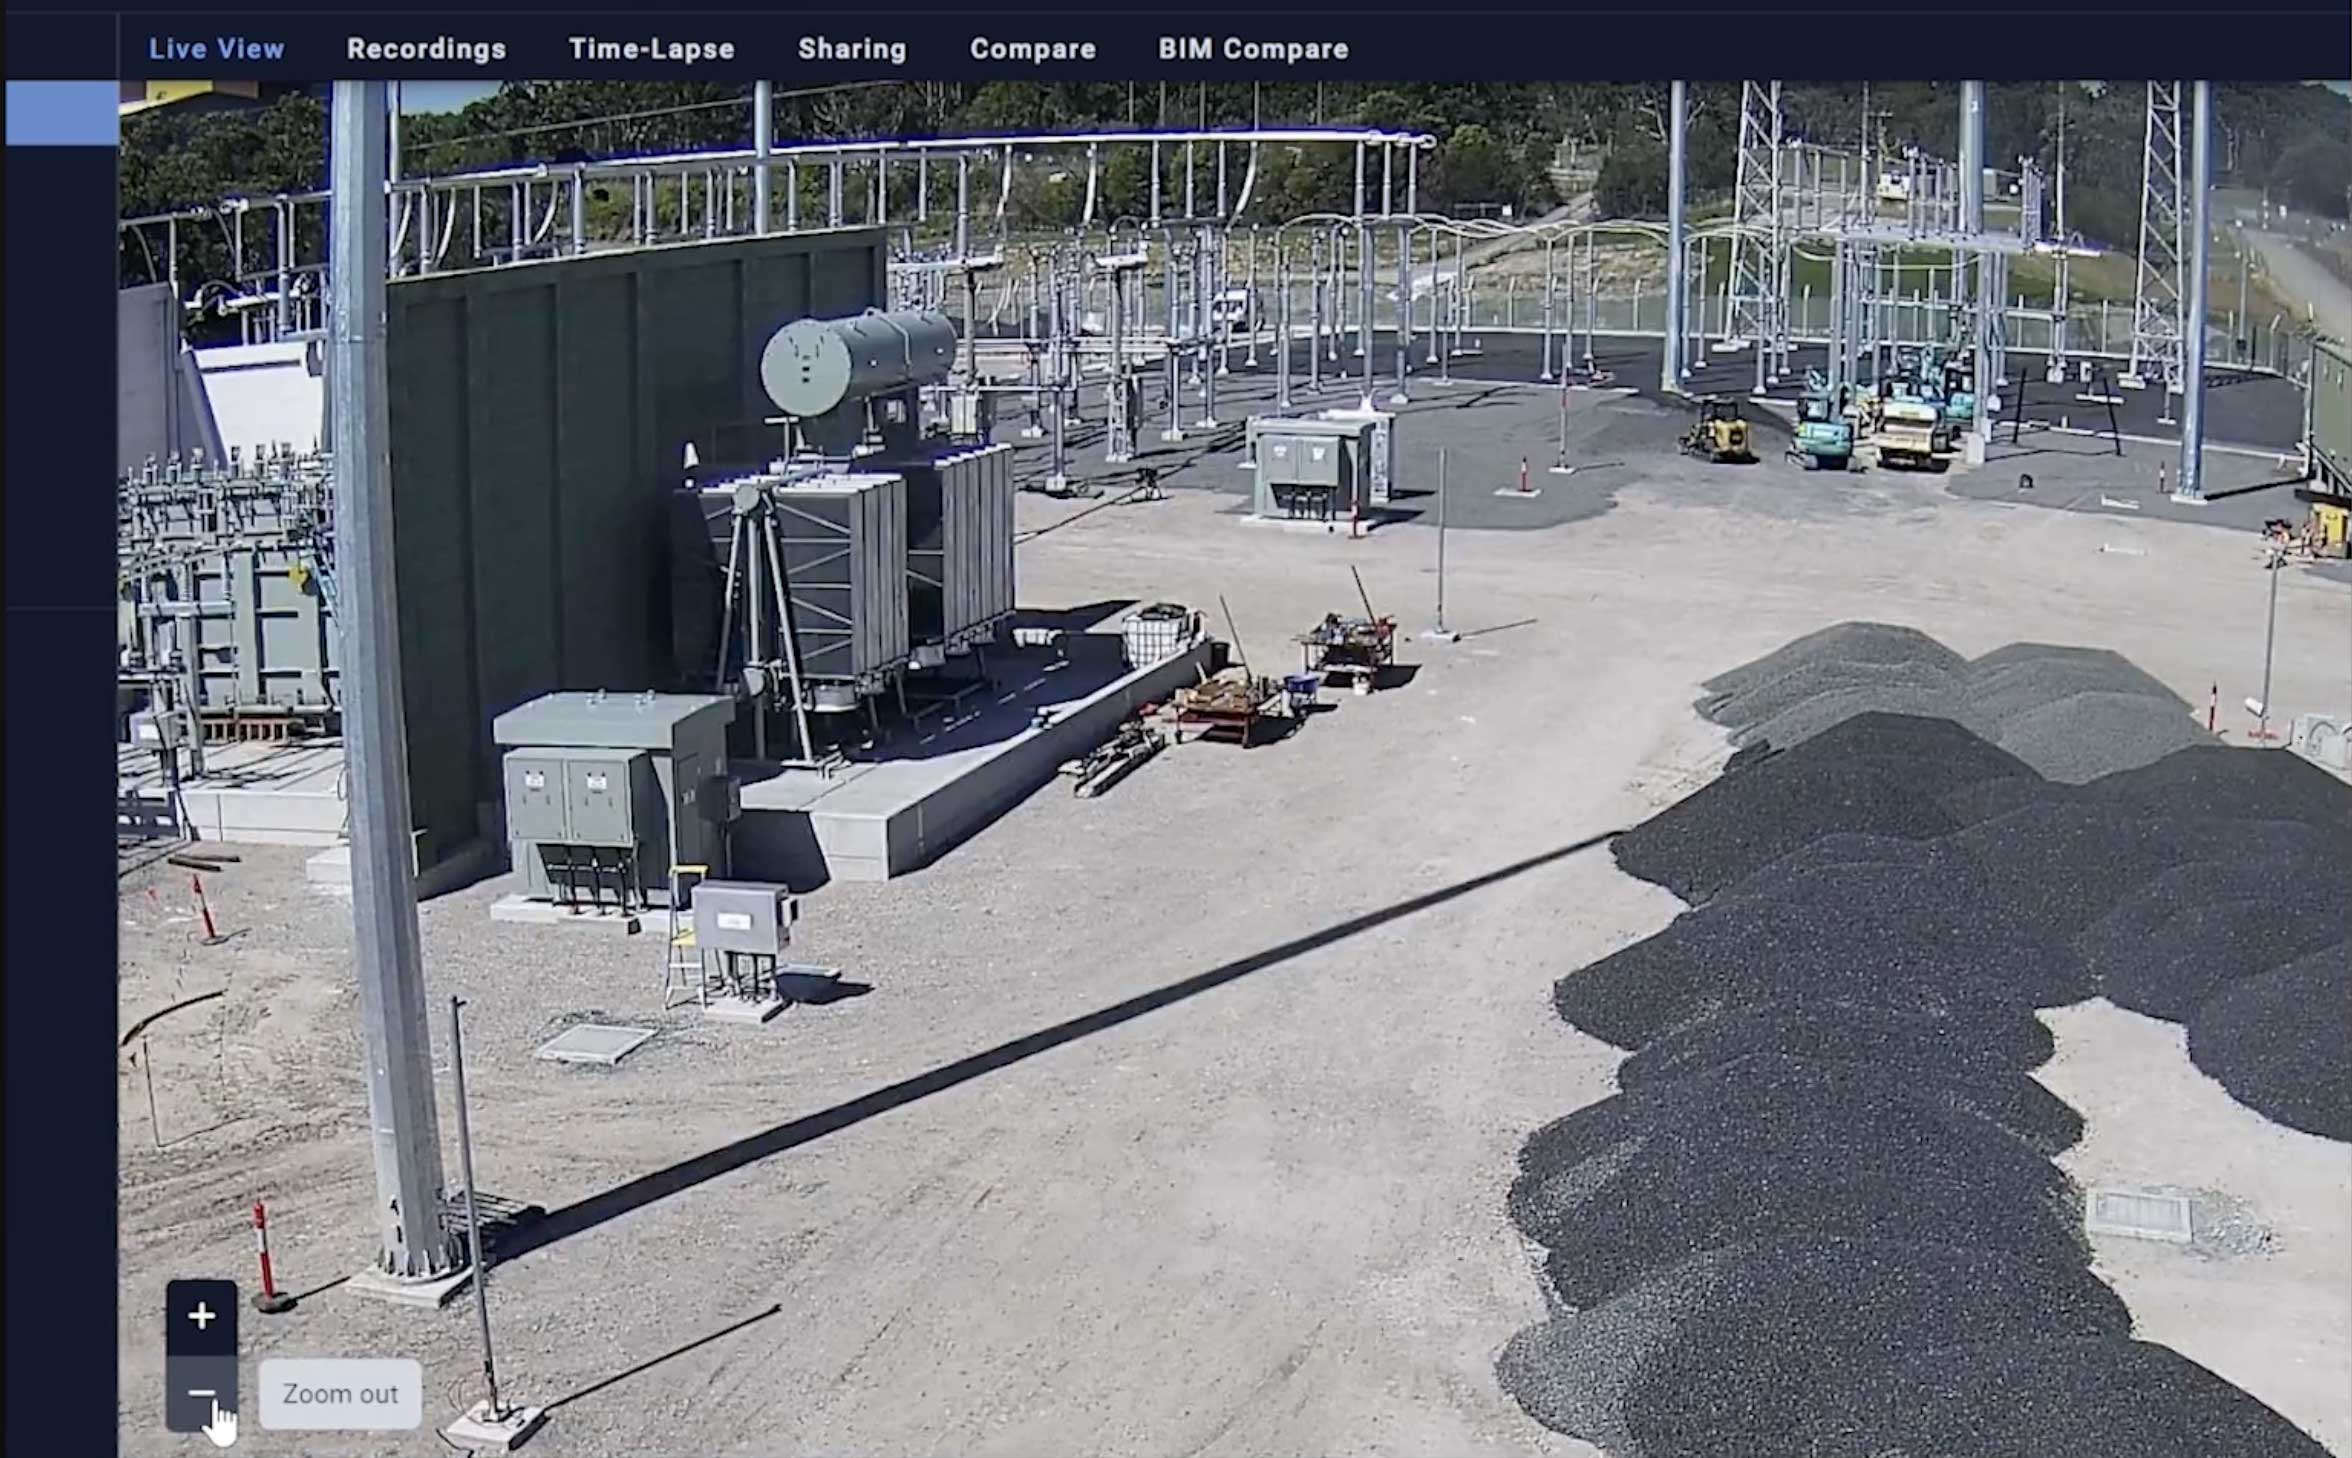
Zoom
How to Use the Zoom Tool
1. Open Zoom
- Log in to Evercam.
- Go to the Live View or Recordings tab.
2. Zoom In & Out
- Use your mouse wheel to zoom in and out.
- Or adjust the zoom slider on the left side of the screen.
3. Focus on Key Areas
- Click and drag to pan across the image.
- Zoom in to inspect specific details – without losing image quality.
Want More Details?
Read the full guide in our User Manual.
[[cta]]

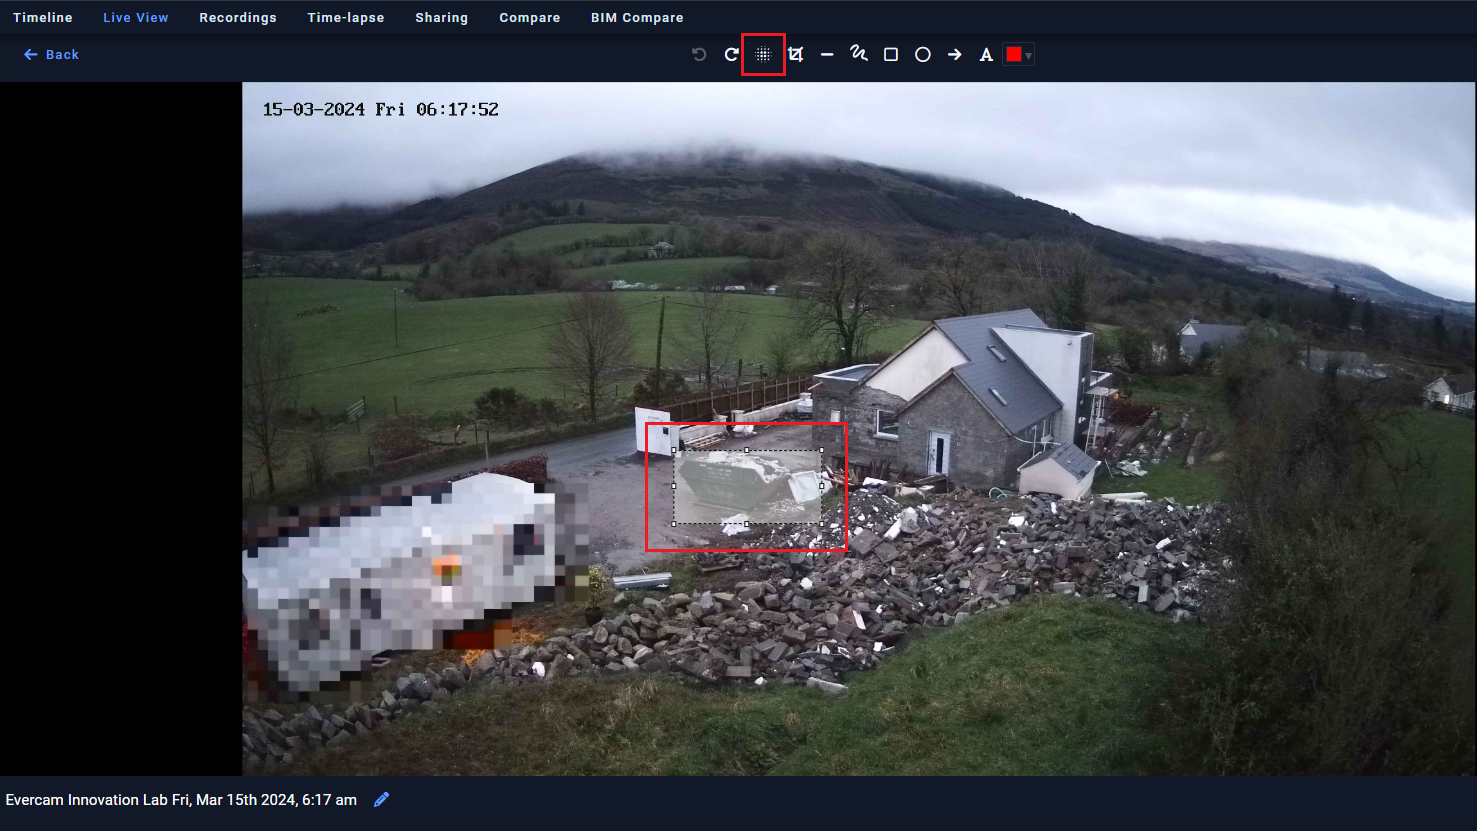
Blur
How to Use the Blur Tool
1. Open the Blur Tool
- Navigate to your camera feed and select the Blur Tool from the menu.
2. Select Areas to Blur
- Click and draw over the areas you want to obscure.
- Adjust the size and intensity of the blur effect.
3. Apply and Save
- Click Apply to set the blur effect.
- Your blurred footage will be saved automatically.
4. Edit or Remove Blurs
- To adjust an existing blur, select it and resize or reposition.
- To remove a blur, click Delete on the selected area.
Need More Info?
Check out the full guide in our User Manual.
[[cta]]
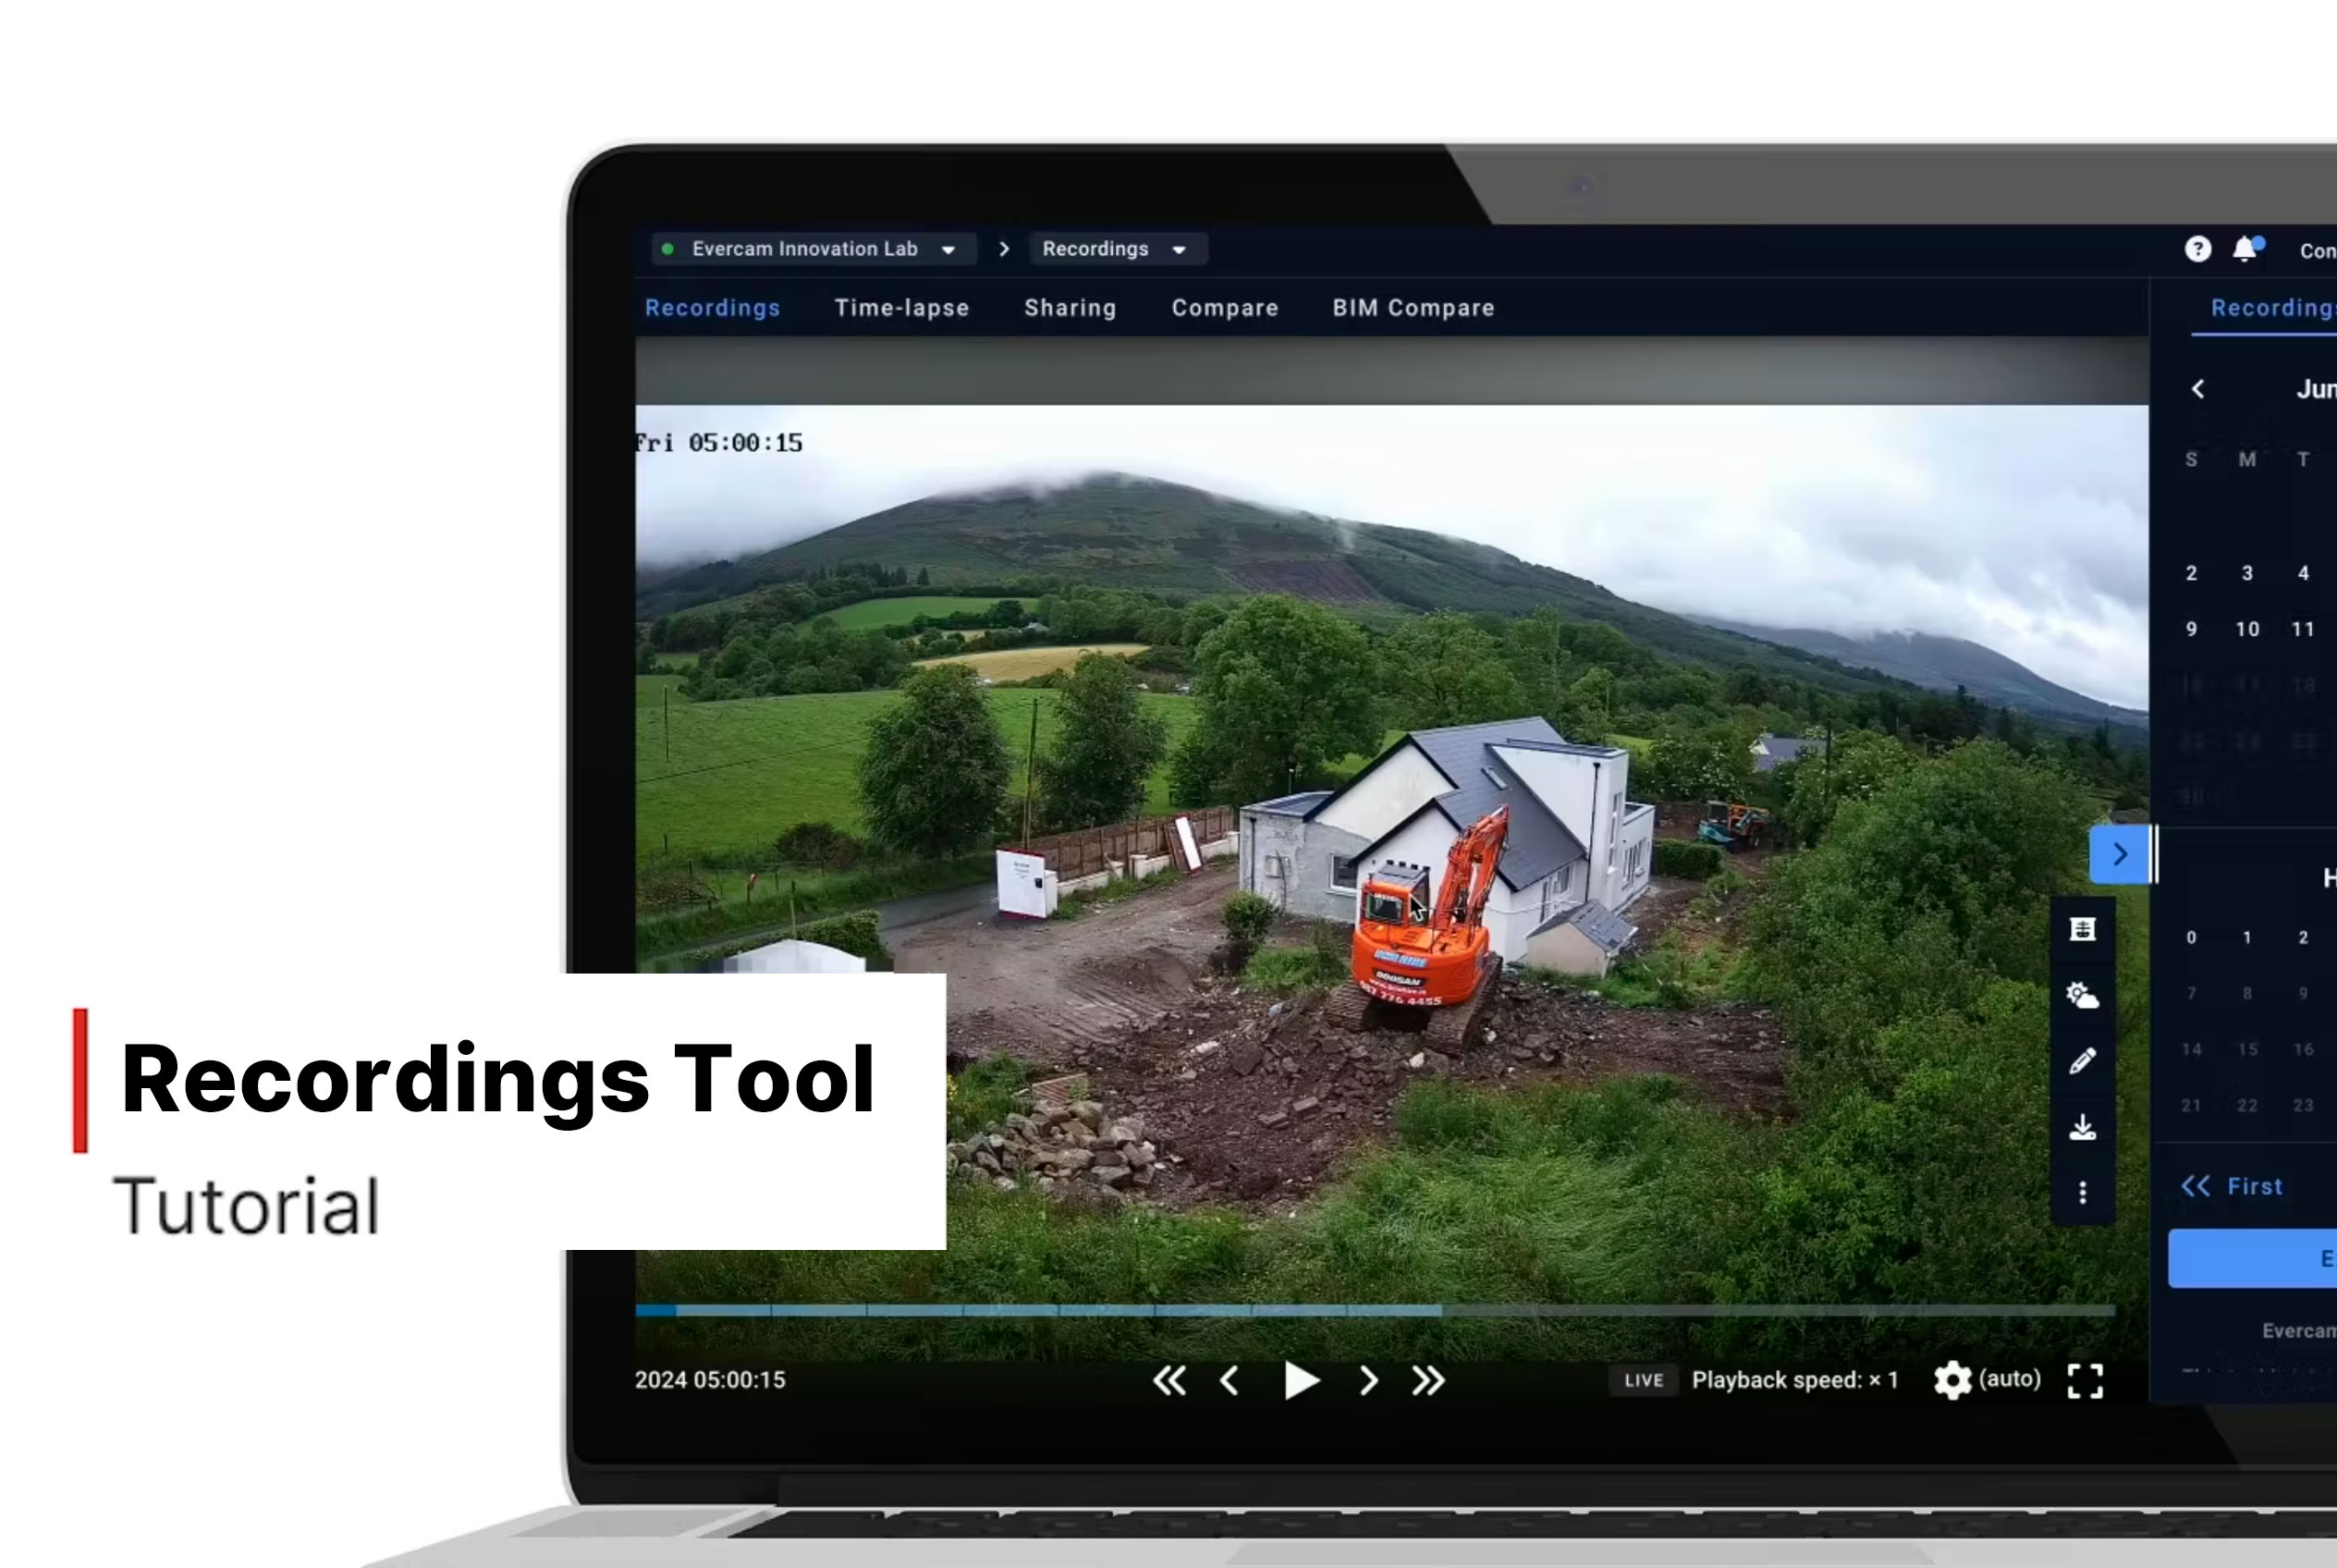
Recordings
How To Use The Recordings Tool
- Select a camera from the menu on your left to view its history.
- Click the Recordings tab at the top of the Evercam dashboard.
- Use the Calendar on the right to select a date and time.
- Navigate through the selected hour using the Timeline at the bottom.
- Click Play to watch or use the < and > buttons to move frame by frame.
- Adjust the Playback Speed from 0.25x to 2.5x if needed.
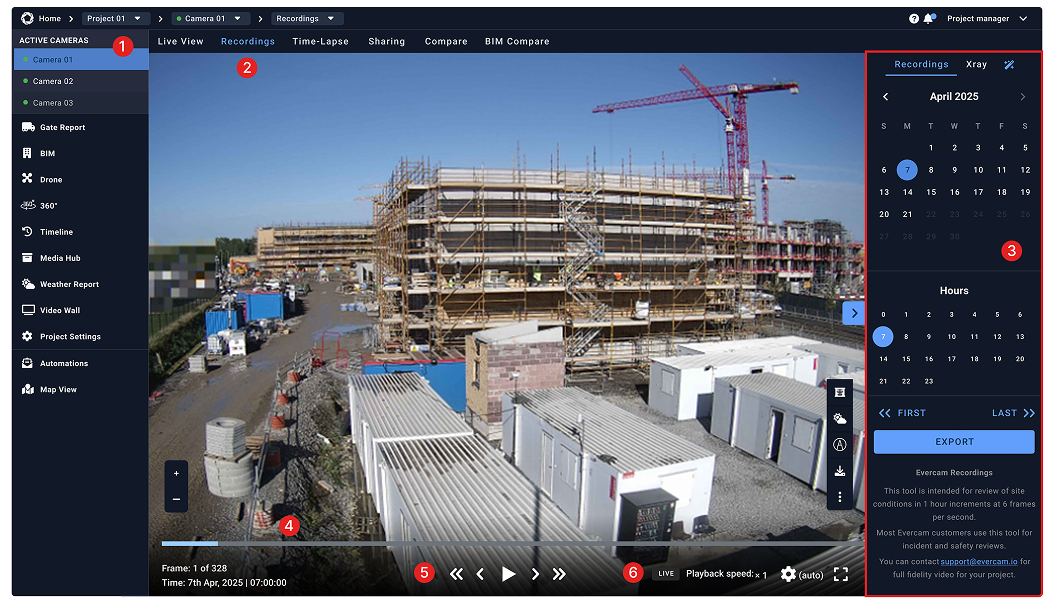
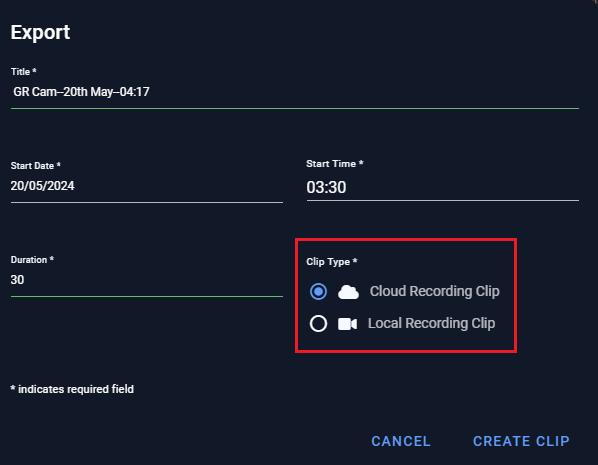
How to Export & Share a Clip
- Click Export and enter the title, start date, start time, and duration.
- Press Create Clip, and your video will be saved in the Media Hub.
- You can now download your clip, send its link, or share it directly on social media channels.
Related Tools to Help Manage Your Project
With the ability to navigate construction data across every project moment in your recordings, you can also use the X-Ray, Mark-up, and Weather tools to improve planning, progress reporting, and project communication.
Need More Details?
Read the full guide in our User Manual.
[[cta]]
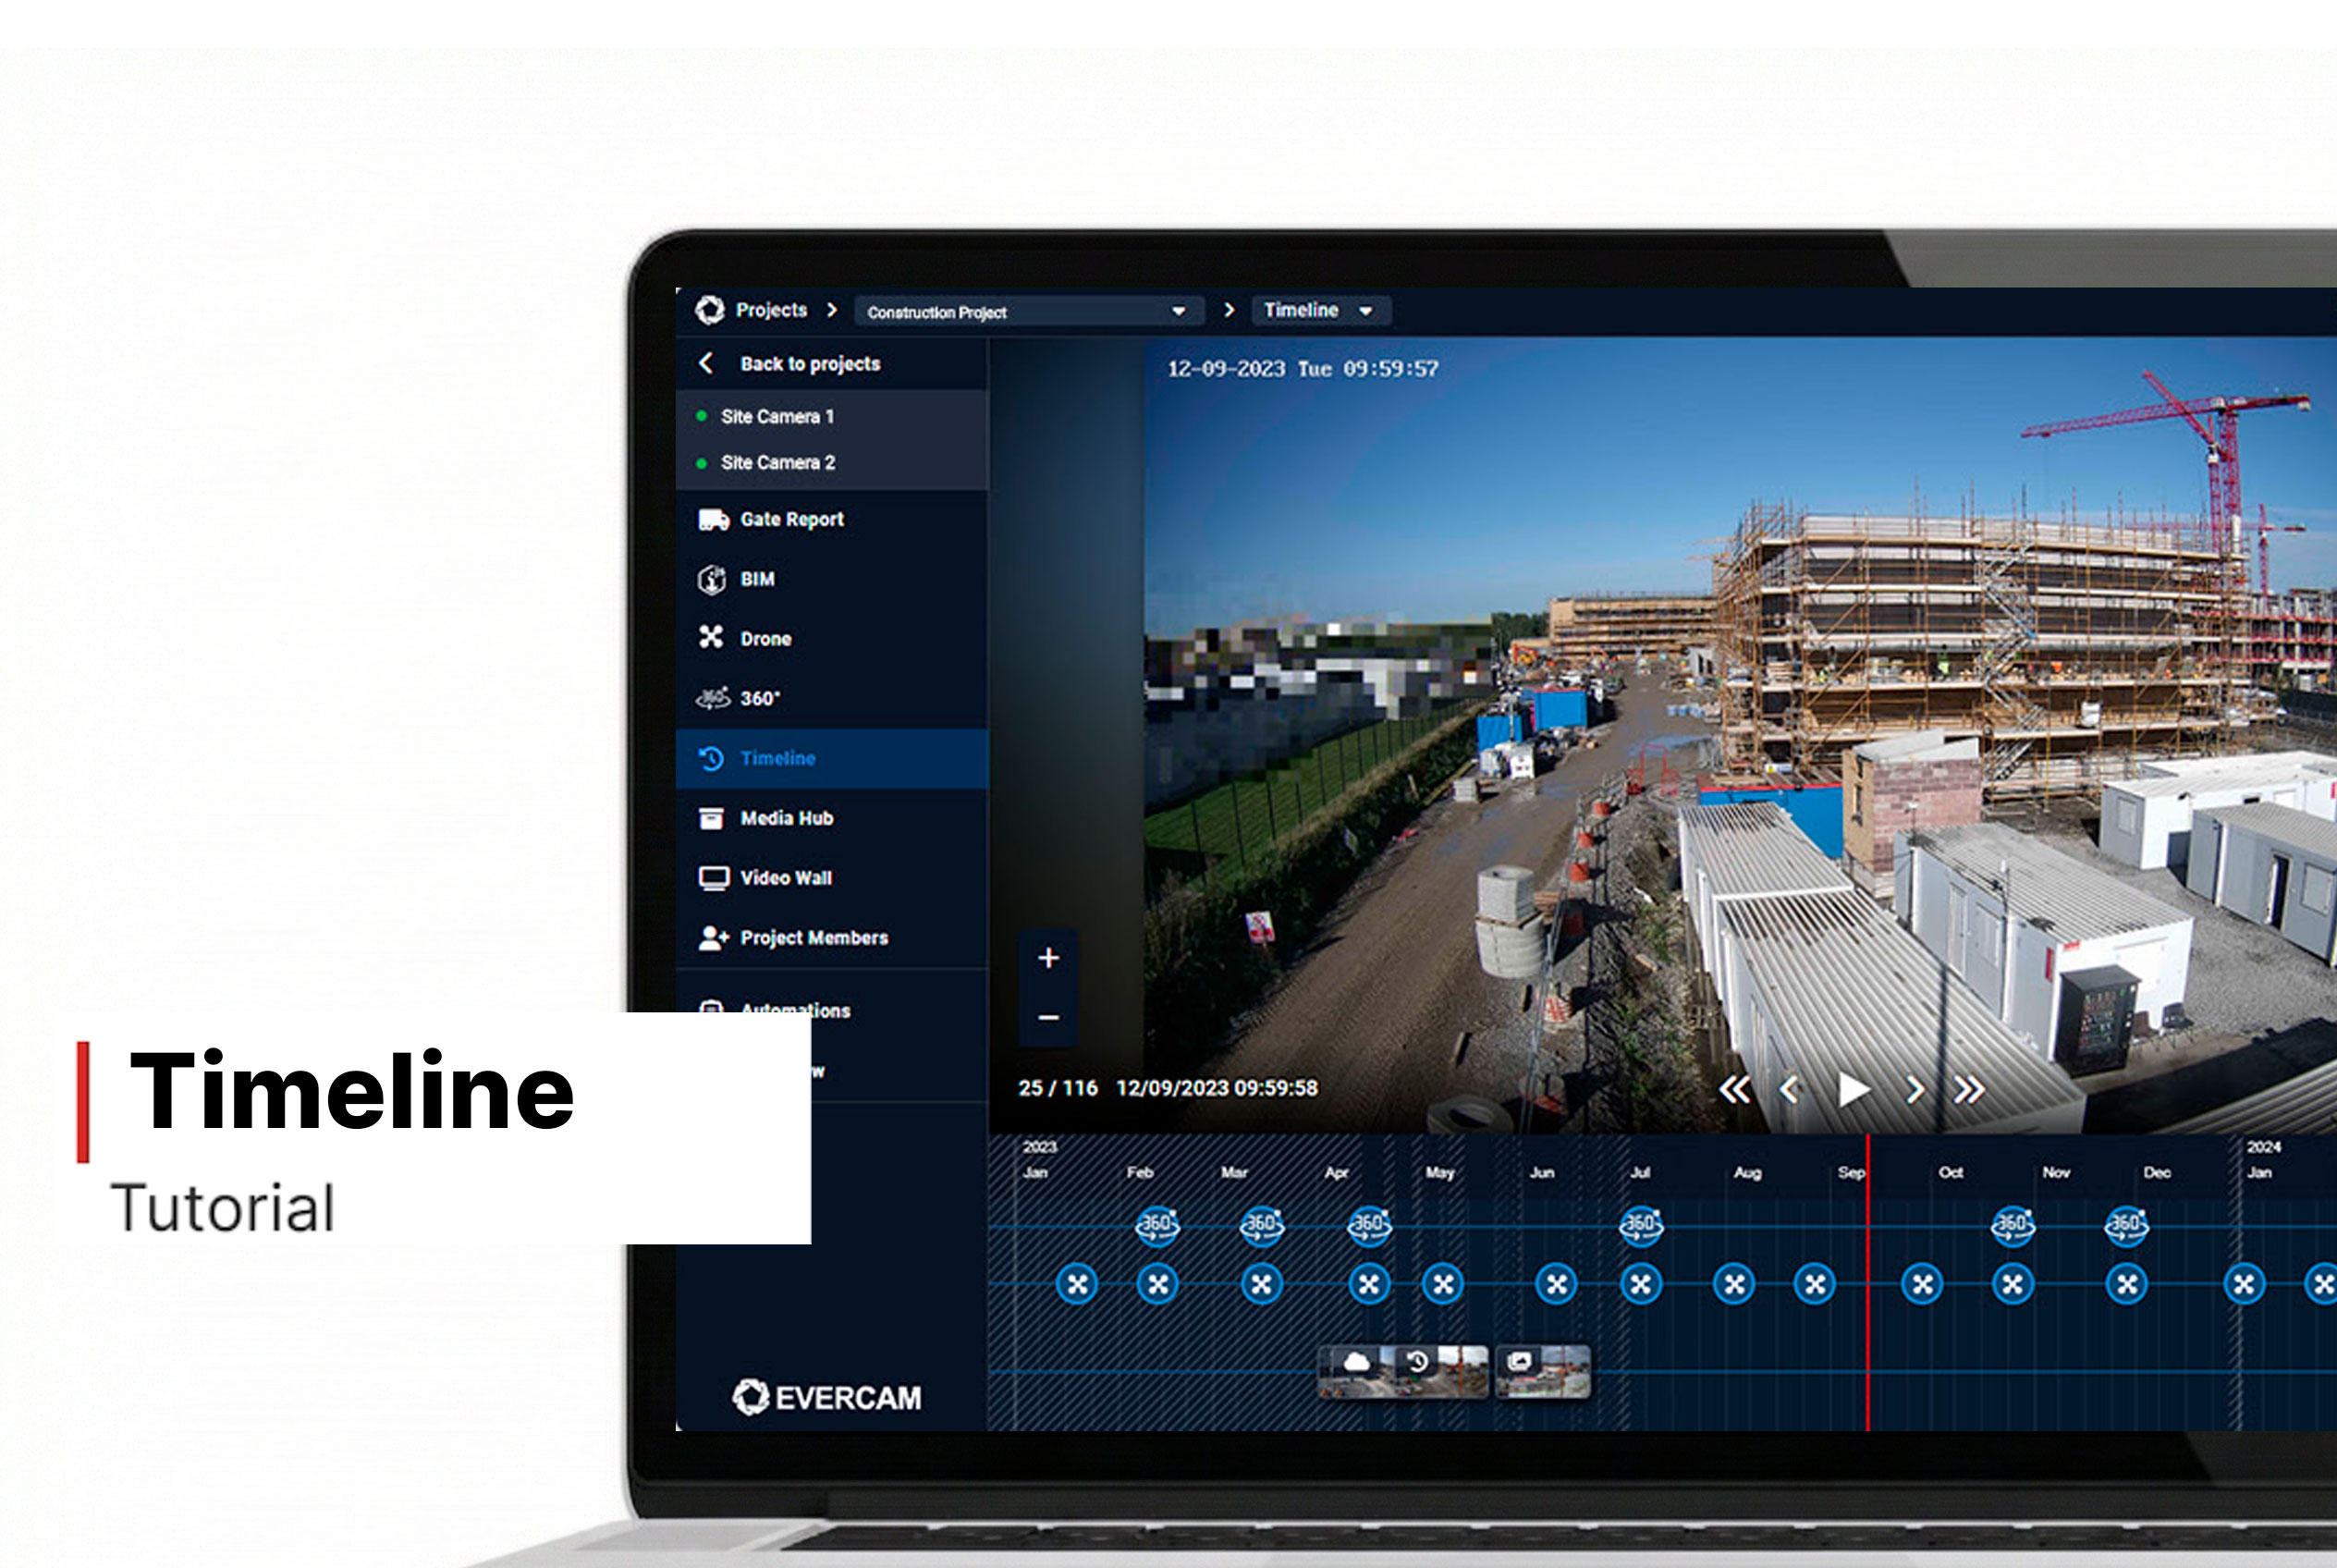
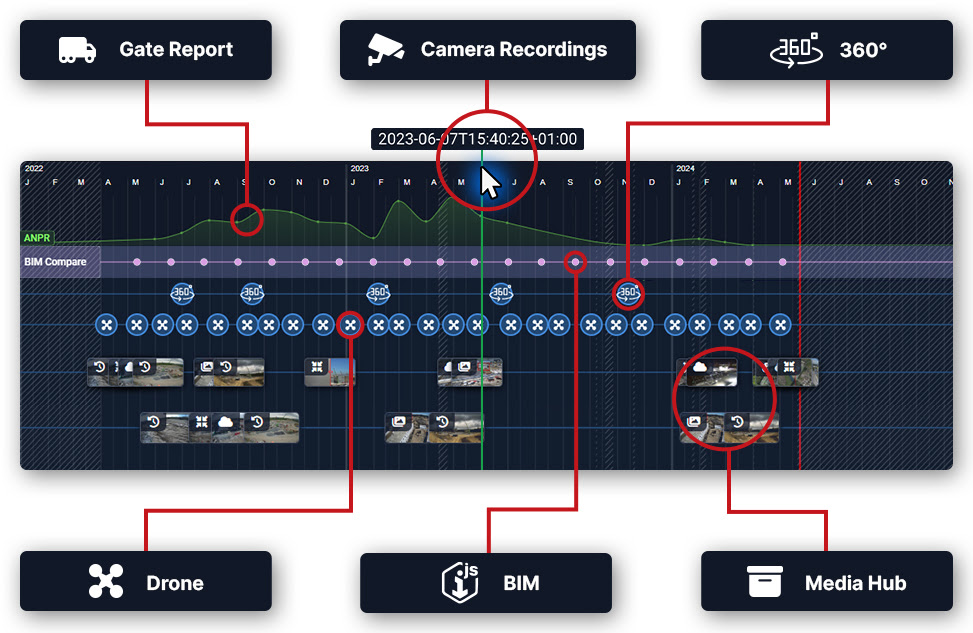
Timeline
How to Use The Timeline Tool
- Choose the camera you’d like to view from the drop-down selector at the upper right side.
- Choose the visibility of elements/data on the timeline by selecting them on the left navigation panel.
- Open drone flights, 360 walks, BIM milestones, or Media Hub assets directly through the icons on the timeline graph.
- Use the platform tools such as Xray, Compare, Weather, and Mark-up Tool, all within the Timeline tab.
- Place Comments on camera-recorded images for other users to read.
Want More Details?
Check out the full guide in our User Manual.
[[cta]]
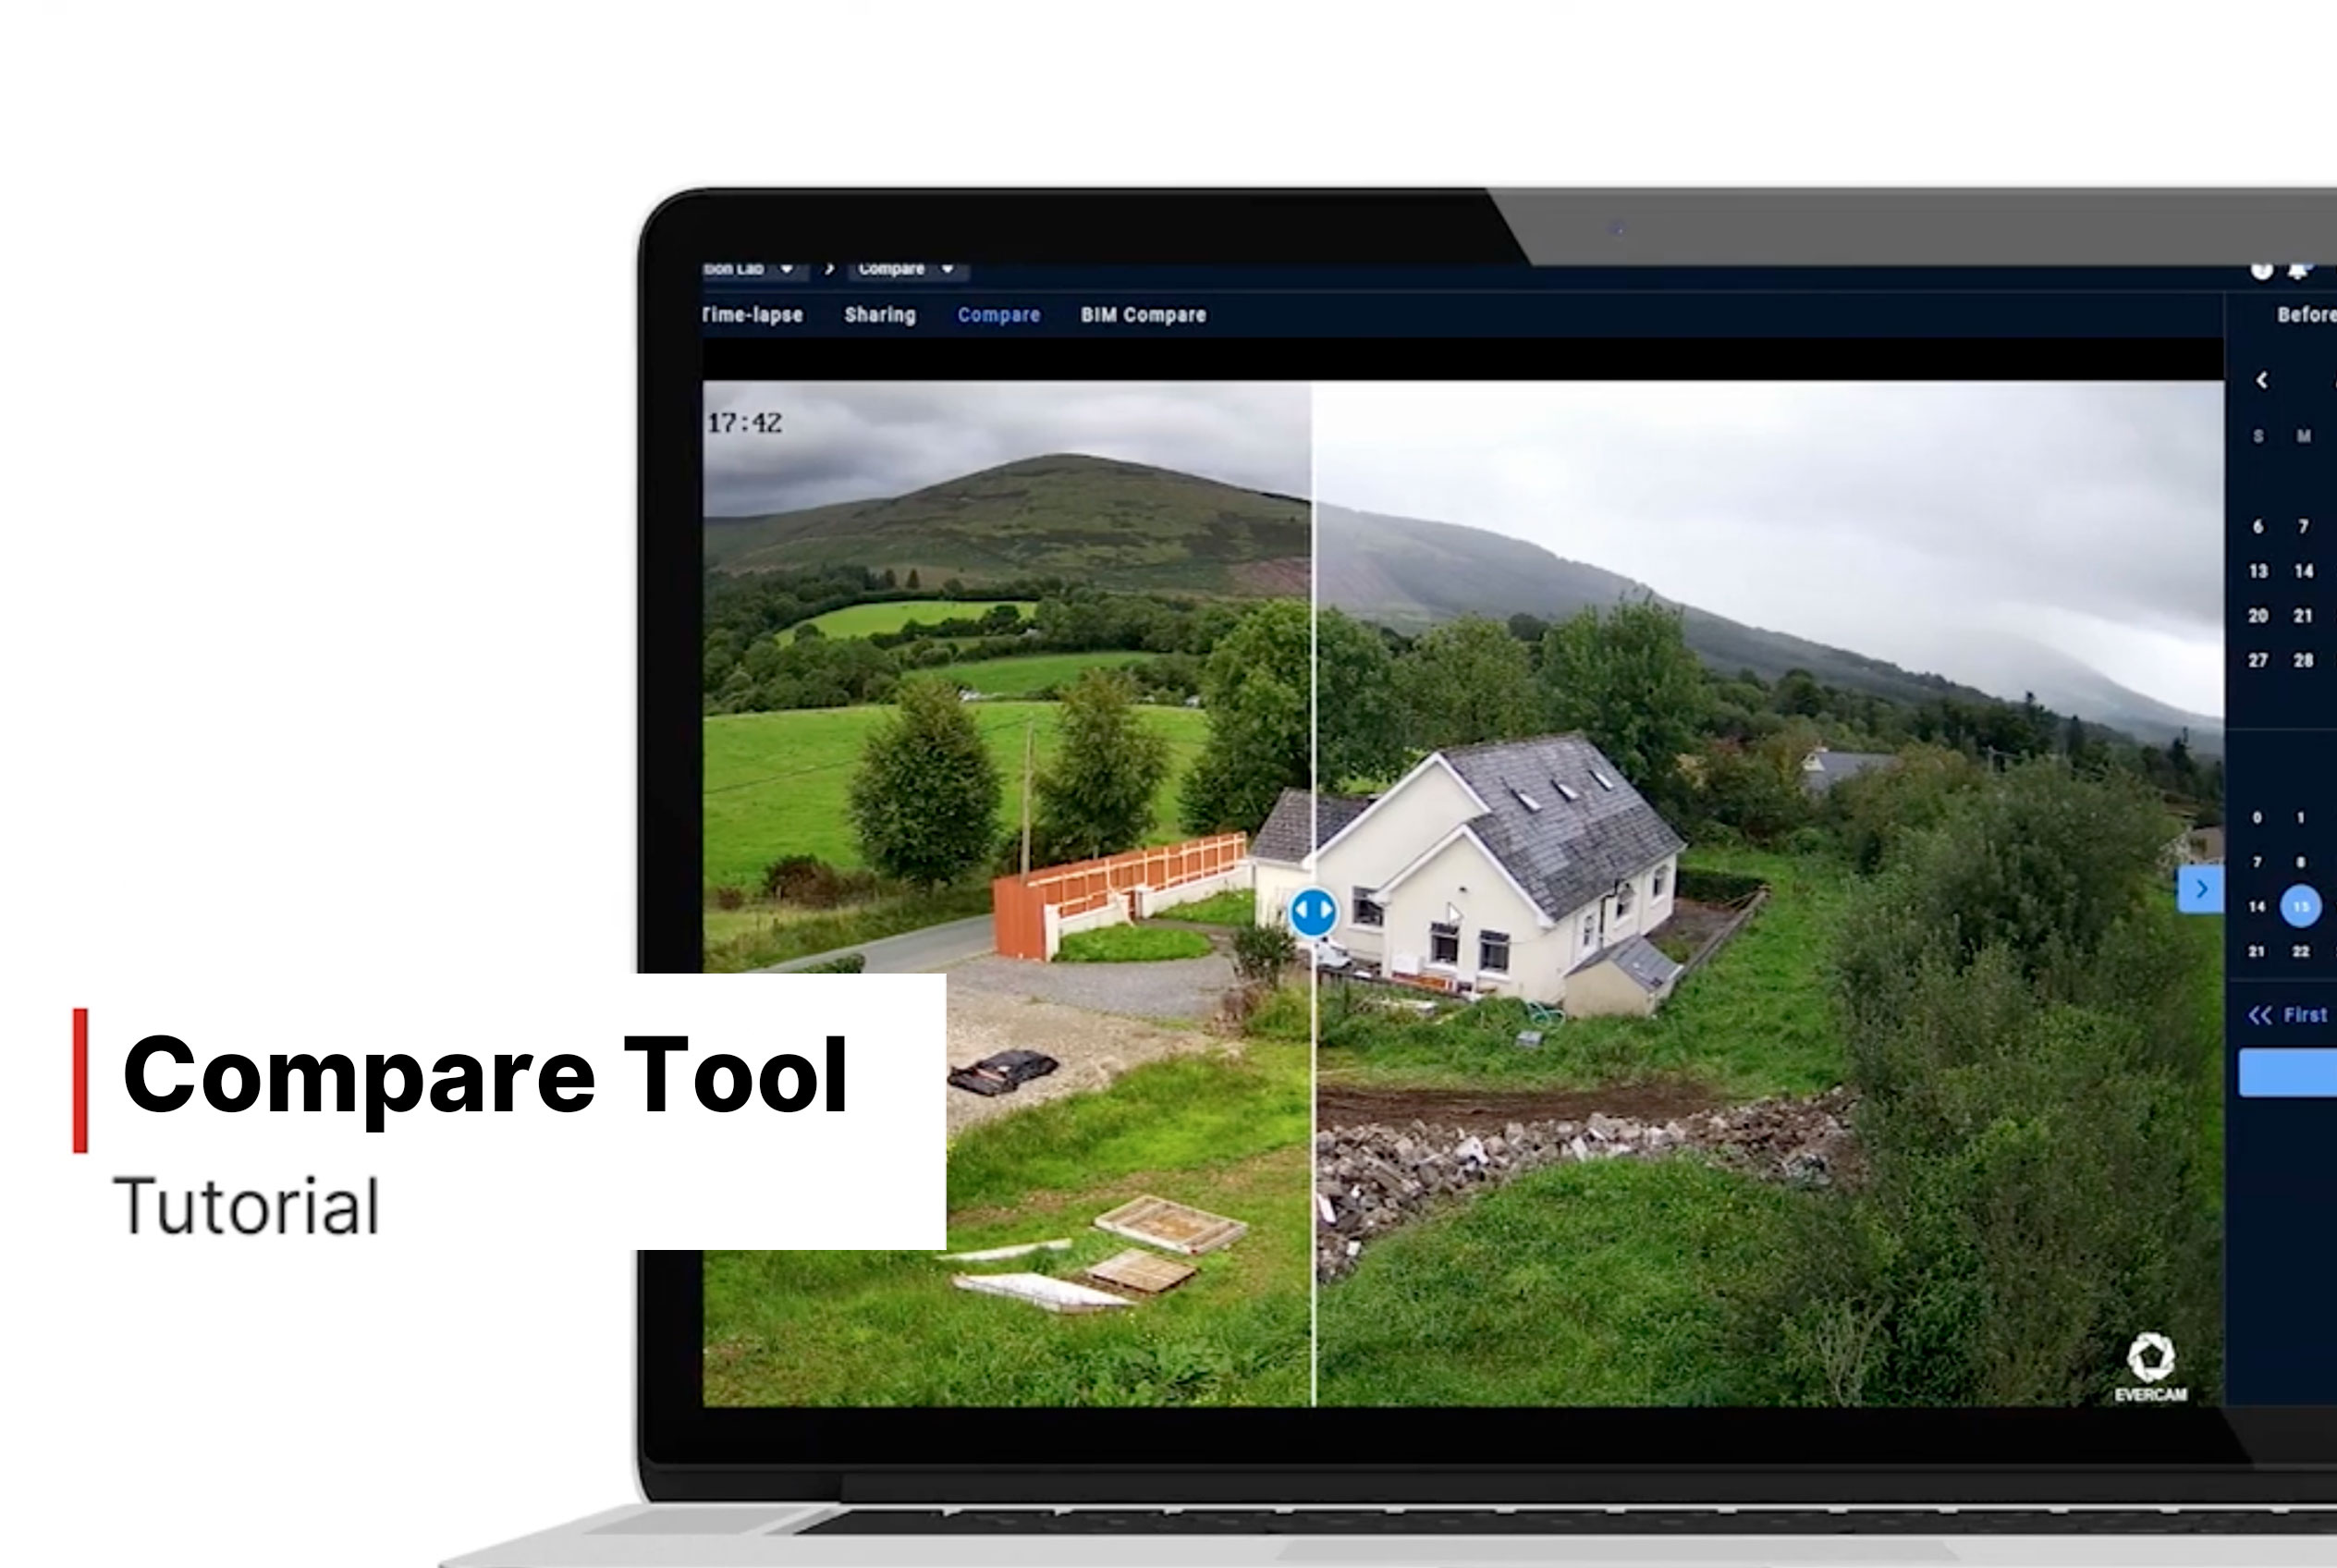
Compare
How to Use the Compare Tool
- Select the camera from your list.
- Click the Compare Tool tab on the top of your Evercam dashboard.
- Choose the first image by selecting a date and time from the calendar.
- Choose the second image – this could be a past image or a live feed snapshot.
- Drag the slider left or right to reveal differences between the two images.
- Adjust the zoom level to focus on specific details.
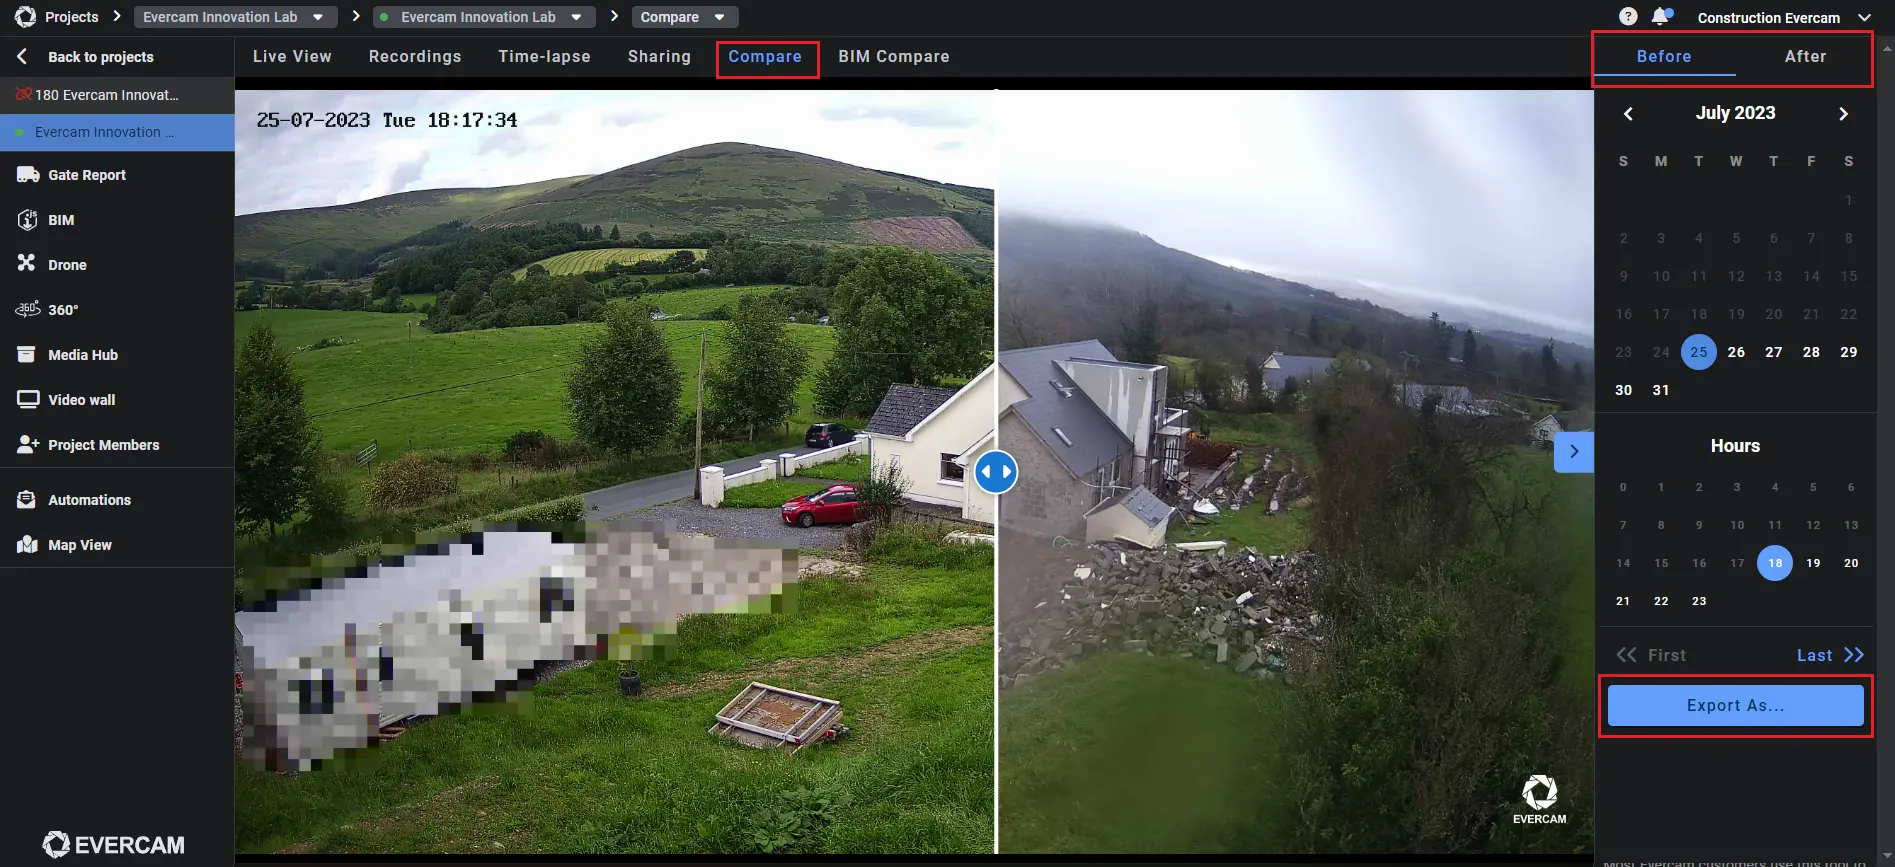
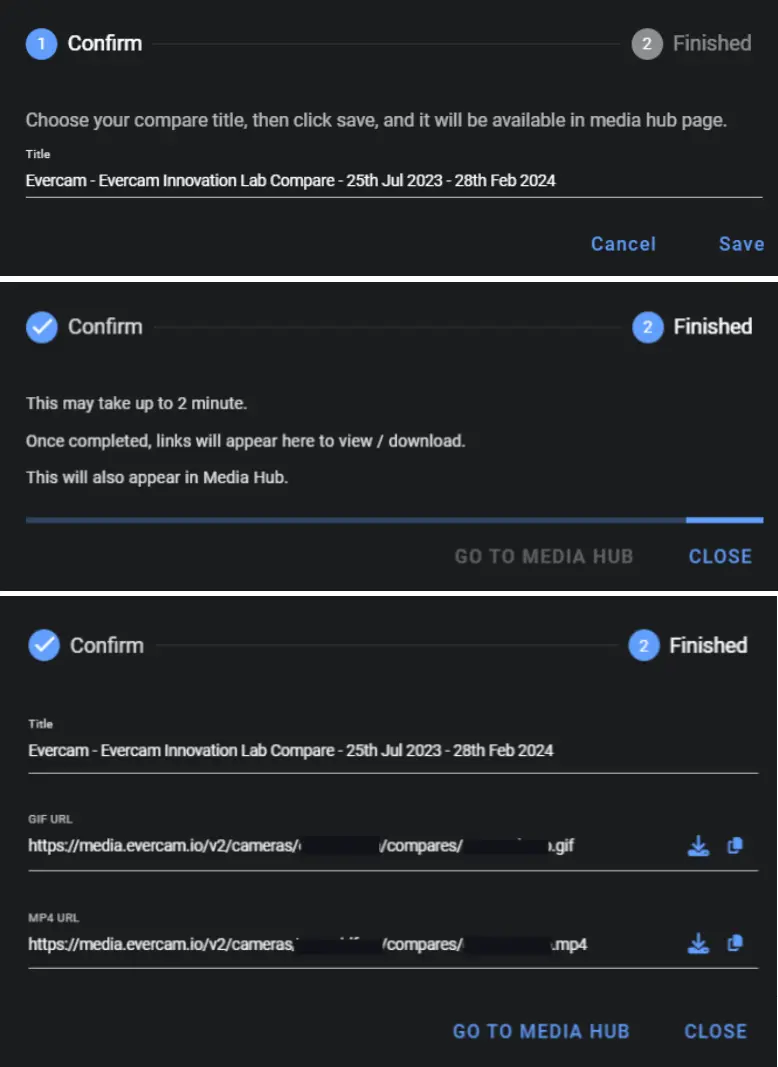
Download & Share Comparisons
- Click Export to save the comparison as a GIF.
- Access saved comparisons in the Media Hub for reporting and collaboration.
Need More Details?
Check out the full User Manual.
[[cta]]
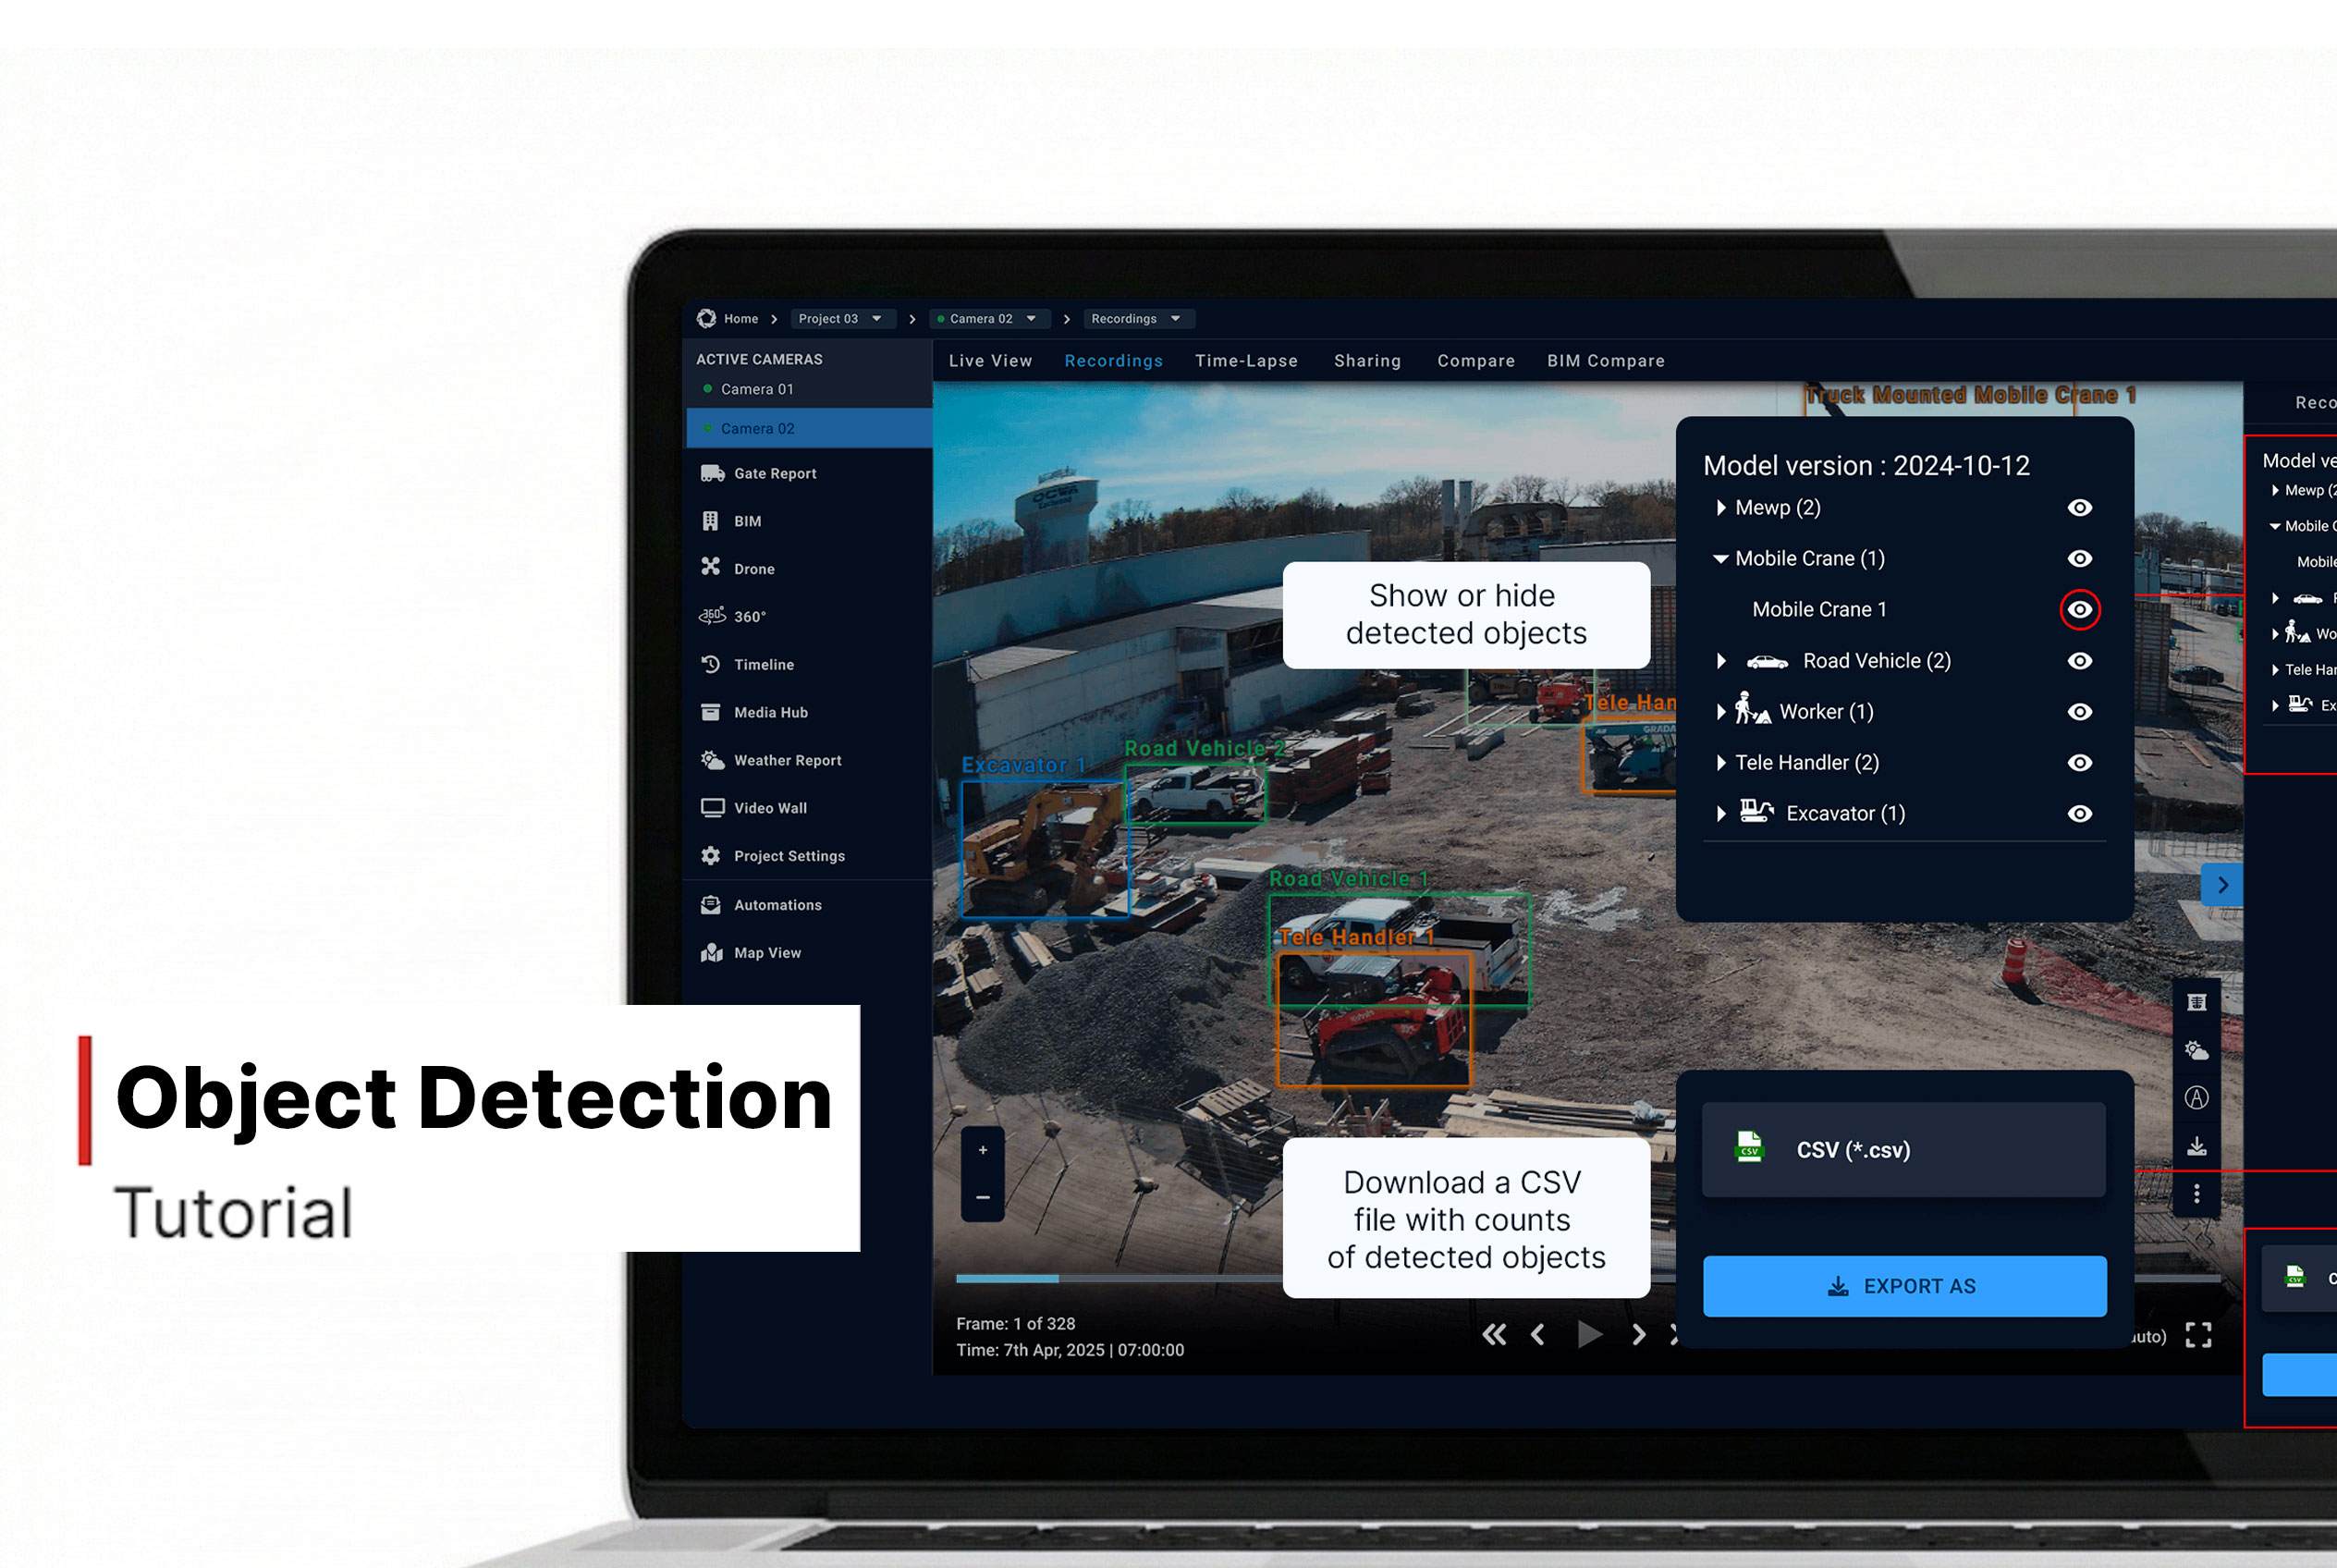
Object Detection
How to use Object Detection
- Select the camera
- Navigate to the Recordings tab
- Click on the Magic Wand icon in the top right of your dashboard
- Select Object Detection from the dropdown menu
- Choose Object Detection to activate object recognition
- Detected objects will be outlined with coloured boxes:
- Toggle Object Detection on/off to compare the original vs. detection overlay
Save or Share the Enhanced Image
- Click the Download button to save the improved image.
- Share it directly with stakeholders for better collaboration.
Need More Details?
Read the full guide in our User Manual.
[[cta]]
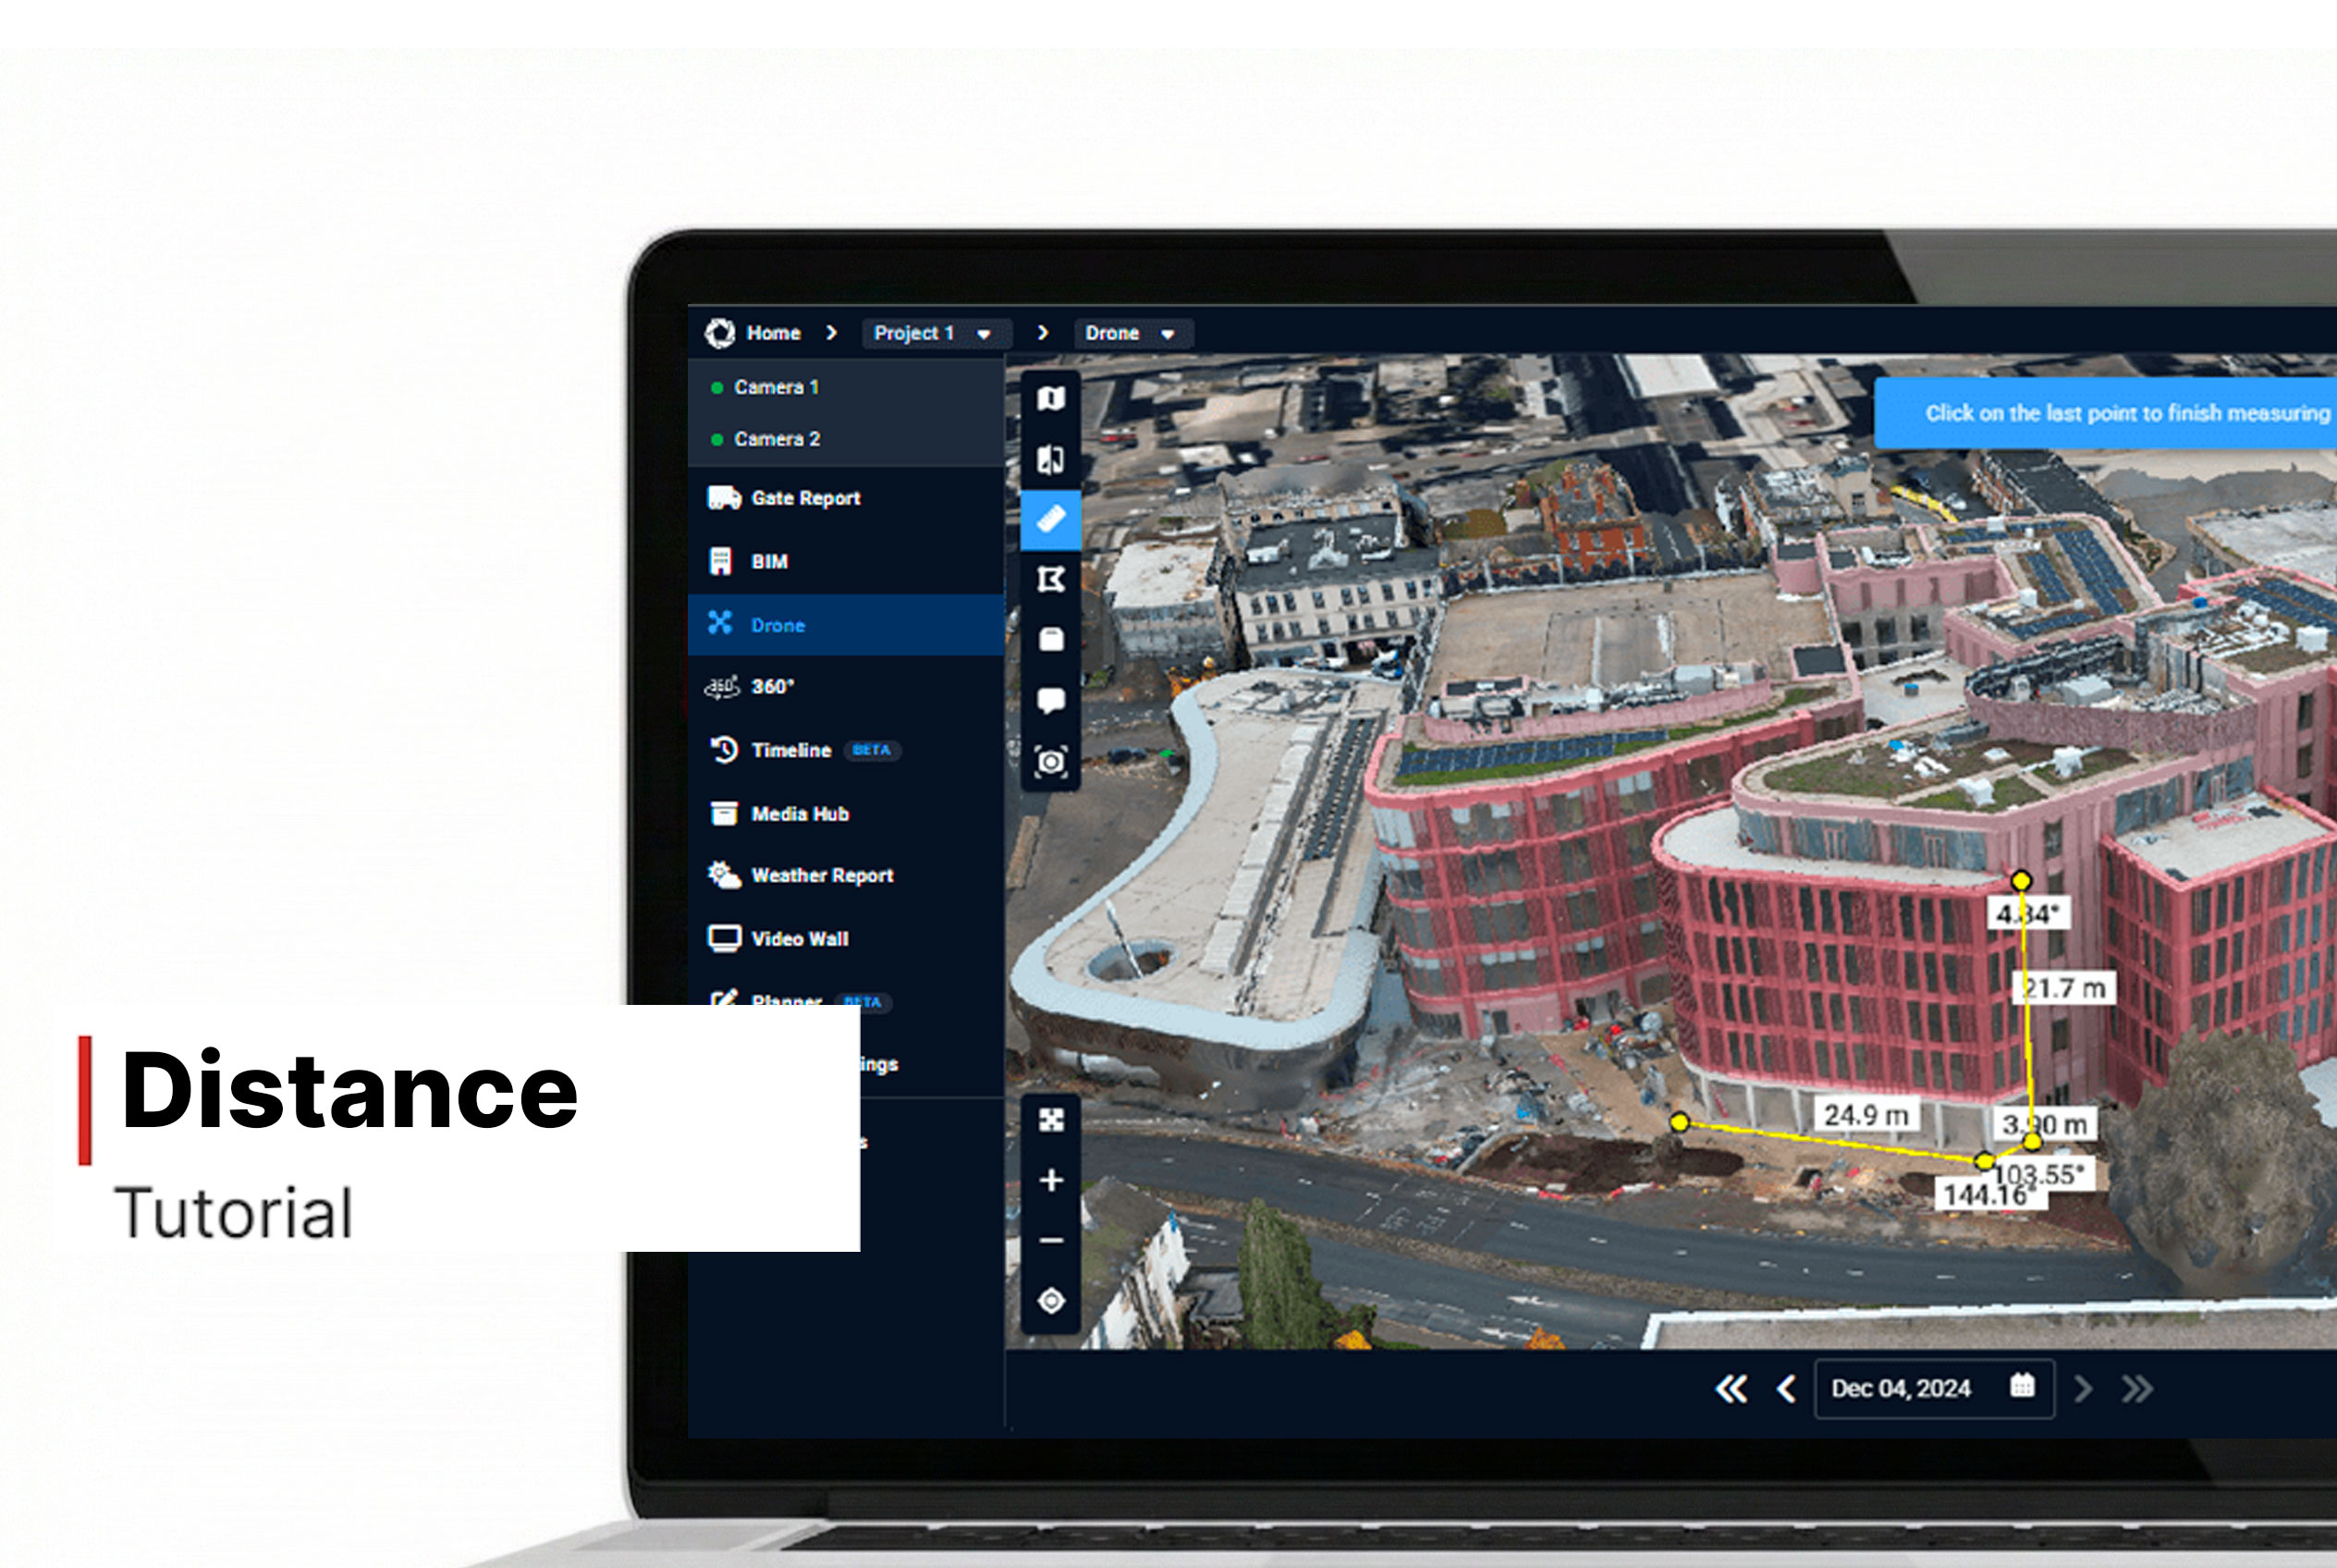
Distance
How to Measure Site Distances Using the Distance Feature
- In Evercam Drone, click the Distance icon in the top-left corner of the interface.
- This enables point-to-point measurement mode.
- Click on your starting point, then click again to place the second point.
- The system will display the distance between the two points.
- Use the navigation tools to ensure both points are accurately placed on the surface.
- Zoom in for greater precision on detailed elements.

Want More Details?
Read the full guide in our User Manual.
[[cta]]

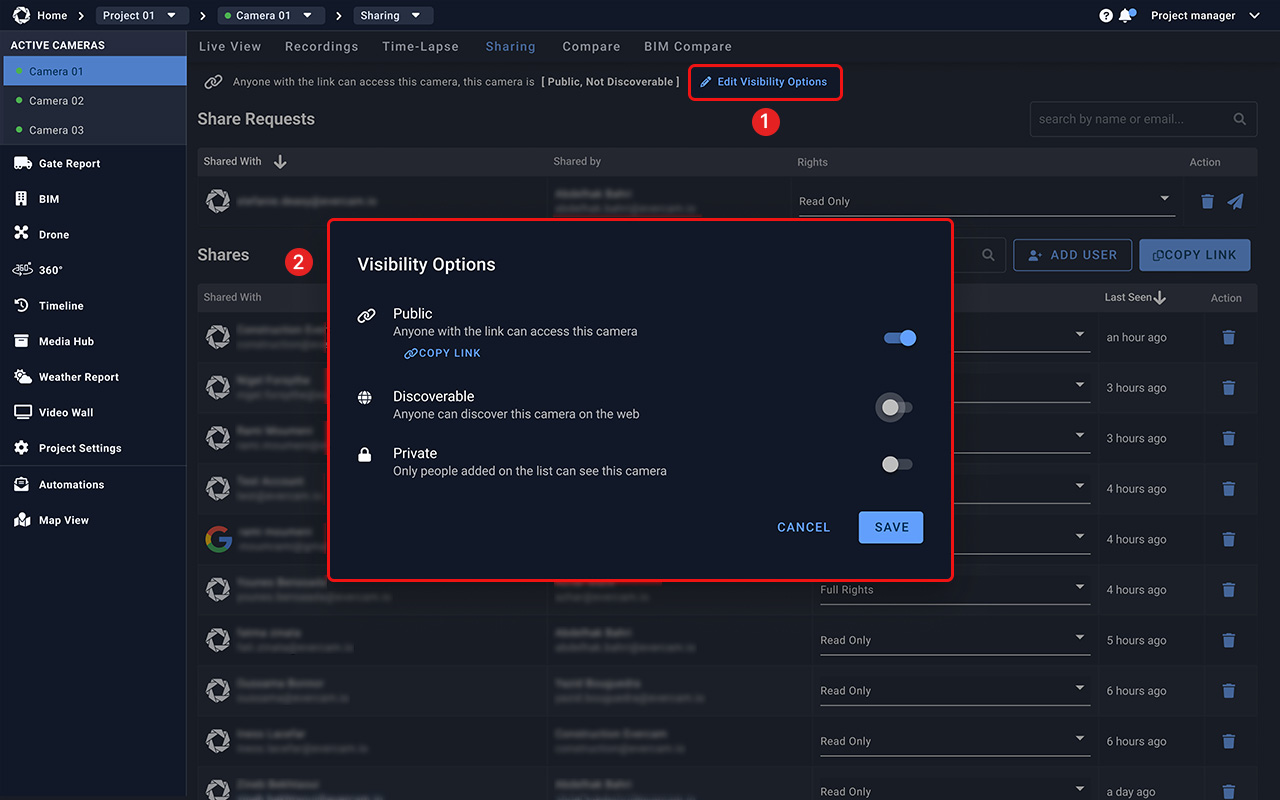
Sharing the Camera
Sharing simplifies collaboration by allowing you to share snapshots and videos with stakeholders. Whether for routine updates or critical decision-making, this feature ensures that all parties are informed and engaged.
How to Share a Camera
1. Click the Sharing tab at the top of the Evercam dashboard.
Note: You won’t see this tab if you have read-only access.
2. Press Add User and enter the email addresses of the people you want to share the camera with.
3. Add an optional message for the recipients.
4. Choose the permission level for each user:
- Read + Share – View cameras and share access with others.
- Read Only – View cameras but cannot share or manage users.
5. Click Share to complete sharing.

Managing Access
- Remove a User: Click the Trash Bin icon next to their name.
- Share a Video: Click the Copy Link (available only for Public cameras).
- Change Camera Visibility: Click Edit Options to set the camera as Public, Discoverable, or Private.
Need More Details?
Read the full guide in our User Manual.
[[cta]]
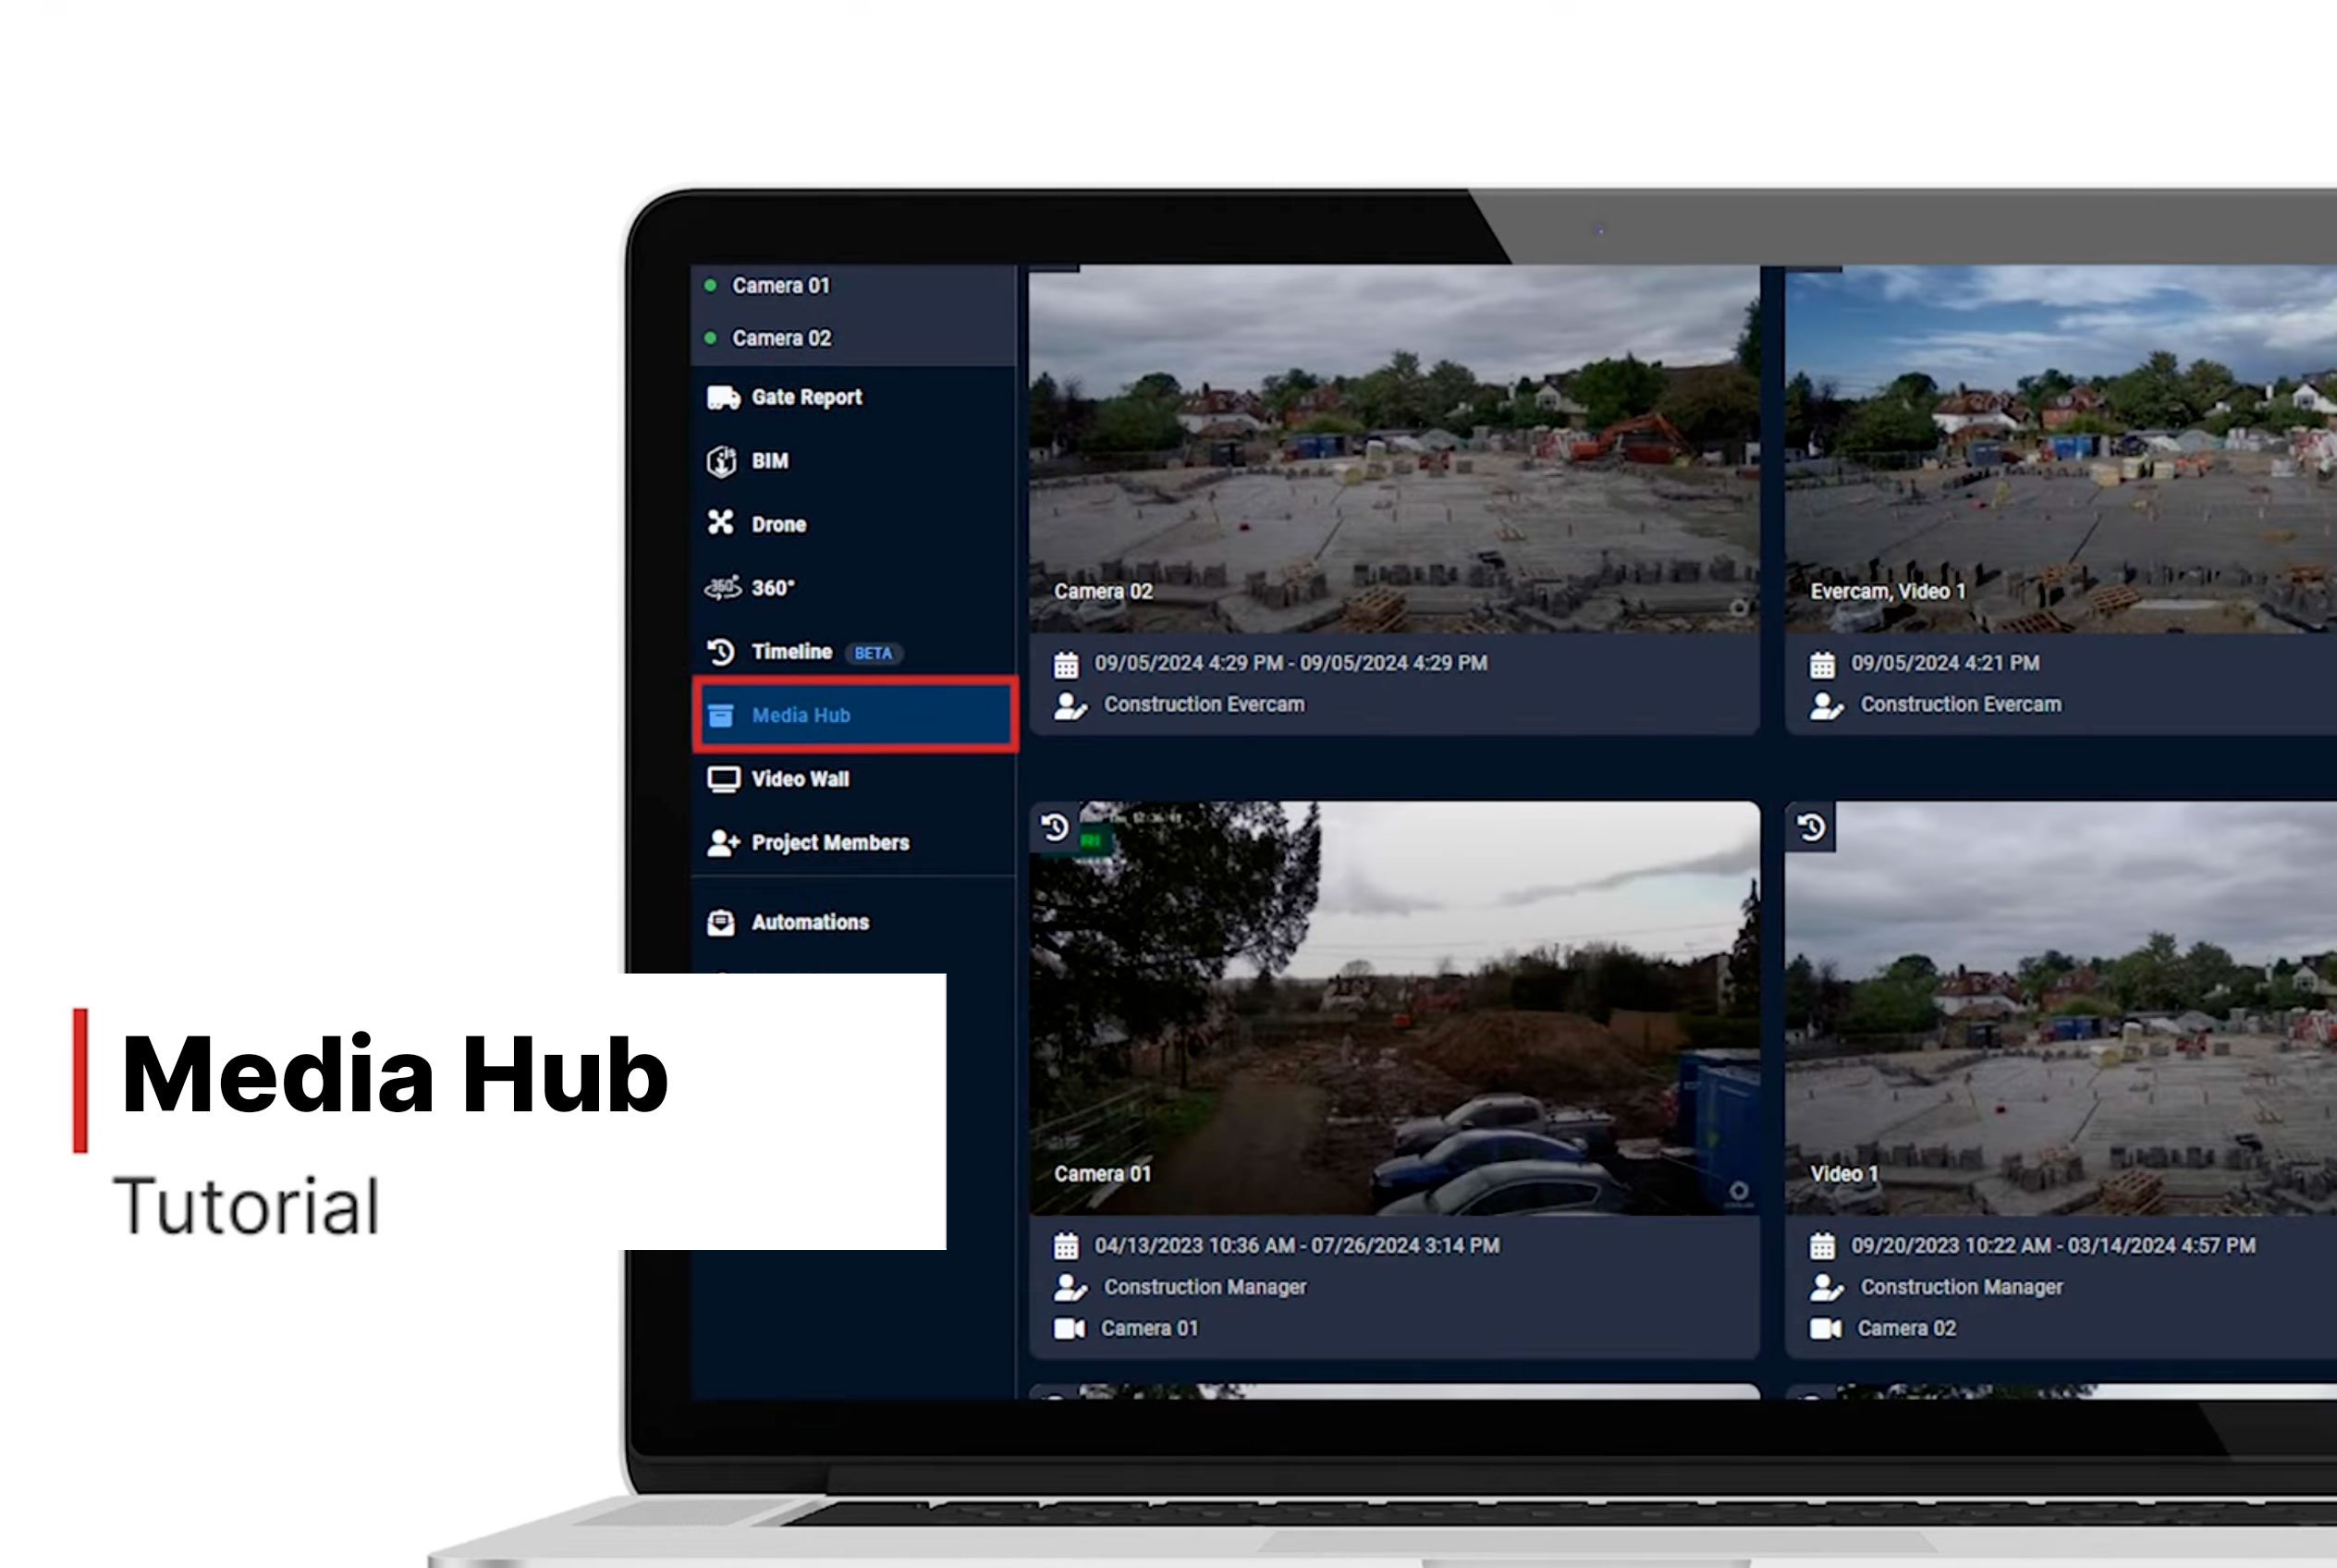
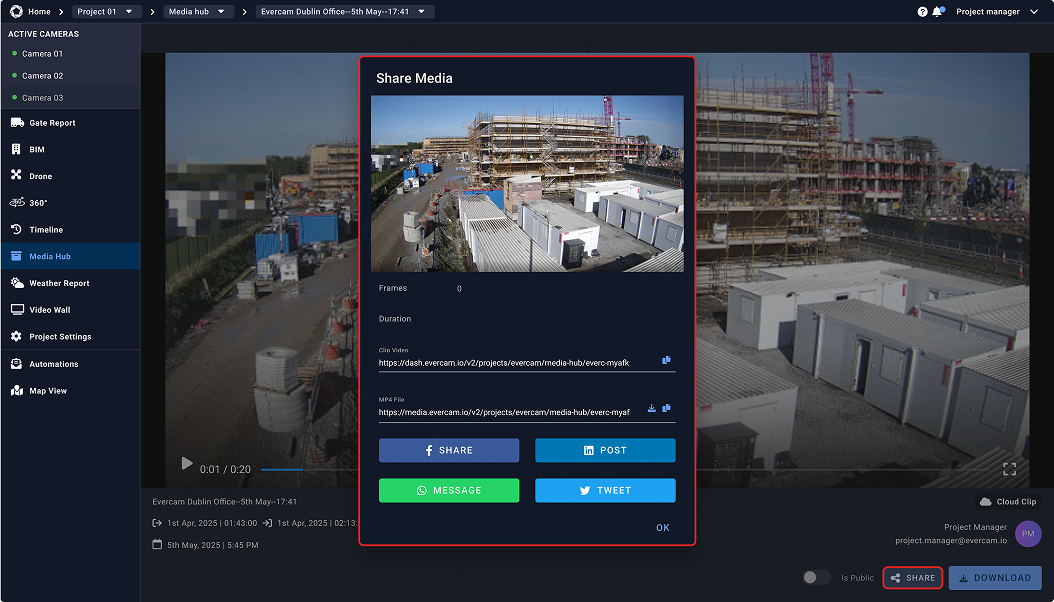
Media Hub
The Media Hub is your go-to storage for all saved recordings, snapshots, and time-lapses. Instead of searching through endless footage, quickly find, review, and share key moments – all in one place.
How to Use the Media Hub
- Click the Media Hub tab in the left-hand navigation bar of the Evercam dashboard.
- All saved media (recordings, time-lapses, mark-ups) will appear in a grid or list view.
- Use the search bar or apply filters to sort media:
- By camera
- By file type (GIF, video, image, etc.)
- By creator
- By date
- Sort A-Z or Z-A alphabetically
- Click any media file to preview it in-browser.

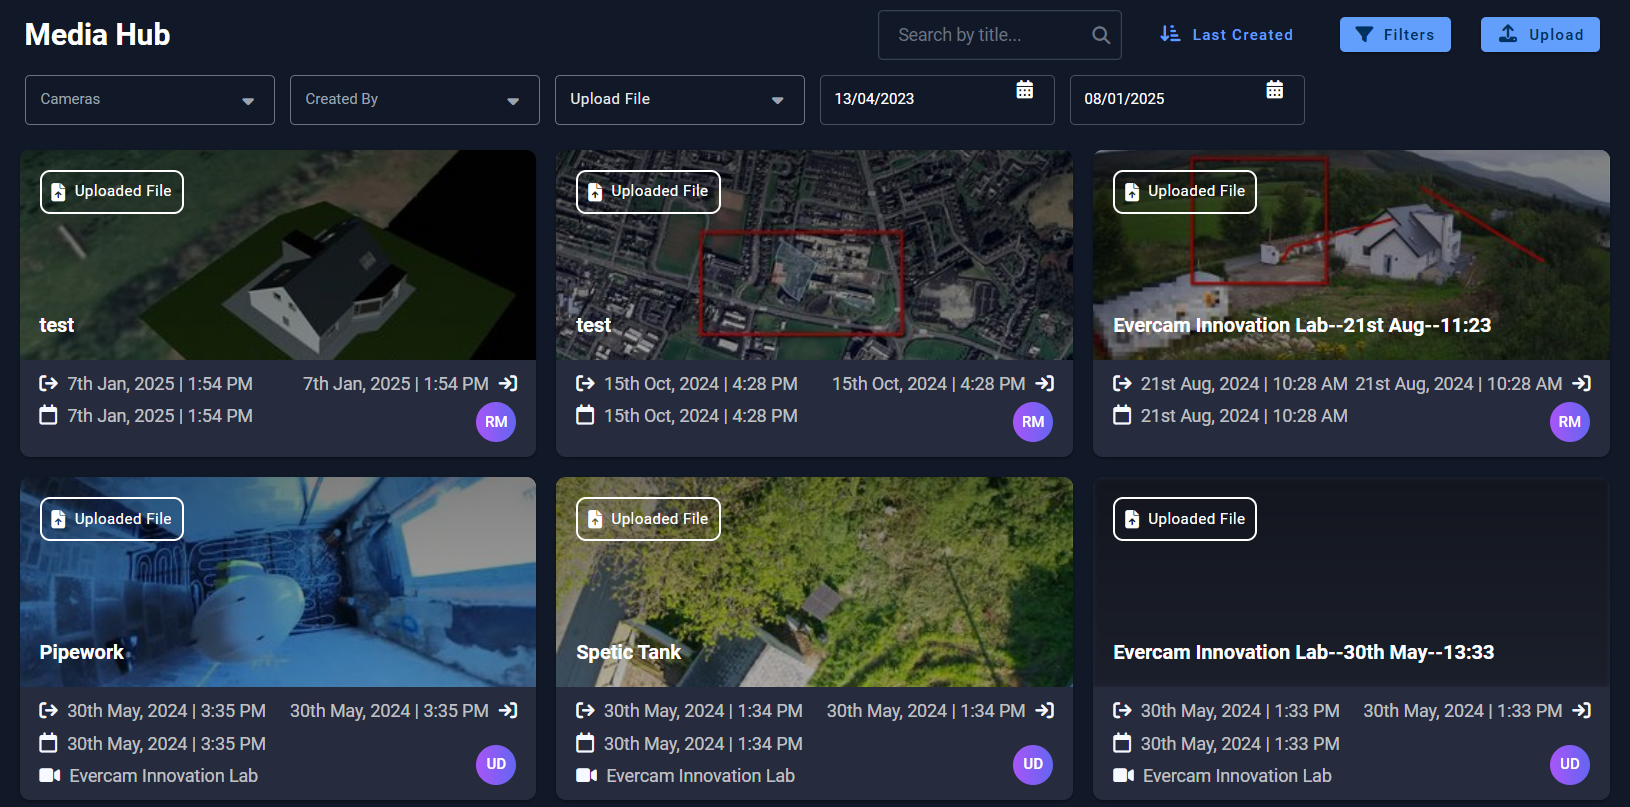
Upload External Media
- Use the Upload button in the Media Hub to upload files directly or via URL.
- Note:
- All file formats are accepted
- Only .mp4, .jpg, PDF, and .png will be viewable in the platform
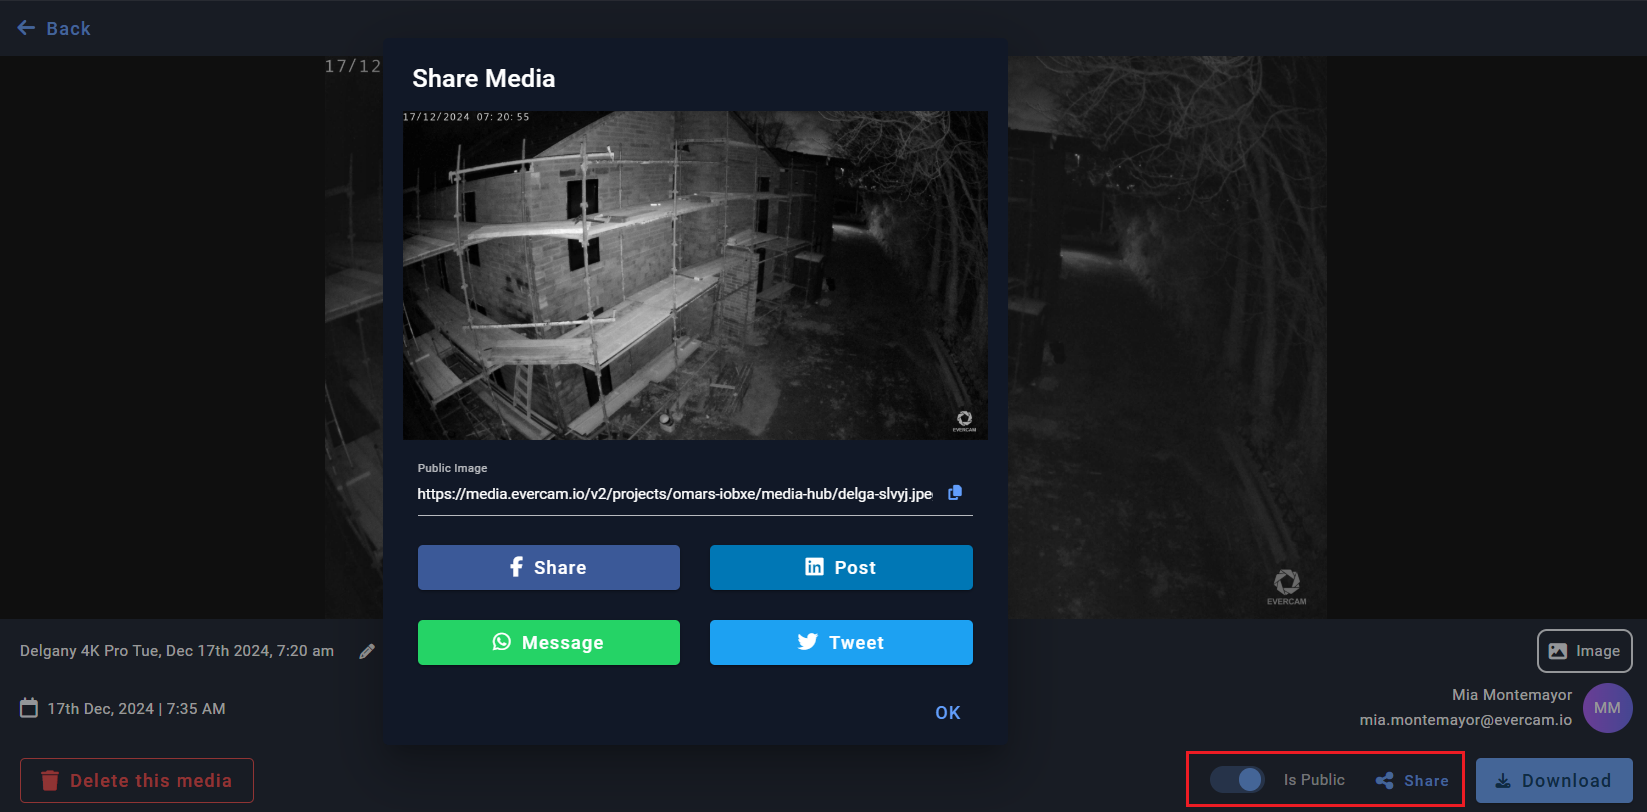
Download or Share Media
- Click on a media item.
- A Download button will appear at the bottom right corner of the screen.
- Click to save it to your device.
- If sharing is enabled by your Company Admin:
- You can click the Share button to generate social or direct-share links.
- Note: The file must be marked as Public to enable sharing.
Want More Info?
Read the full guide in our User Manual.
[[cta]]
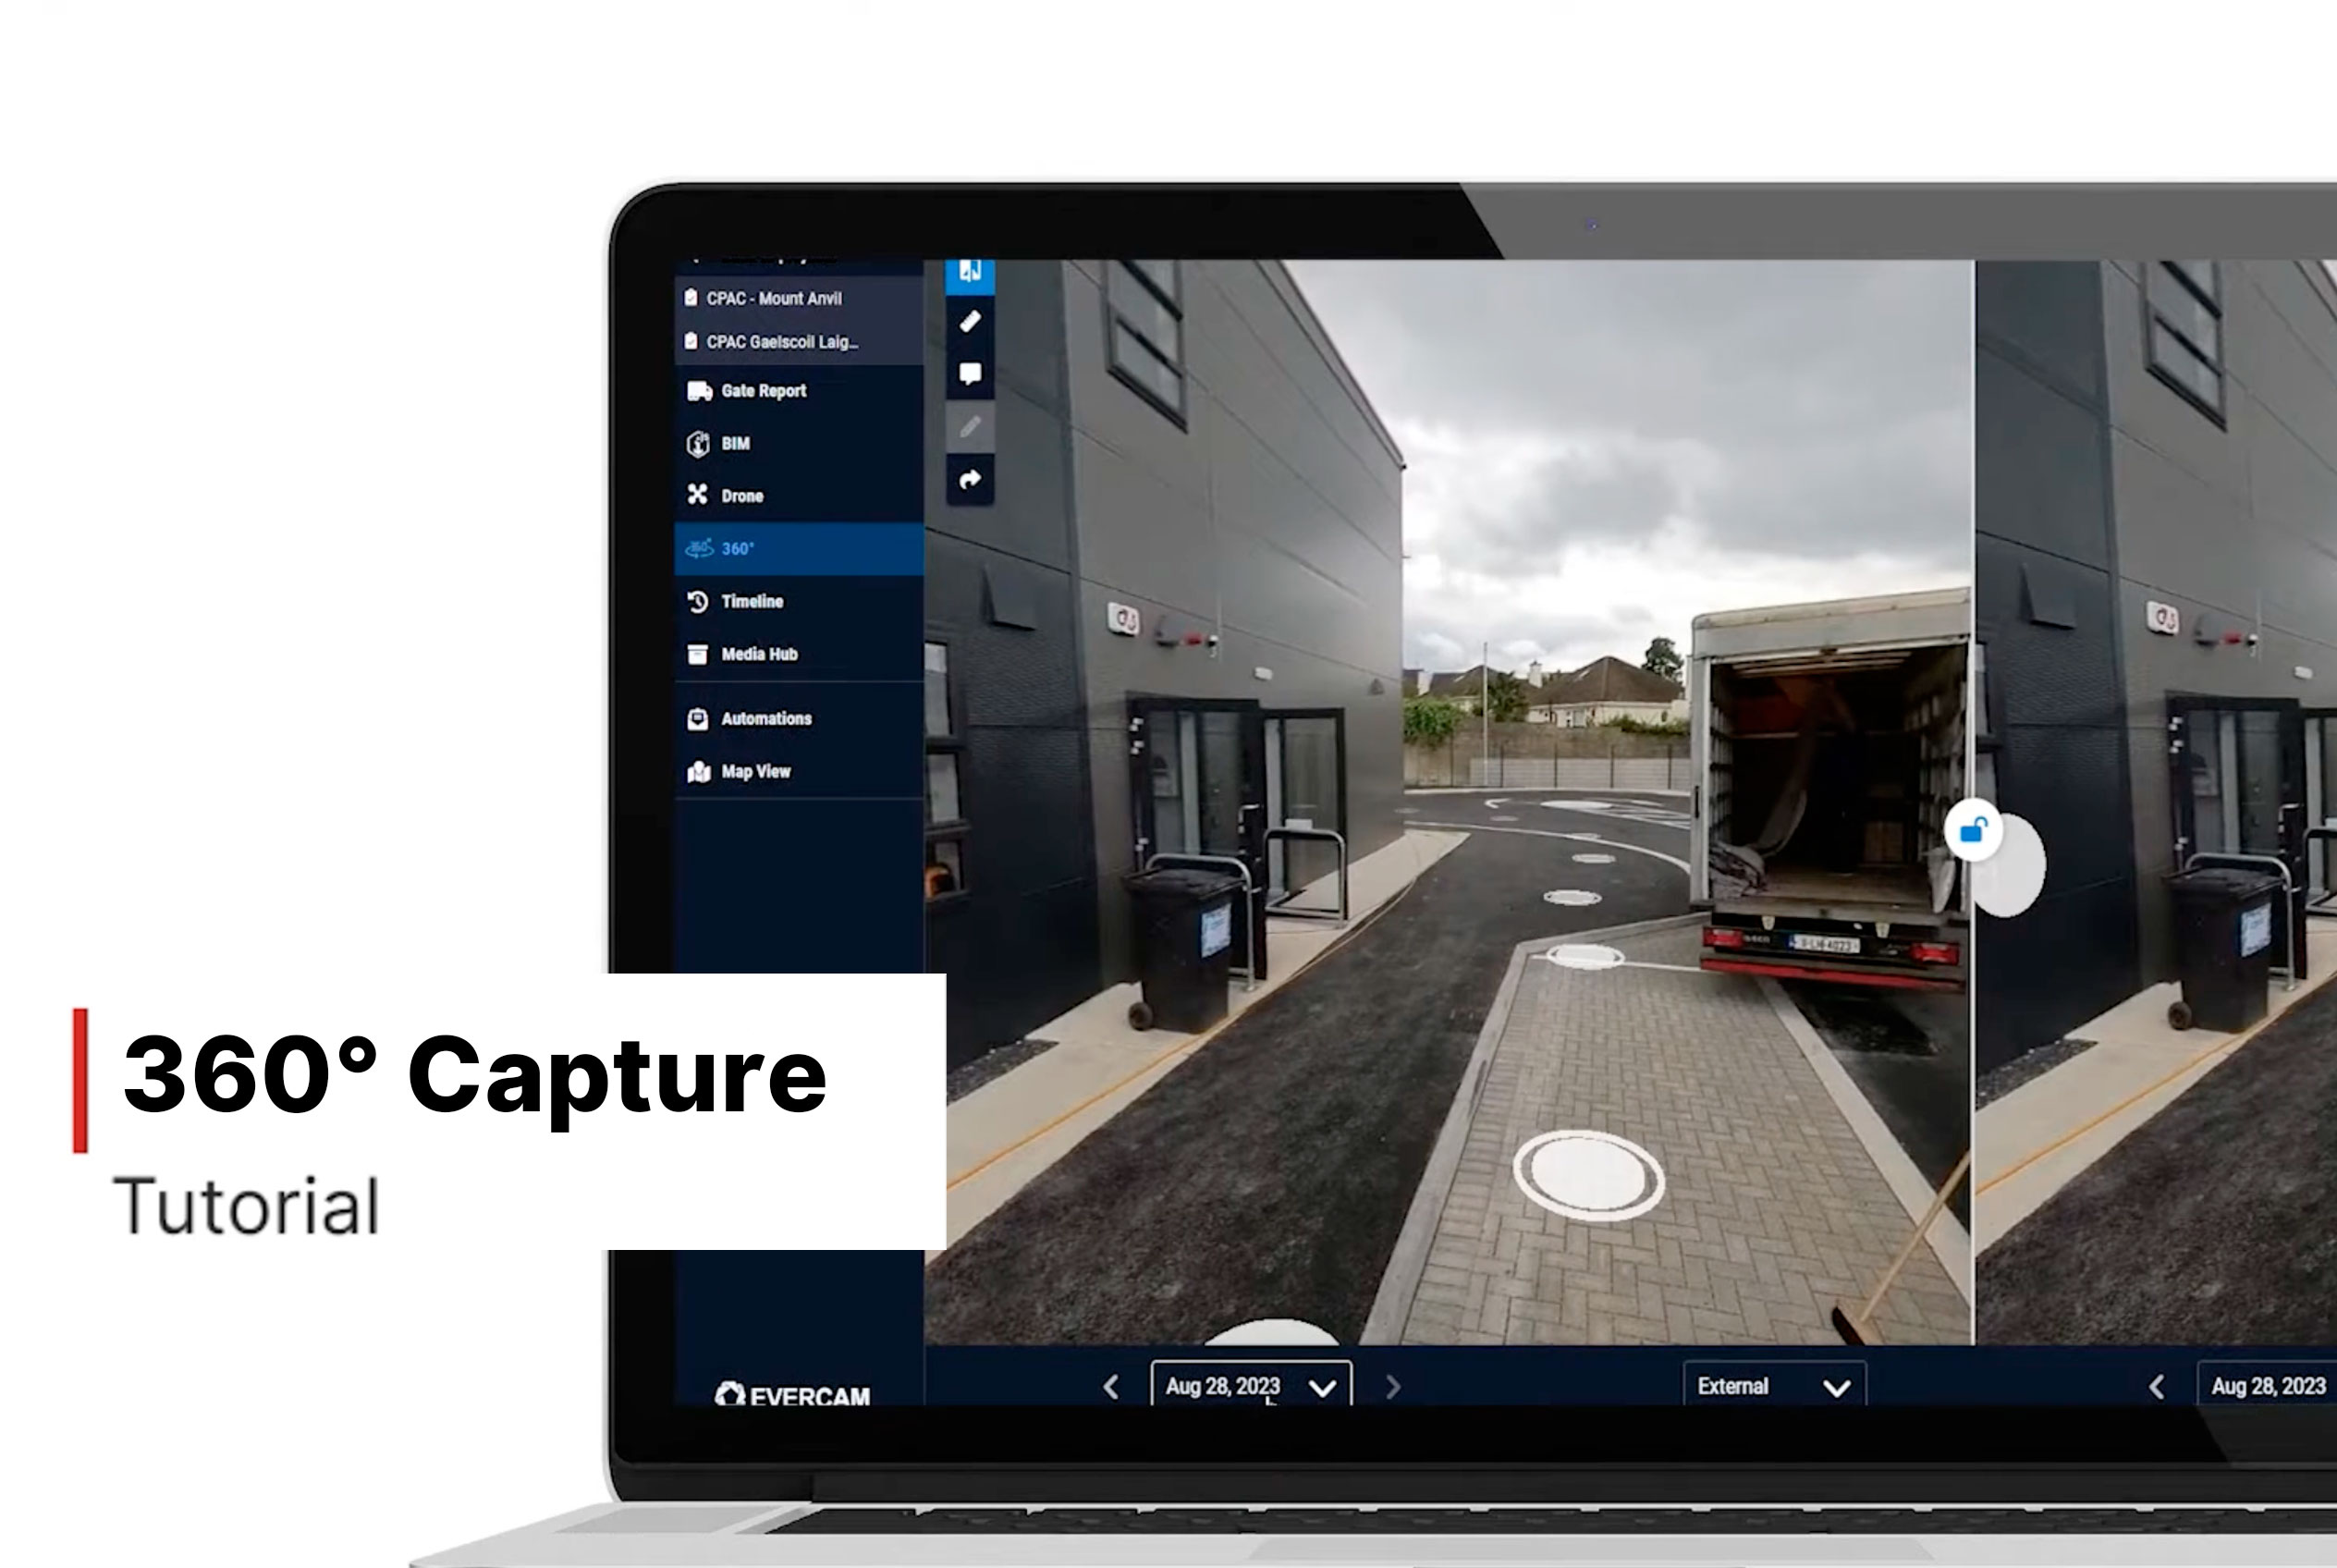
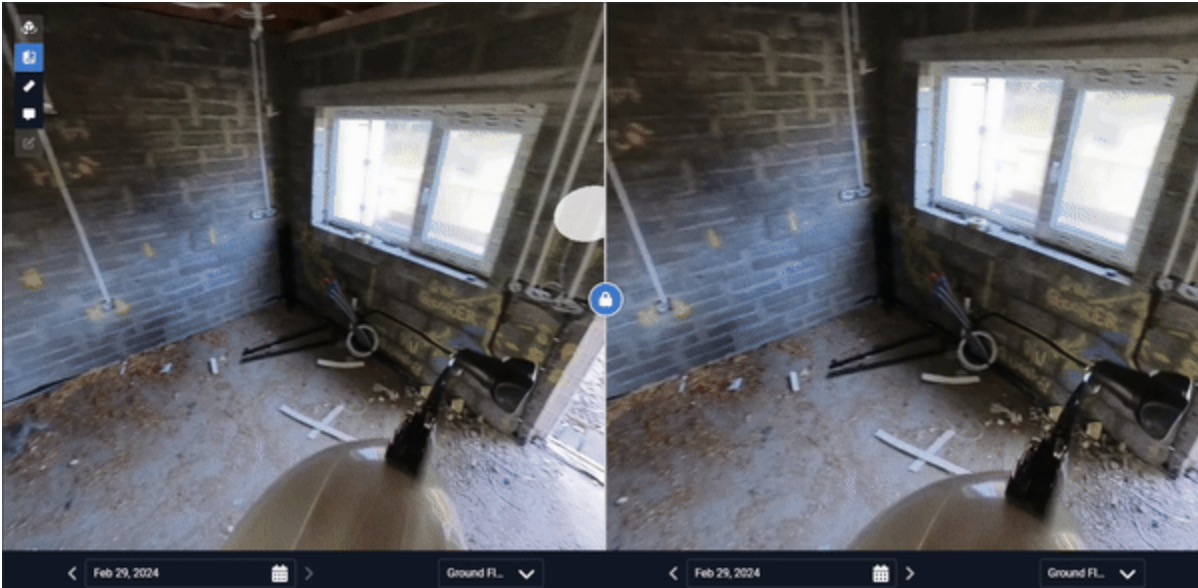
360° Capture
See Your Entire Site with 360° Views
The 360° Camera Tool gives you a complete, interactive view of your site, helping you track progress, monitor safety, and enhance collaboration.
How to Use the 360° Camera Tool
1. Access the 360° Camera
- Click the 360° tab in the Evercam dashboard.
- Select a camera from the available list.
2. Explore the Site in 360°
- Click and drag to rotate the view in any direction.
- Use the zoom controls to focus on specific areas.
3. Compare Site Progress
- Switch between different dates to track changes over time.
- View images side by side for easy comparison.
4. Share & Save Views
- Capture a snapshot and save it to the Media Hub.
- Share a direct link to the 360° view with your team.
Want More Details?
Read the full guide in our User Manual.
[[cta]]
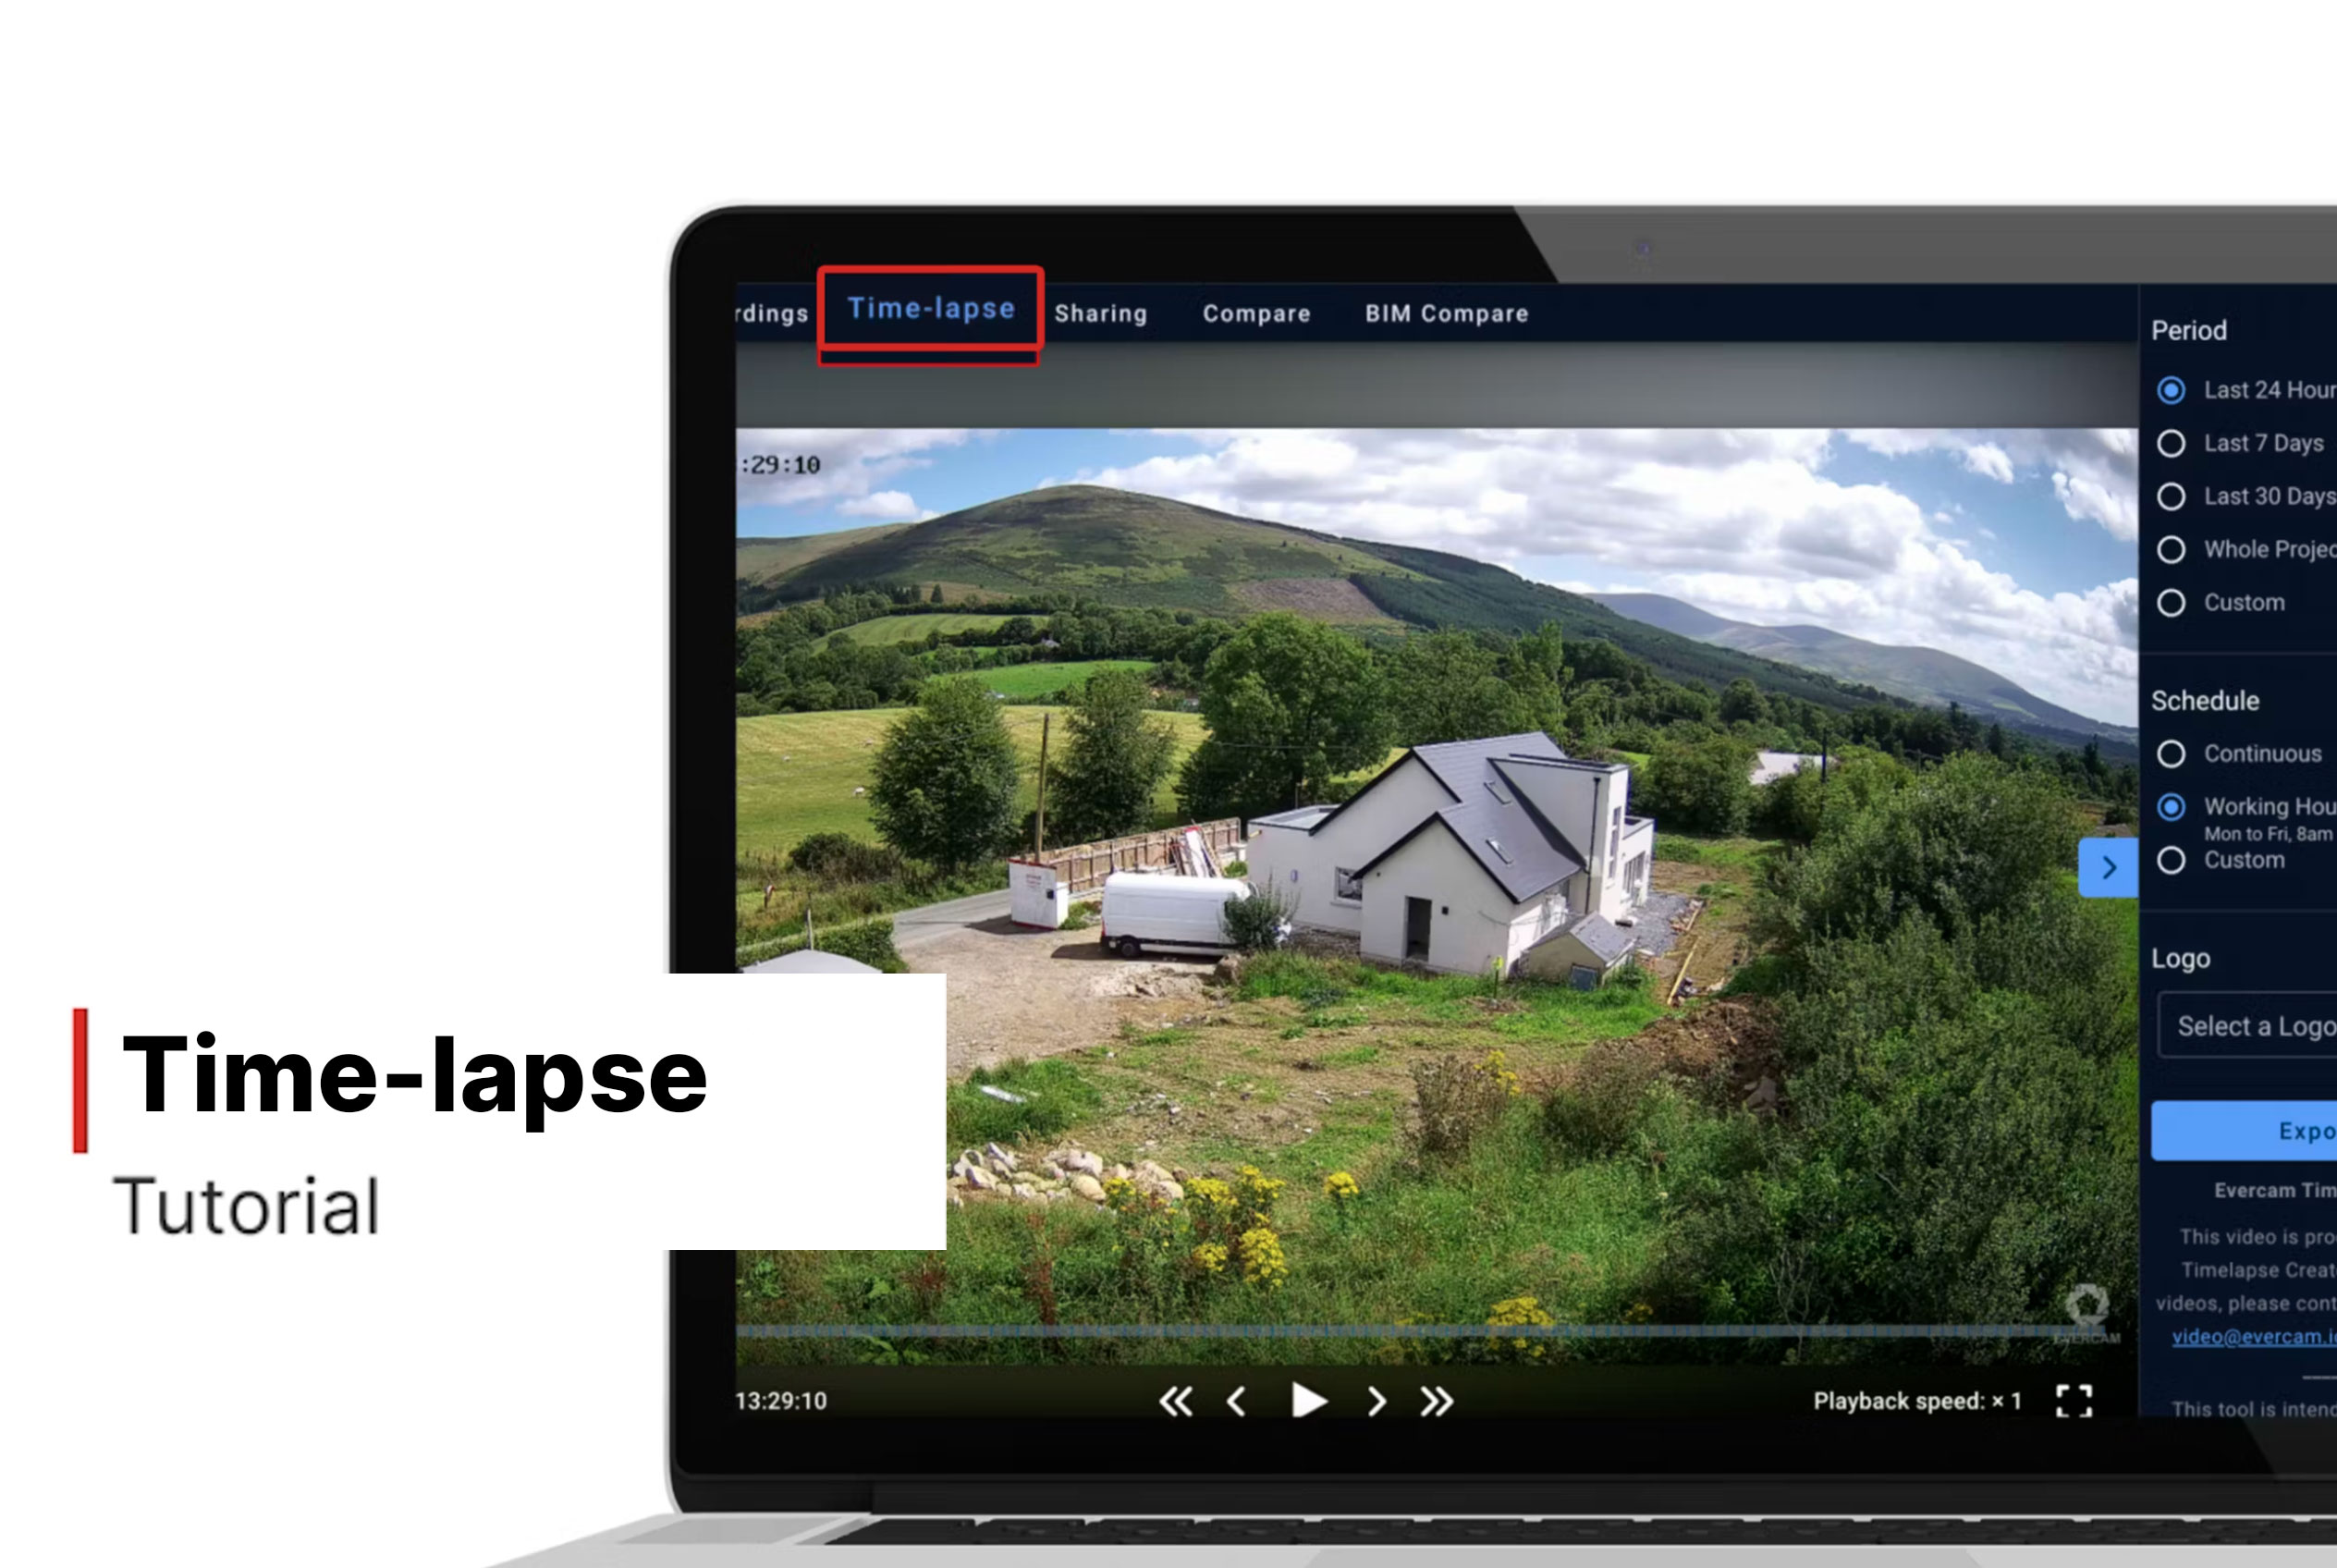
Time-lapse Creator
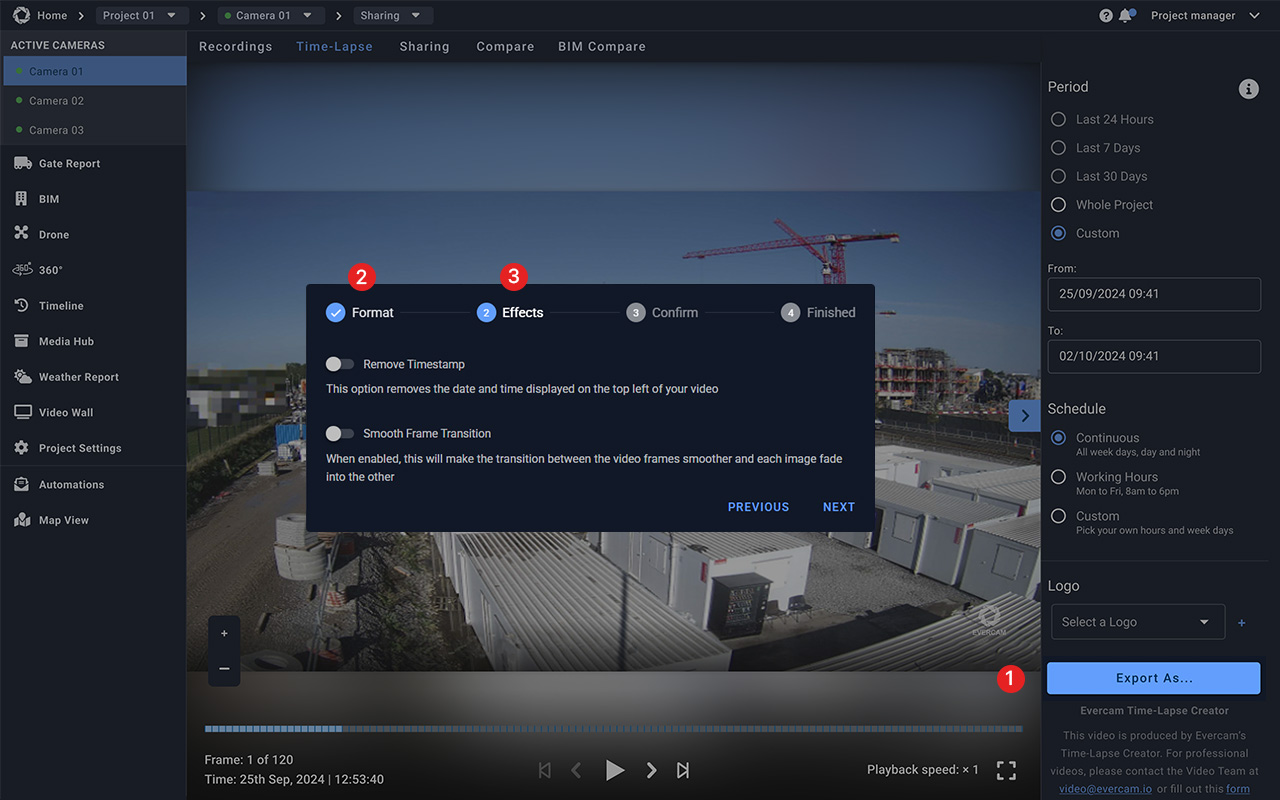
How to Create a Time-lapse
- Select a camera from the menu on the top left of your screen.
- From the top left-hand menu, select “Time-lapse.”
- Use the date range selectors at the top right-hand menu of the page to set your time window.
- Alternatively, use pre-set ranges (e.g., Last Week, Last Month, or Custom) below the Period.
- Scroll down to “Schedule” settings.
- Choose between continuous playback or specific working hours/days.
- Look for the “Logo” option on the right-hand side to include branding.
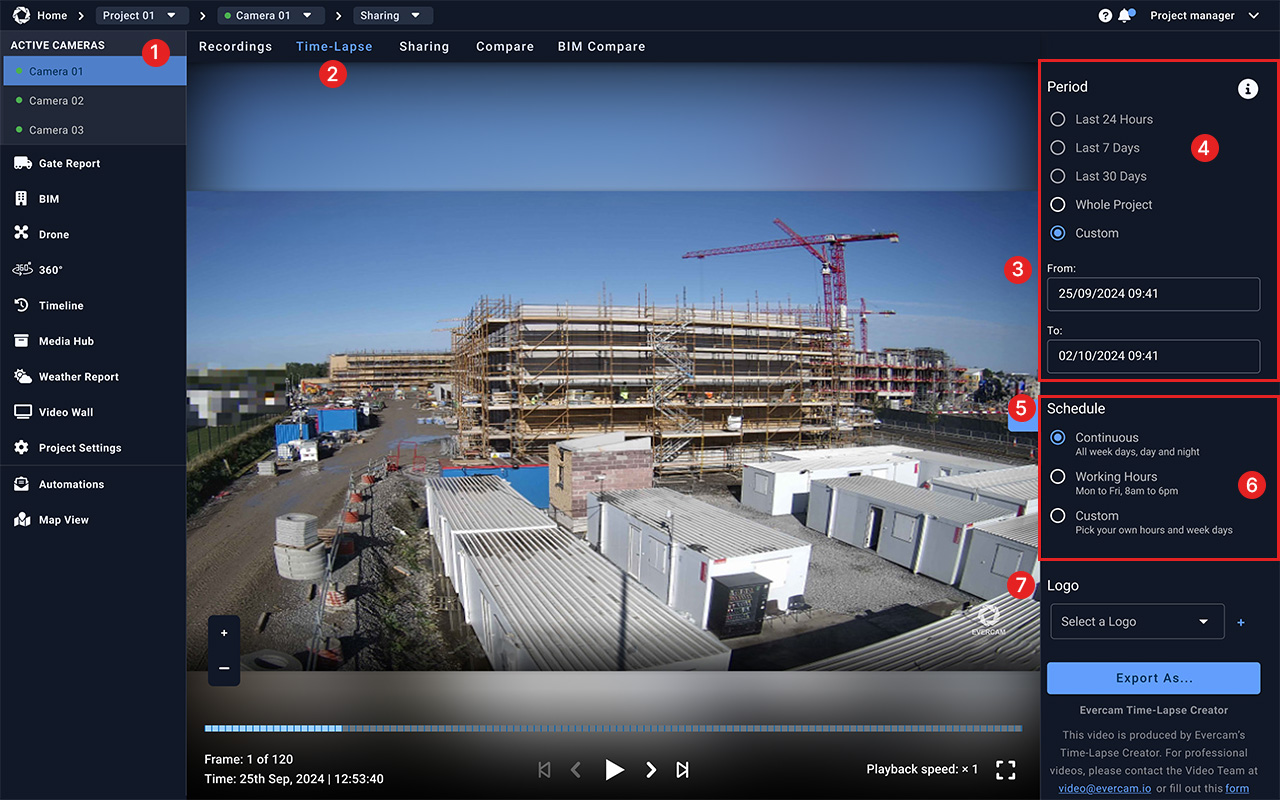
How to Export & Share
- Click the “Export” button in the bottom right to create and download the video.
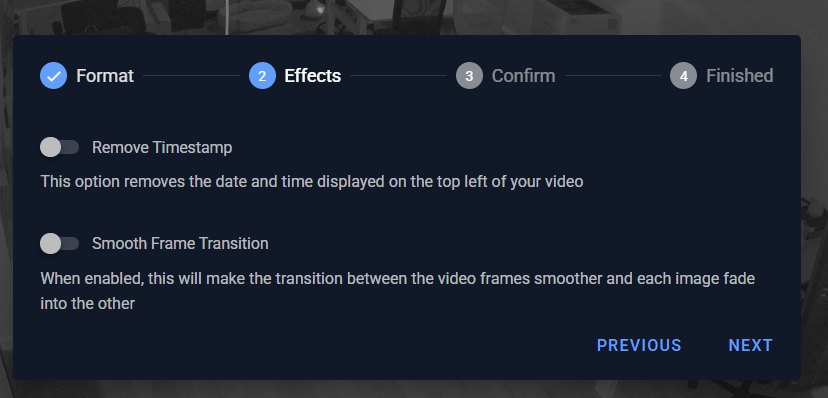
- Select the Format (30, 60, 90 seconds).
- Select the Effects (Remove Timestamp, Smooth frame transitions)
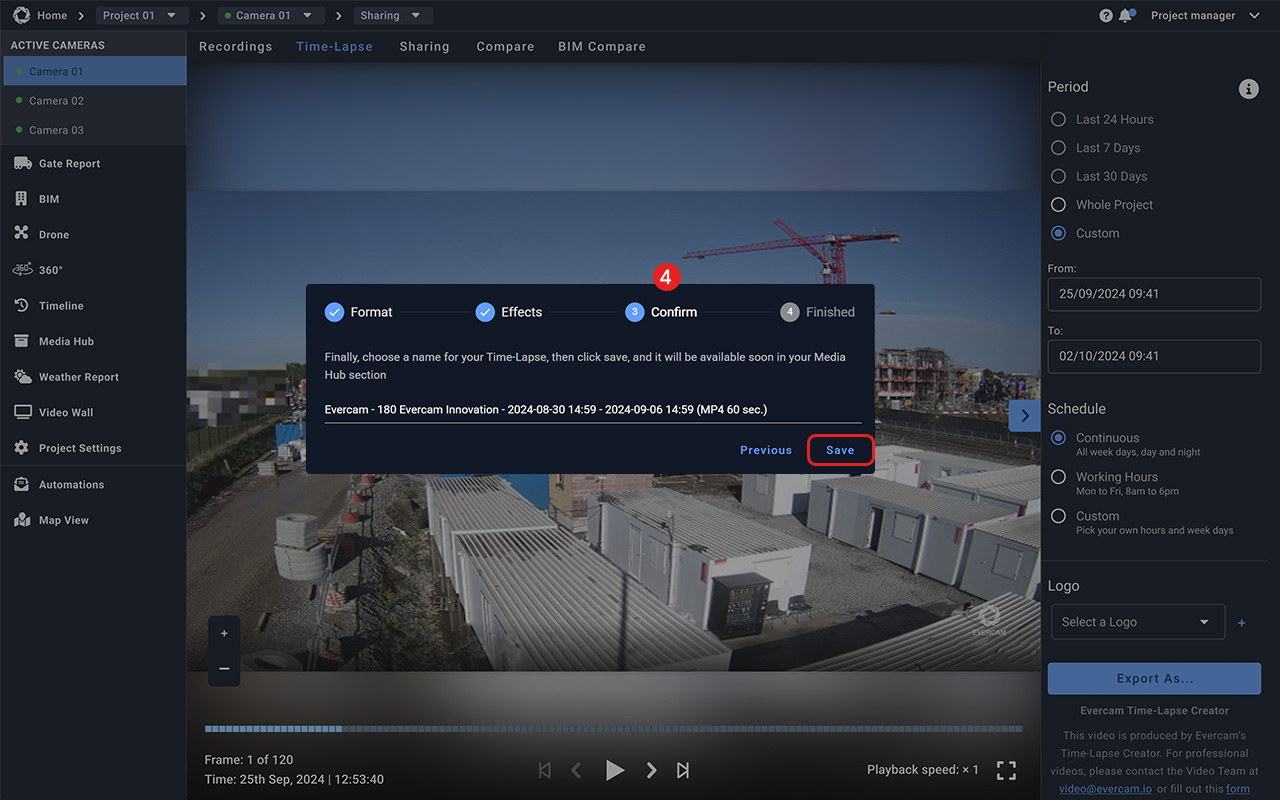
- Confirm your time-lapse creation and give it a name
- Use video controls under the player to watch your timelapse.
Want More Details?
Check out the full guide in our User Manual.
[[cta]]
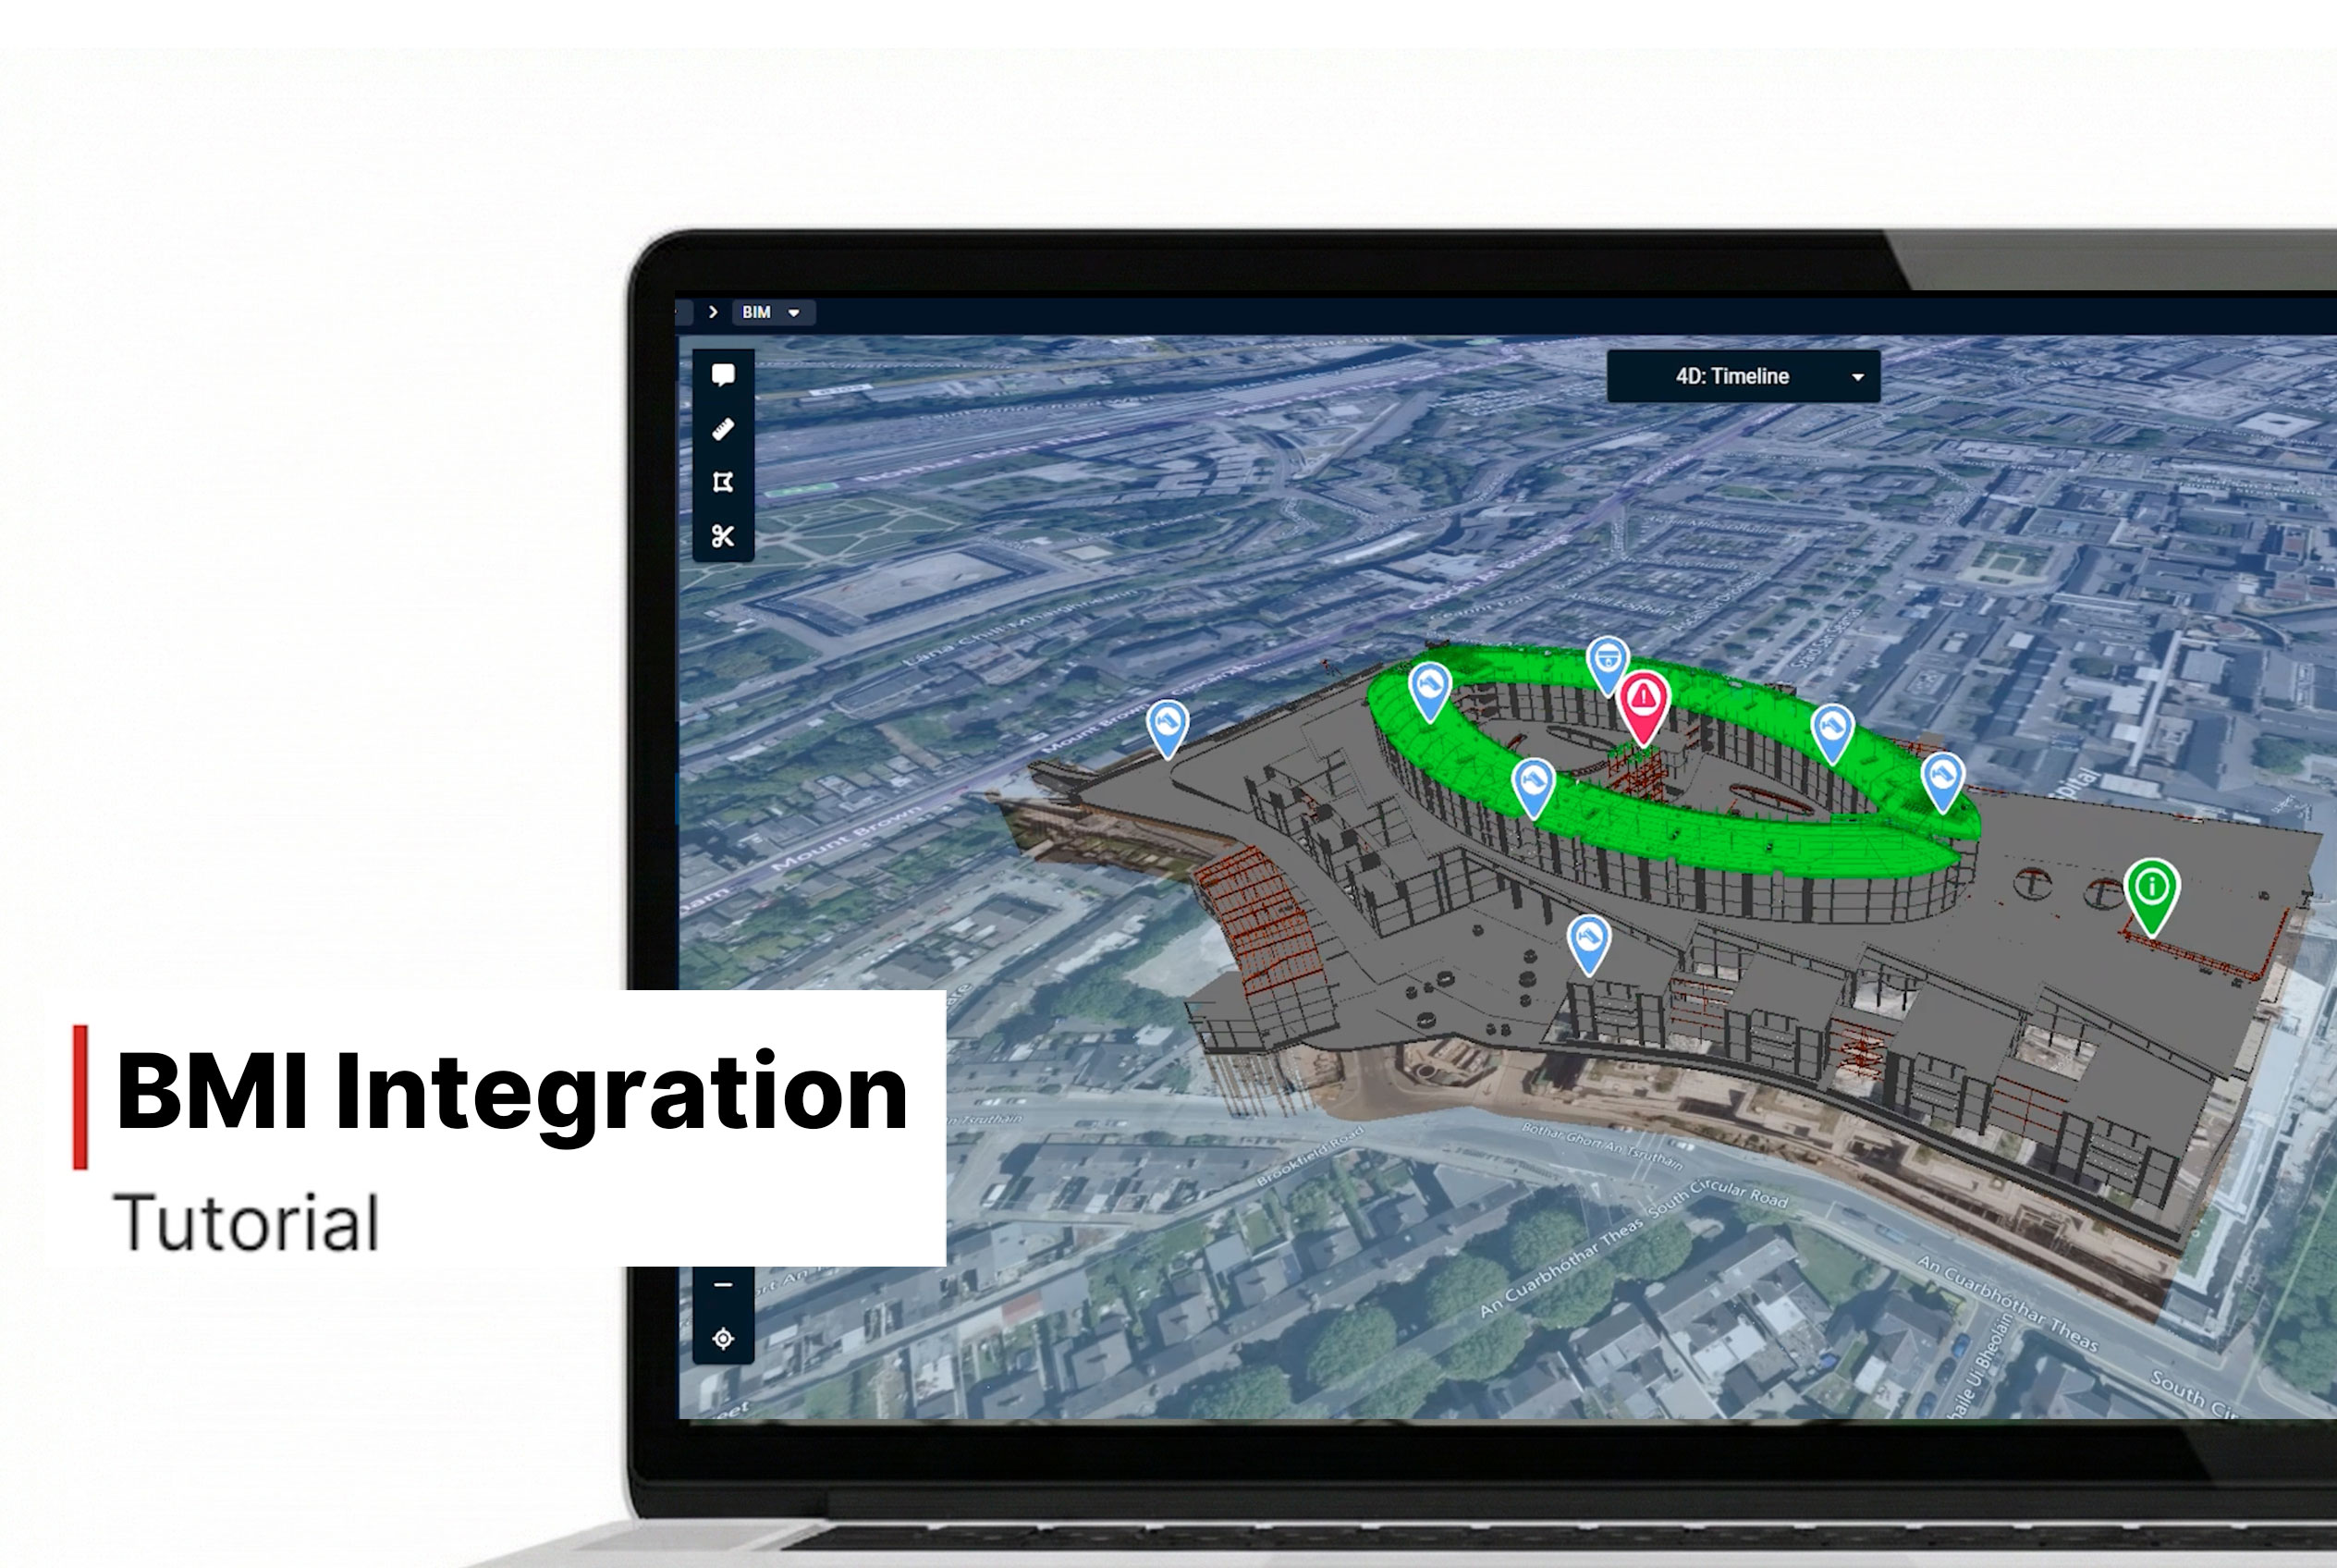
BIM Integration
BIM allows you to view 3D or 4D digital models in their real-world environment and switch between the model and site reality to track changes and communicate project progress within the Evercam platform.
BIM Compare (Design vs. Reality)
BIM Compare overlays your BIM model onto the live camera image, allowing you to compare the as-designed and as-built states.
How to Use BIM Compare:
- From your dashboard, select your camera.
- Access BIM Compare – Click the BIM Compare tab in the dashboard.
- Select a Date – Use the calendar or timeline to match the BIM model to the construction progress at a specific point in time.
- Compare Design vs. Reality – Drag the slider to reveal the differences between the live view and the BIM model.
- Adjust Transparency – Use the Transparency Tool to see the live view behind the model.
- View Model Layers – Toggle between Architectural, Structural, MEP, or 4D layers to focus on different construction elements (availability depends on the BIM model provided).
- Download & Share – Export the current comparison as a GIF, which will be saved in the Media Hub for easy access.
Note: For proper alignment, the camera must have Lens Distortion Correction (LDC) enabled. If the camera moves, the BIM model must be realigned. One realignment per month is included; additional realignments may incur a charge.
BIM view (3D Model Navigation)
BIM View provides an interactive 3D model viewer within Evercam, allowing teams to explore and inspect the entire BIM model without requiring external software.
How to Use BIM View:
- Access BIM View – Click the BIM View tab in the dashboard.
- Navigate the Model – Use zoom, rotate, and pan controls to explore the model from any angle.
- Toggle Model Layers – Switch between Architectural, Structural, MEP, or 4D layers to inspect specific elements.
- Collaborate & Share – Capture screenshots and share insights directly from the viewer.
By combining BIM Compare and BIM View, Evercam’s BIM Integration provides unmatched visibility into construction projects, making it easier to track progress, detect issues early, and ensure compliance with the design.
Need More Details?
Check out the full User Manual.
[[cta]]
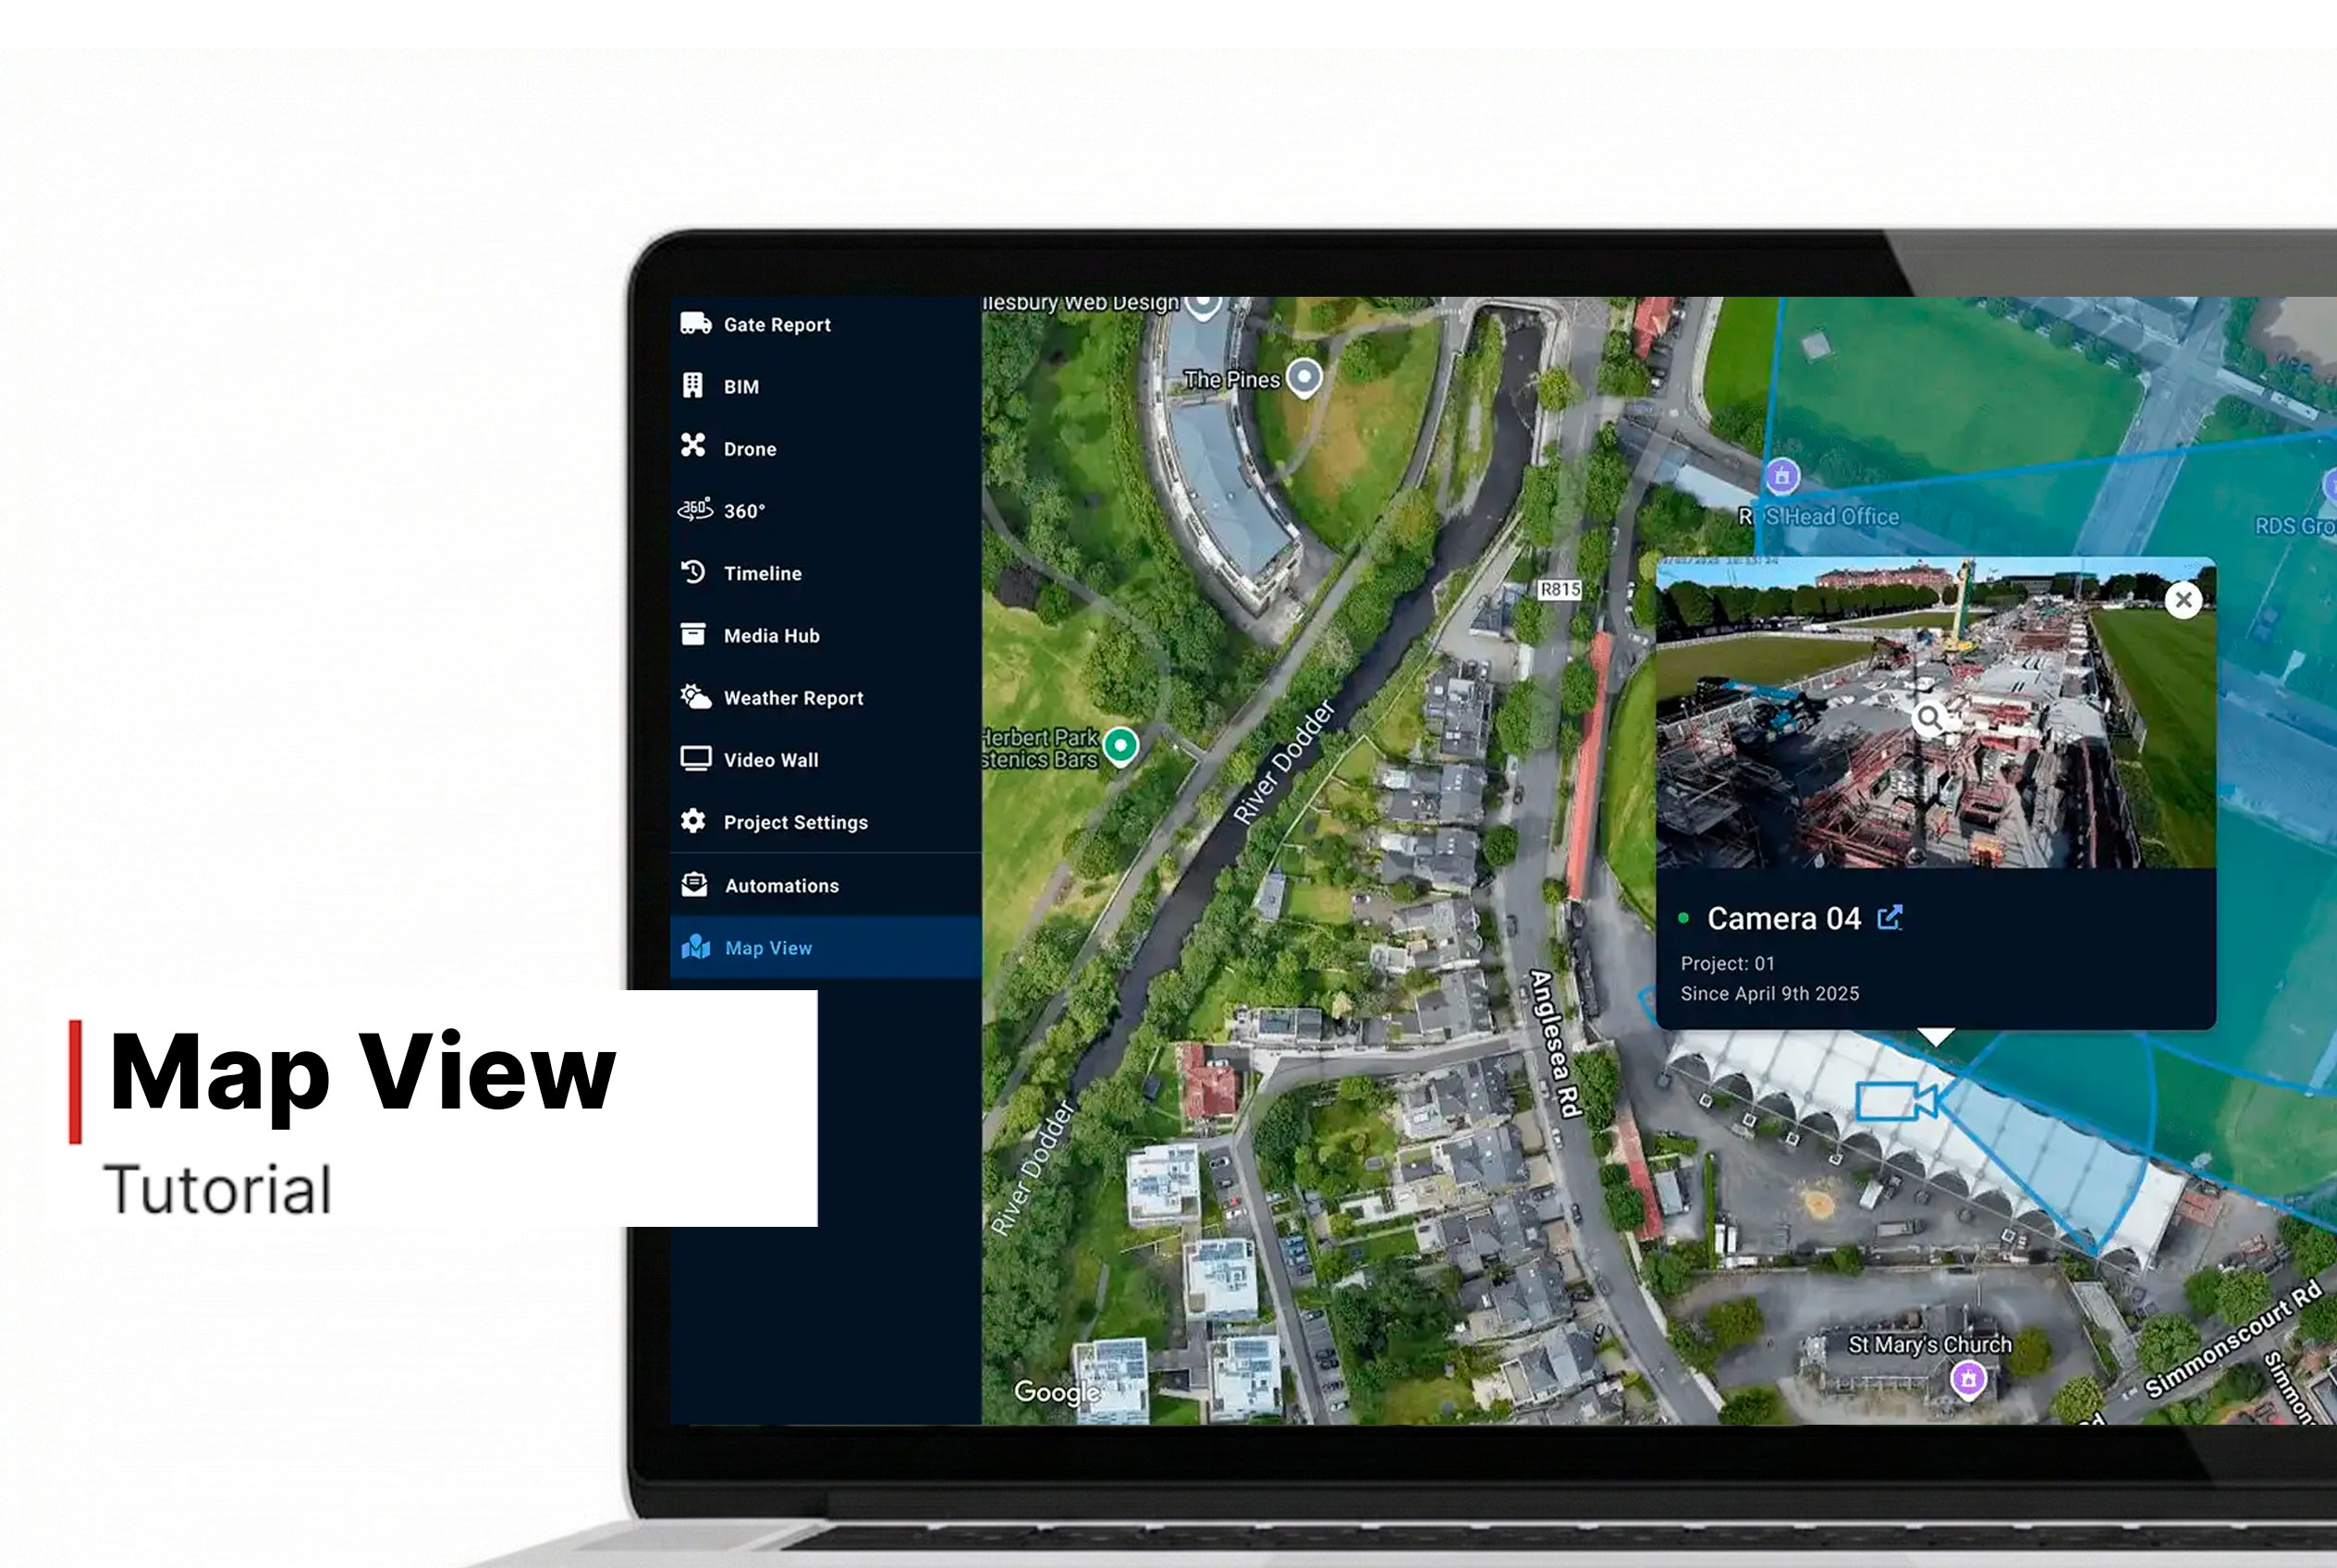
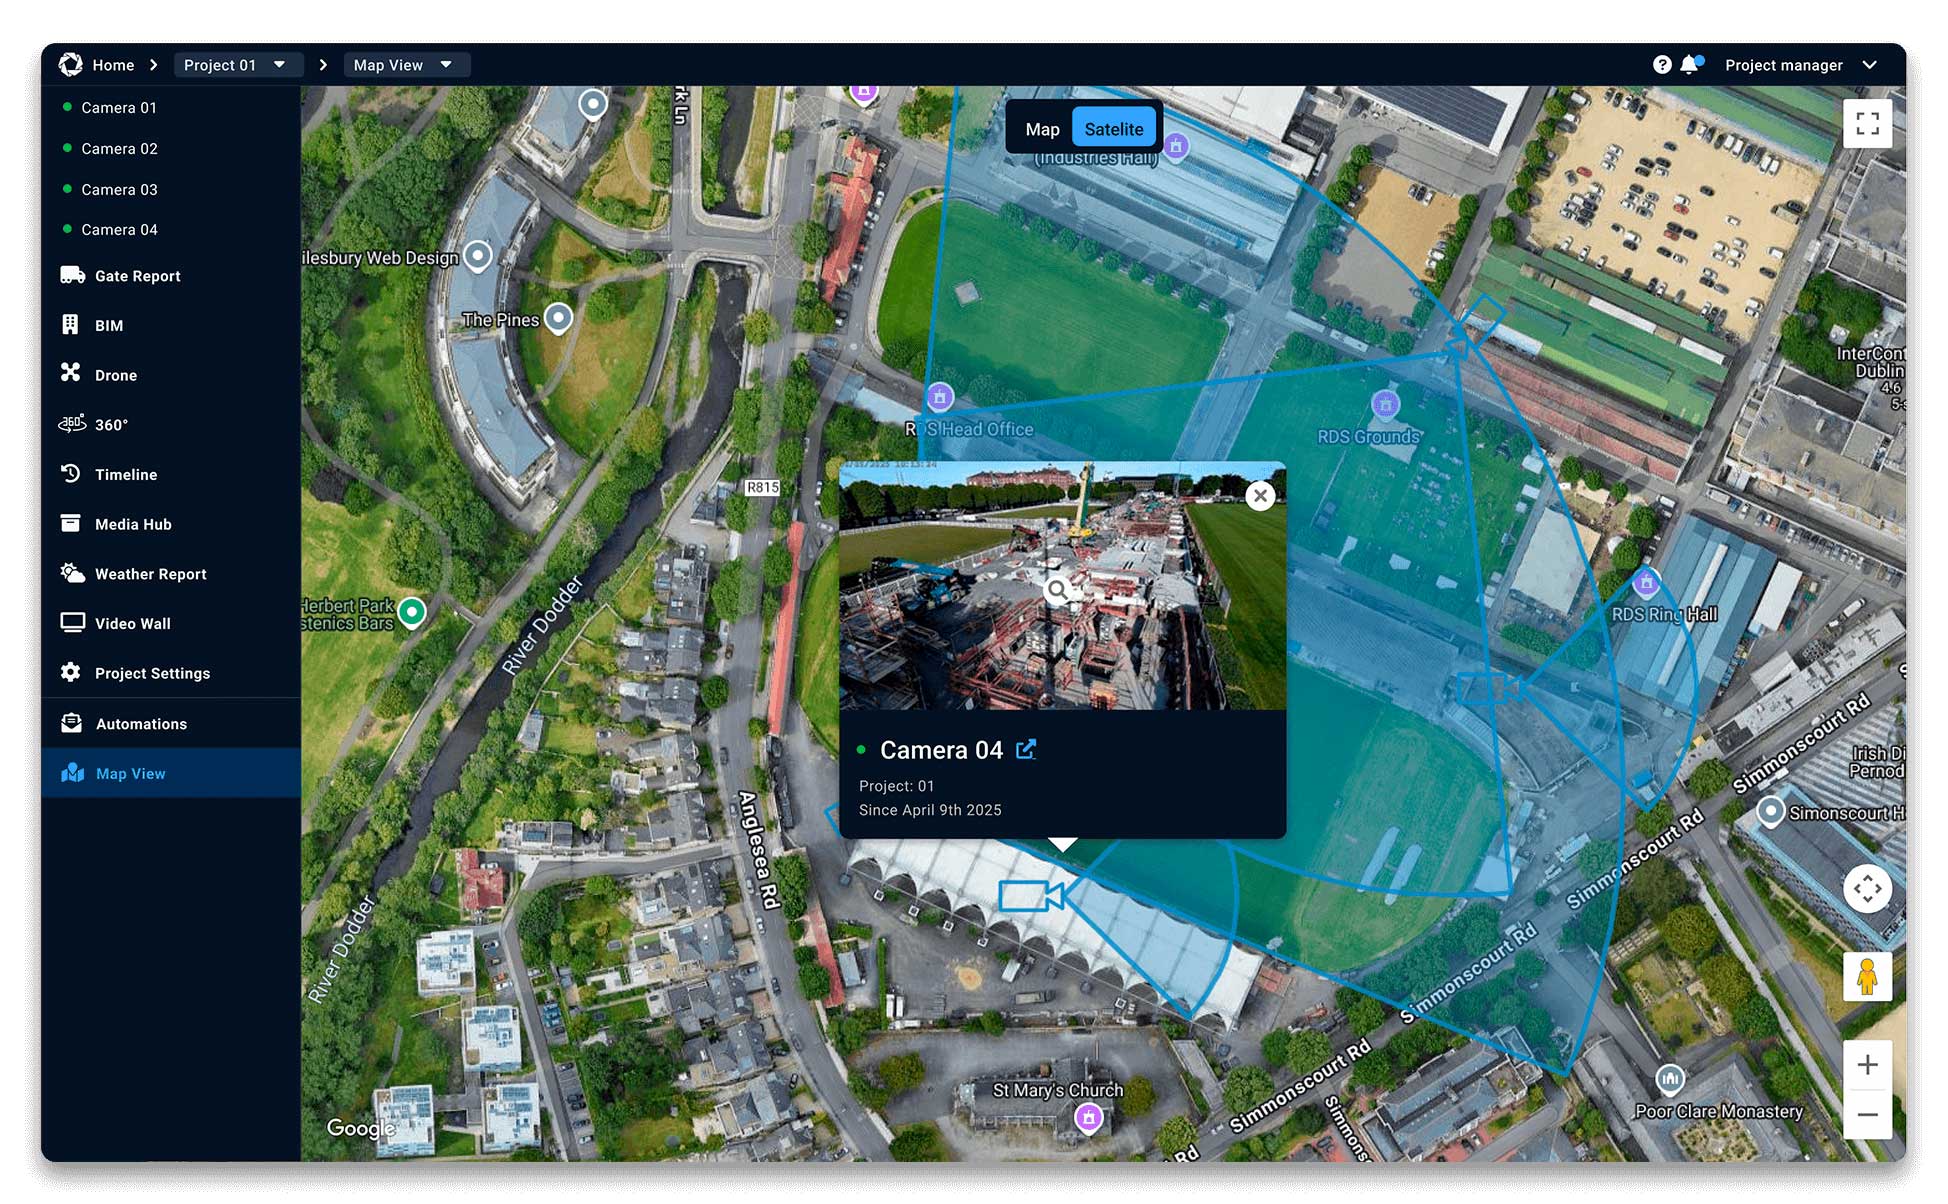
Map View
How to Use the Map View Tool
- Click on the Map View in the left menu tab in your Evercam dashboard.
- Pan & zoom to explore different areas.
- Click on a camera marker to instantly view its live feed.
- Select a camera to see its name, location, and live image.
- Click Full Screen for a larger display.
- Toggle between Satellite and Street Map modes for different perspectives.
Want More Details?
Read the full guide in our User Manual.
[[cta]]
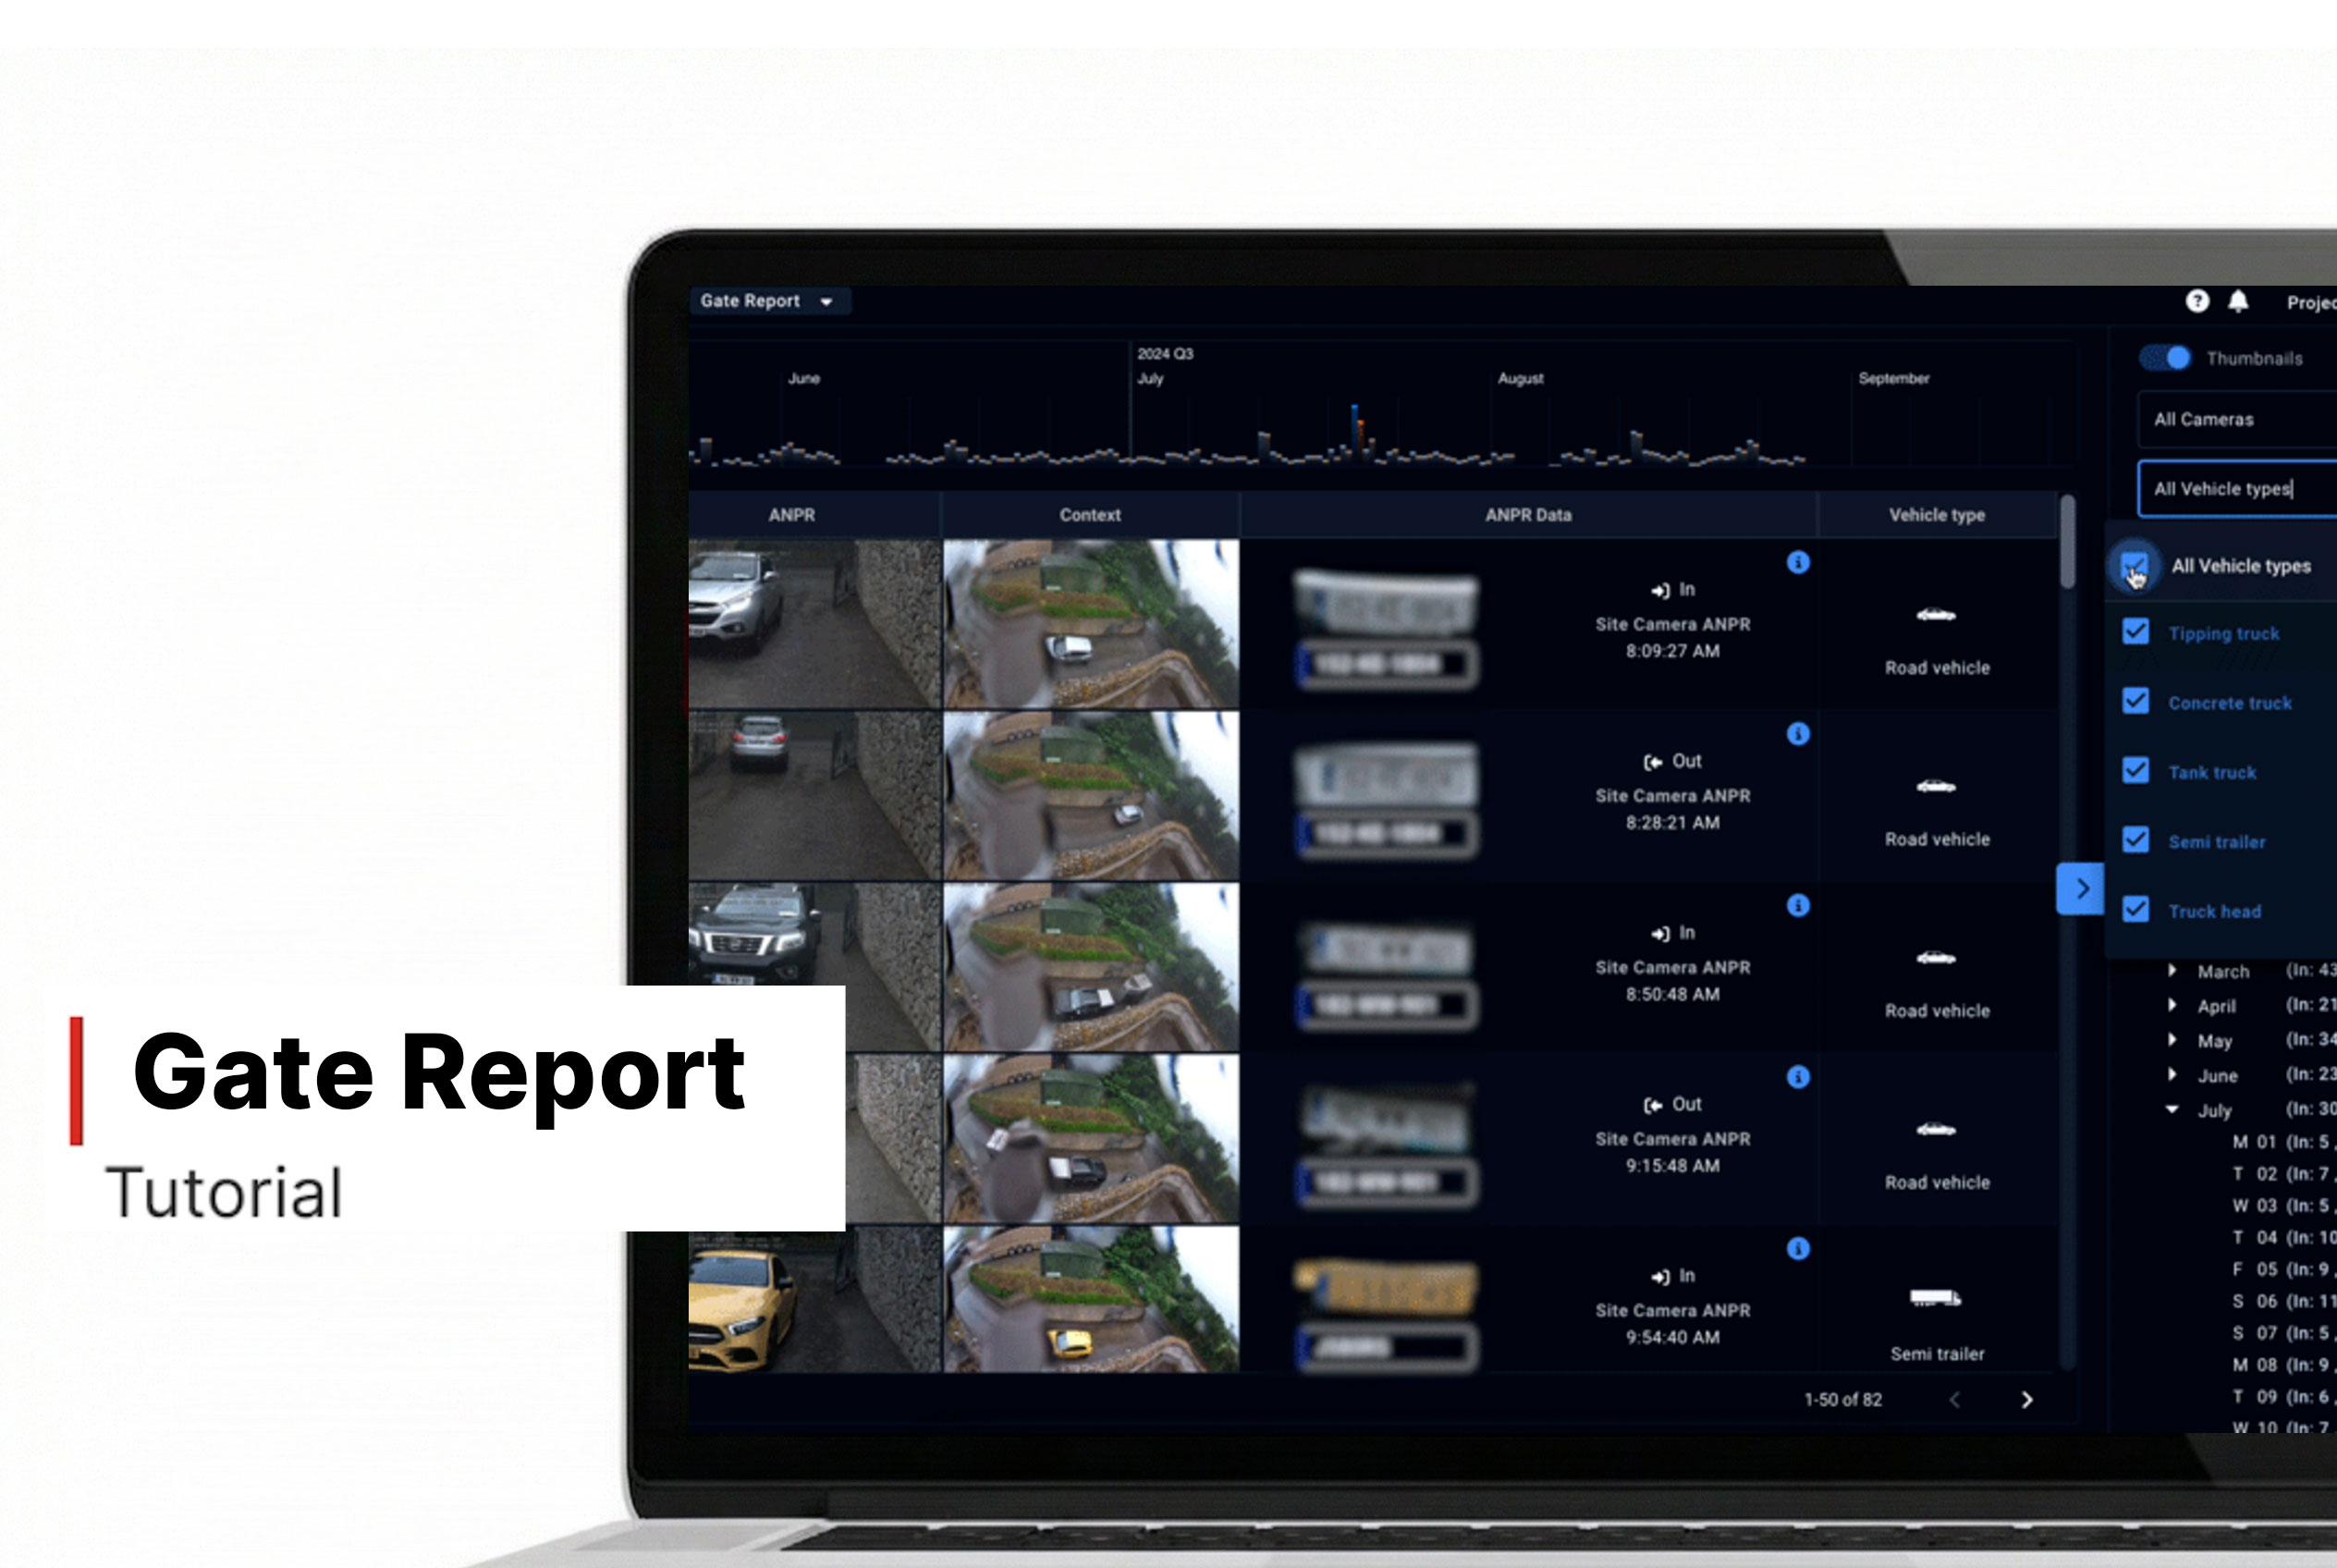
Gate Report
How to Use the Gate Report
- Navigate to the Gate Report tab in the dashboard.
- Select the camera monitoring the site entrance.
- The report lists all vehicles detected, including timestamps.
- Click on an entry to view recorded footage of the vehicle.
- Use filters to find specific dates, times, plate numbers, or vehicle types.
- Compare logs with project schedules for verification.
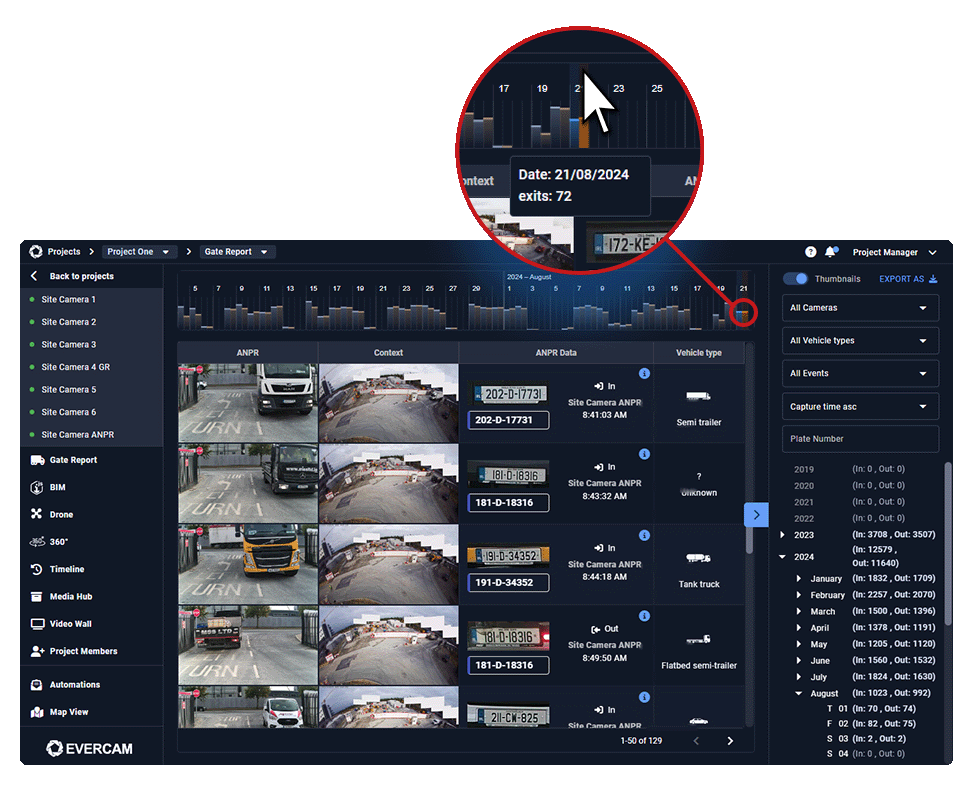
Export & Share Reports
- Click Download to save a report as a CSV or PDF for record-keeping.
- Share with stakeholders for tracking deliveries and site access.
Need More Details?
Check the full guide in our User Manual.
[[cta]]
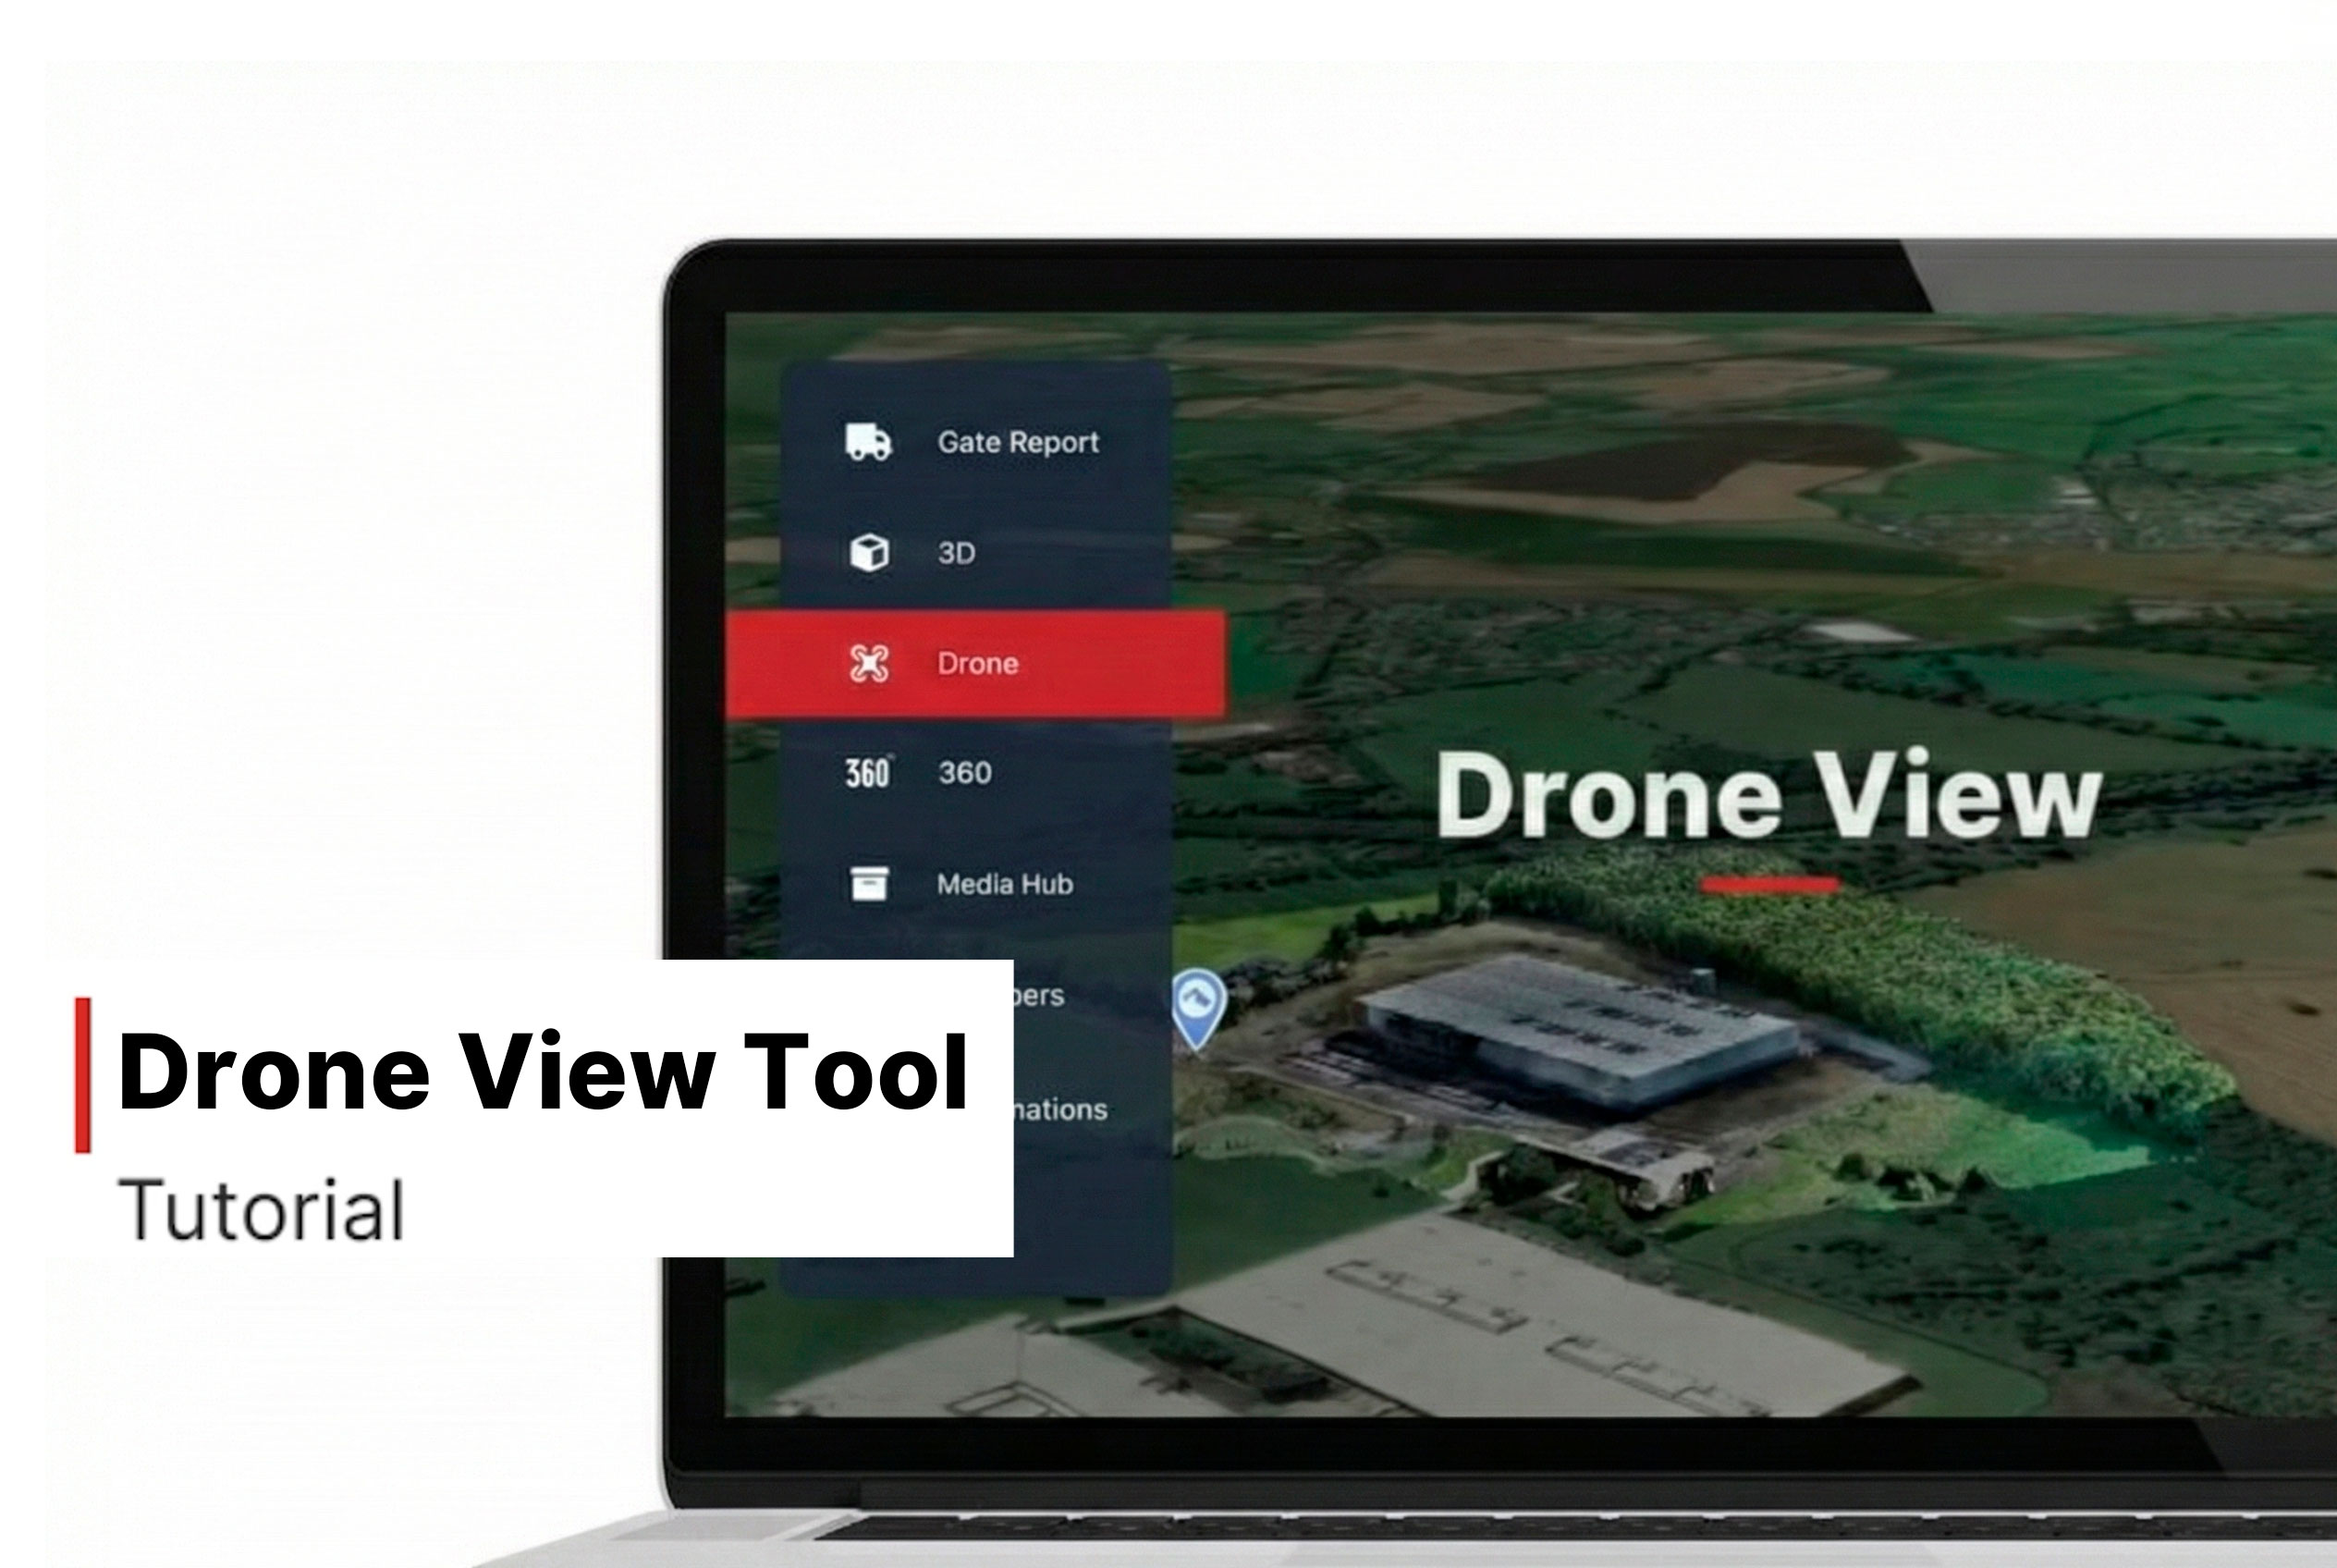
Drone
How to Use the Drone View Tool
- Navigate to the Drone View tab in the left-hand menu of your Evercam dashboard.
- Select a flight date at the bottom navigation bar to view it in detail.
Analyze & Share
- You can annotate and edit the image with the Mark-up Tool.
- Zoom in to inspect specific areas of the site.
- Download or share aerial images with project stakeholders.
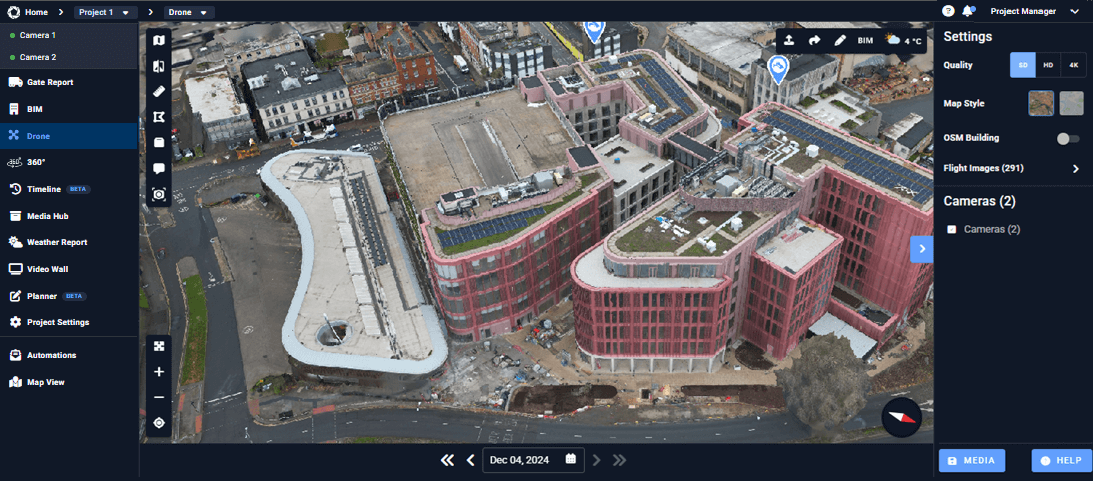
Additional Tools in Drone
Use the additional tools in Drone View to get more insights from your project. In the top left corner, you’ll find features like 2D Mode, Compare, Distance, Area, Volume, Comments, and Inspection. These tools allow you to measure distances, compare different flights, and inspect specific areas on the map. Meanwhile, the top right corner displays current weather conditions and gives you access to annotation tools.
Want More Details?
Read the full guide in our User Manual.
[[cta]]
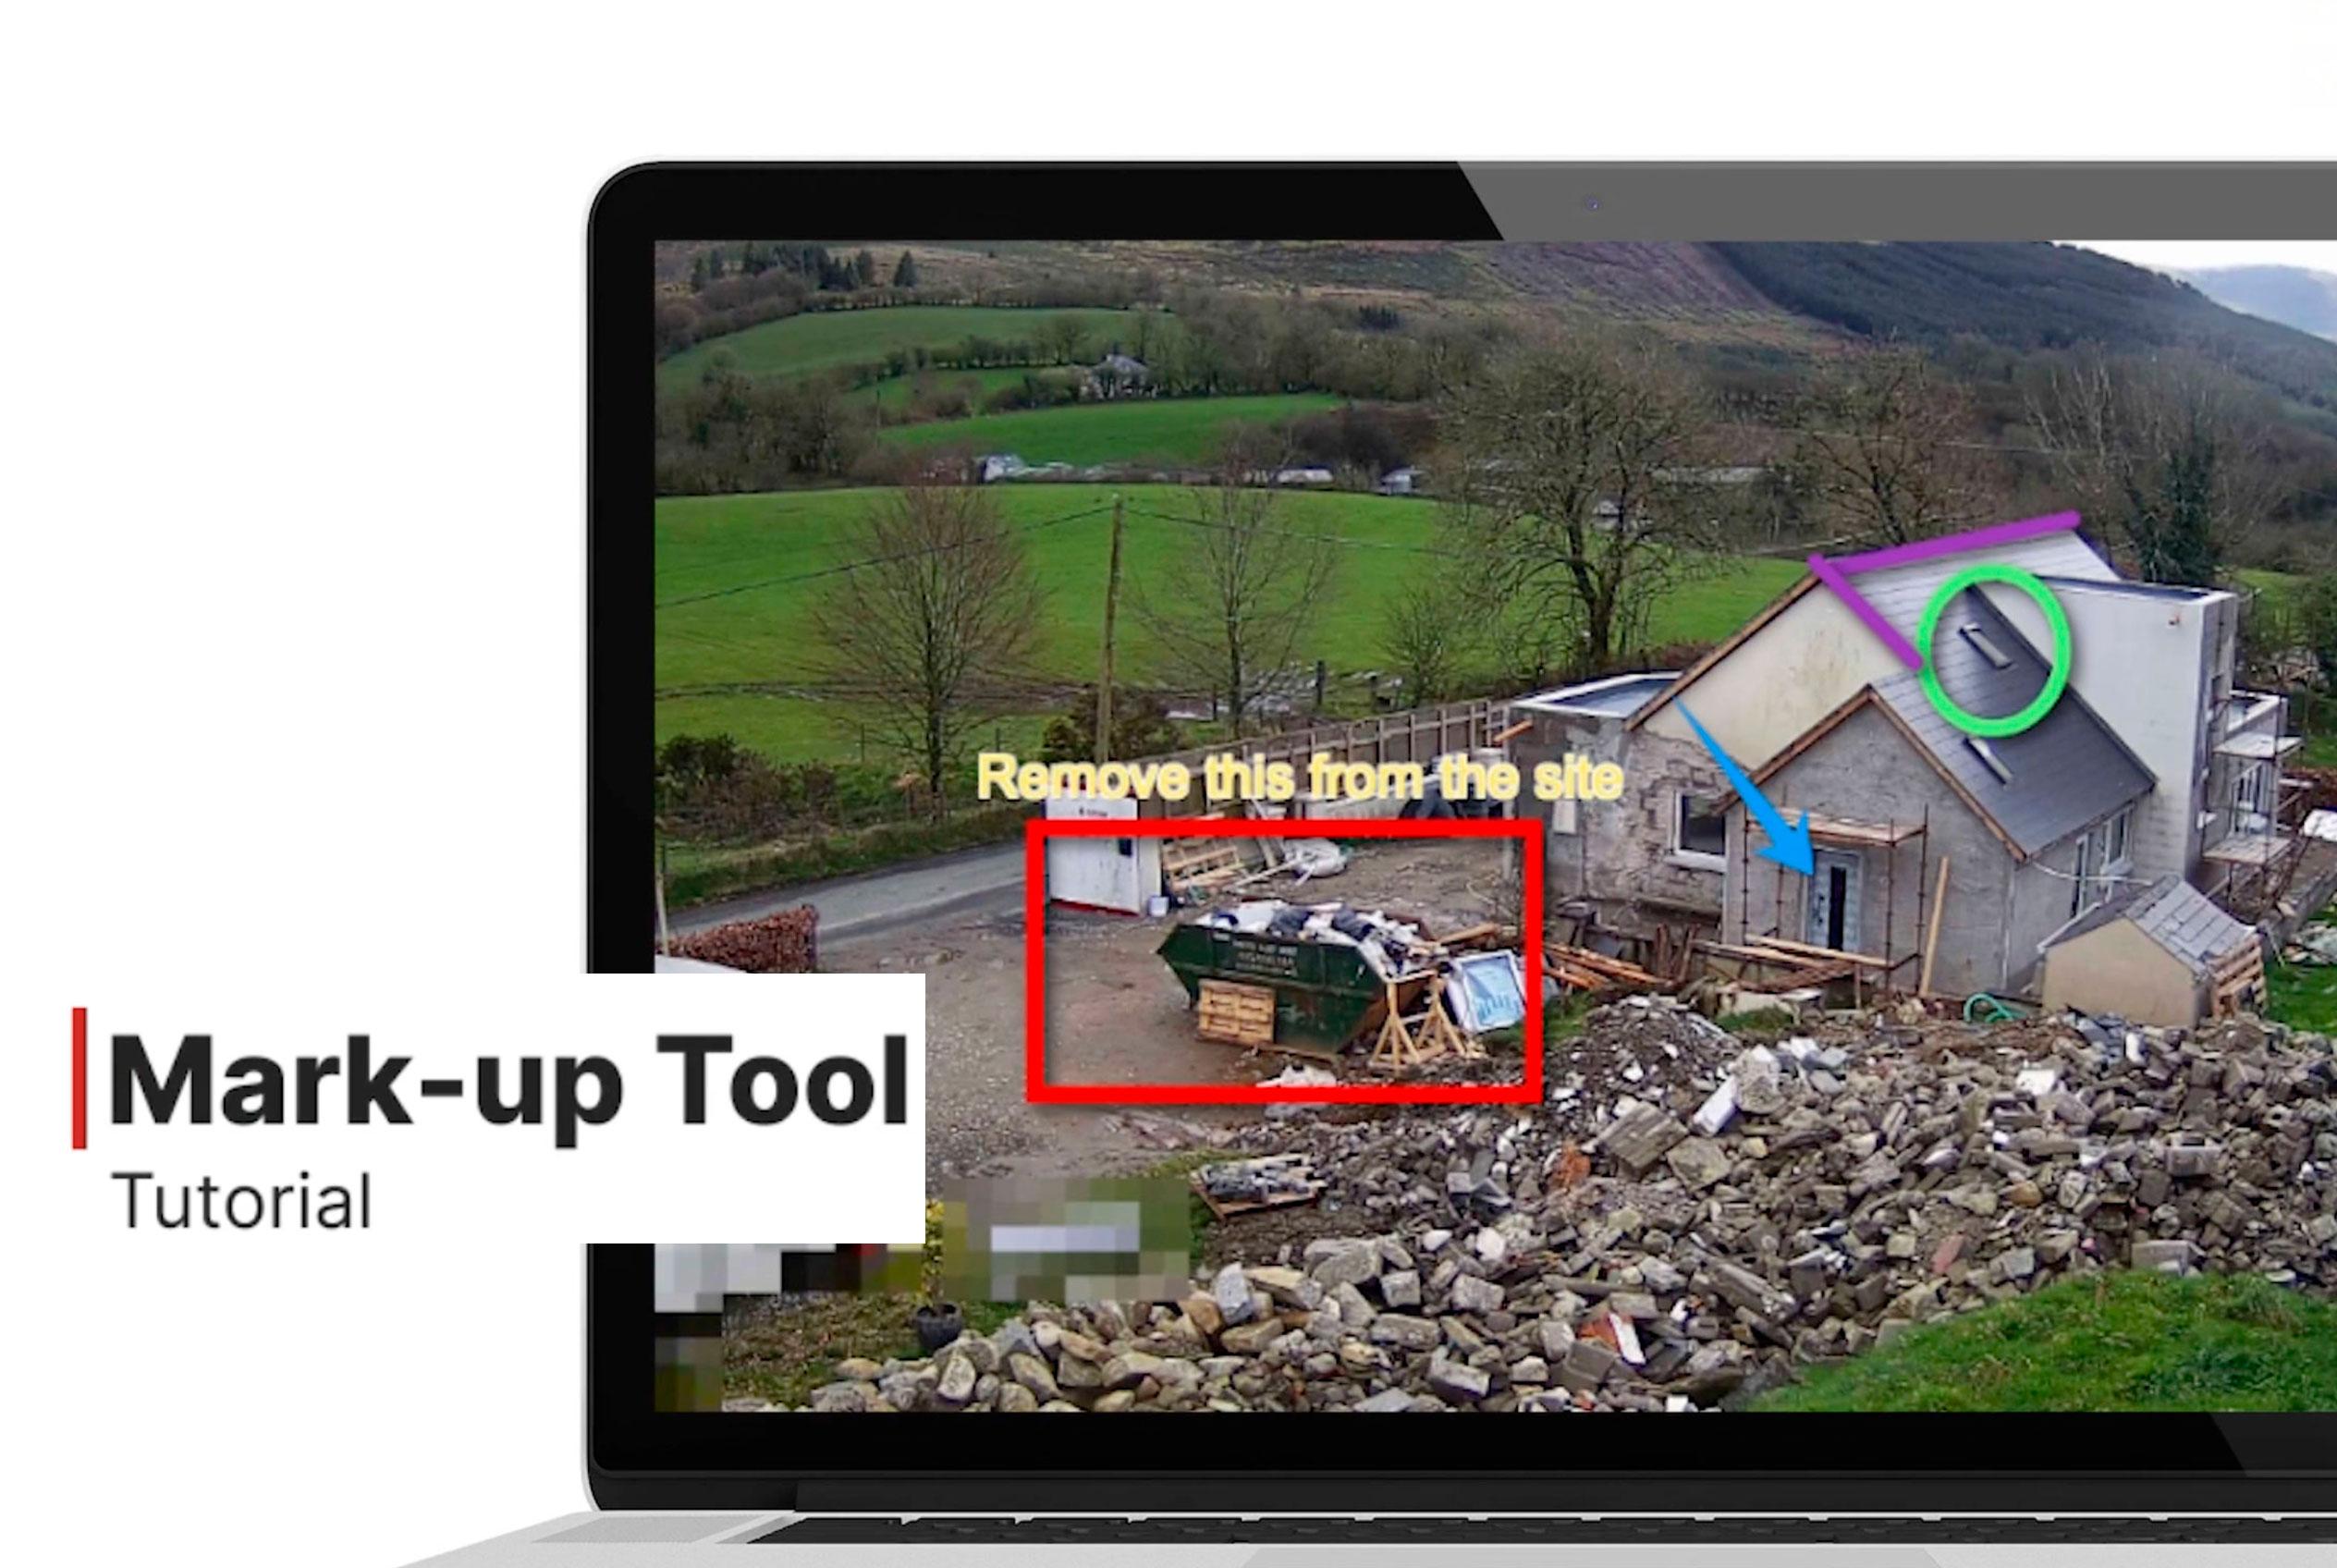
Mark Up
How to Use the Mark-up Tool
- Select the camera
- Open the Live View or Recordings tab at the top of your dashboard.
- Click on the Mark-up Tool icon to activate mark-up mode.
- Draw & Highlight – Use freehand drawing or preset shapes to emphasize areas. You can also blur sensitive information, crop to focus on key sections, and rotate the image for better alignment.
- Add Text & Notes – Click anywhere on the image to insert a note.
- Change Colors – Select different colors for better visibility.
Save & Share
- Click Save to keep your annotations.
- Download the marked-up image or share it with your team for quick collaboration through integrations like Procore, Aconex, and Autodesk.
Need More Details?
Read the full guide in our User Manual.
[[cta]]
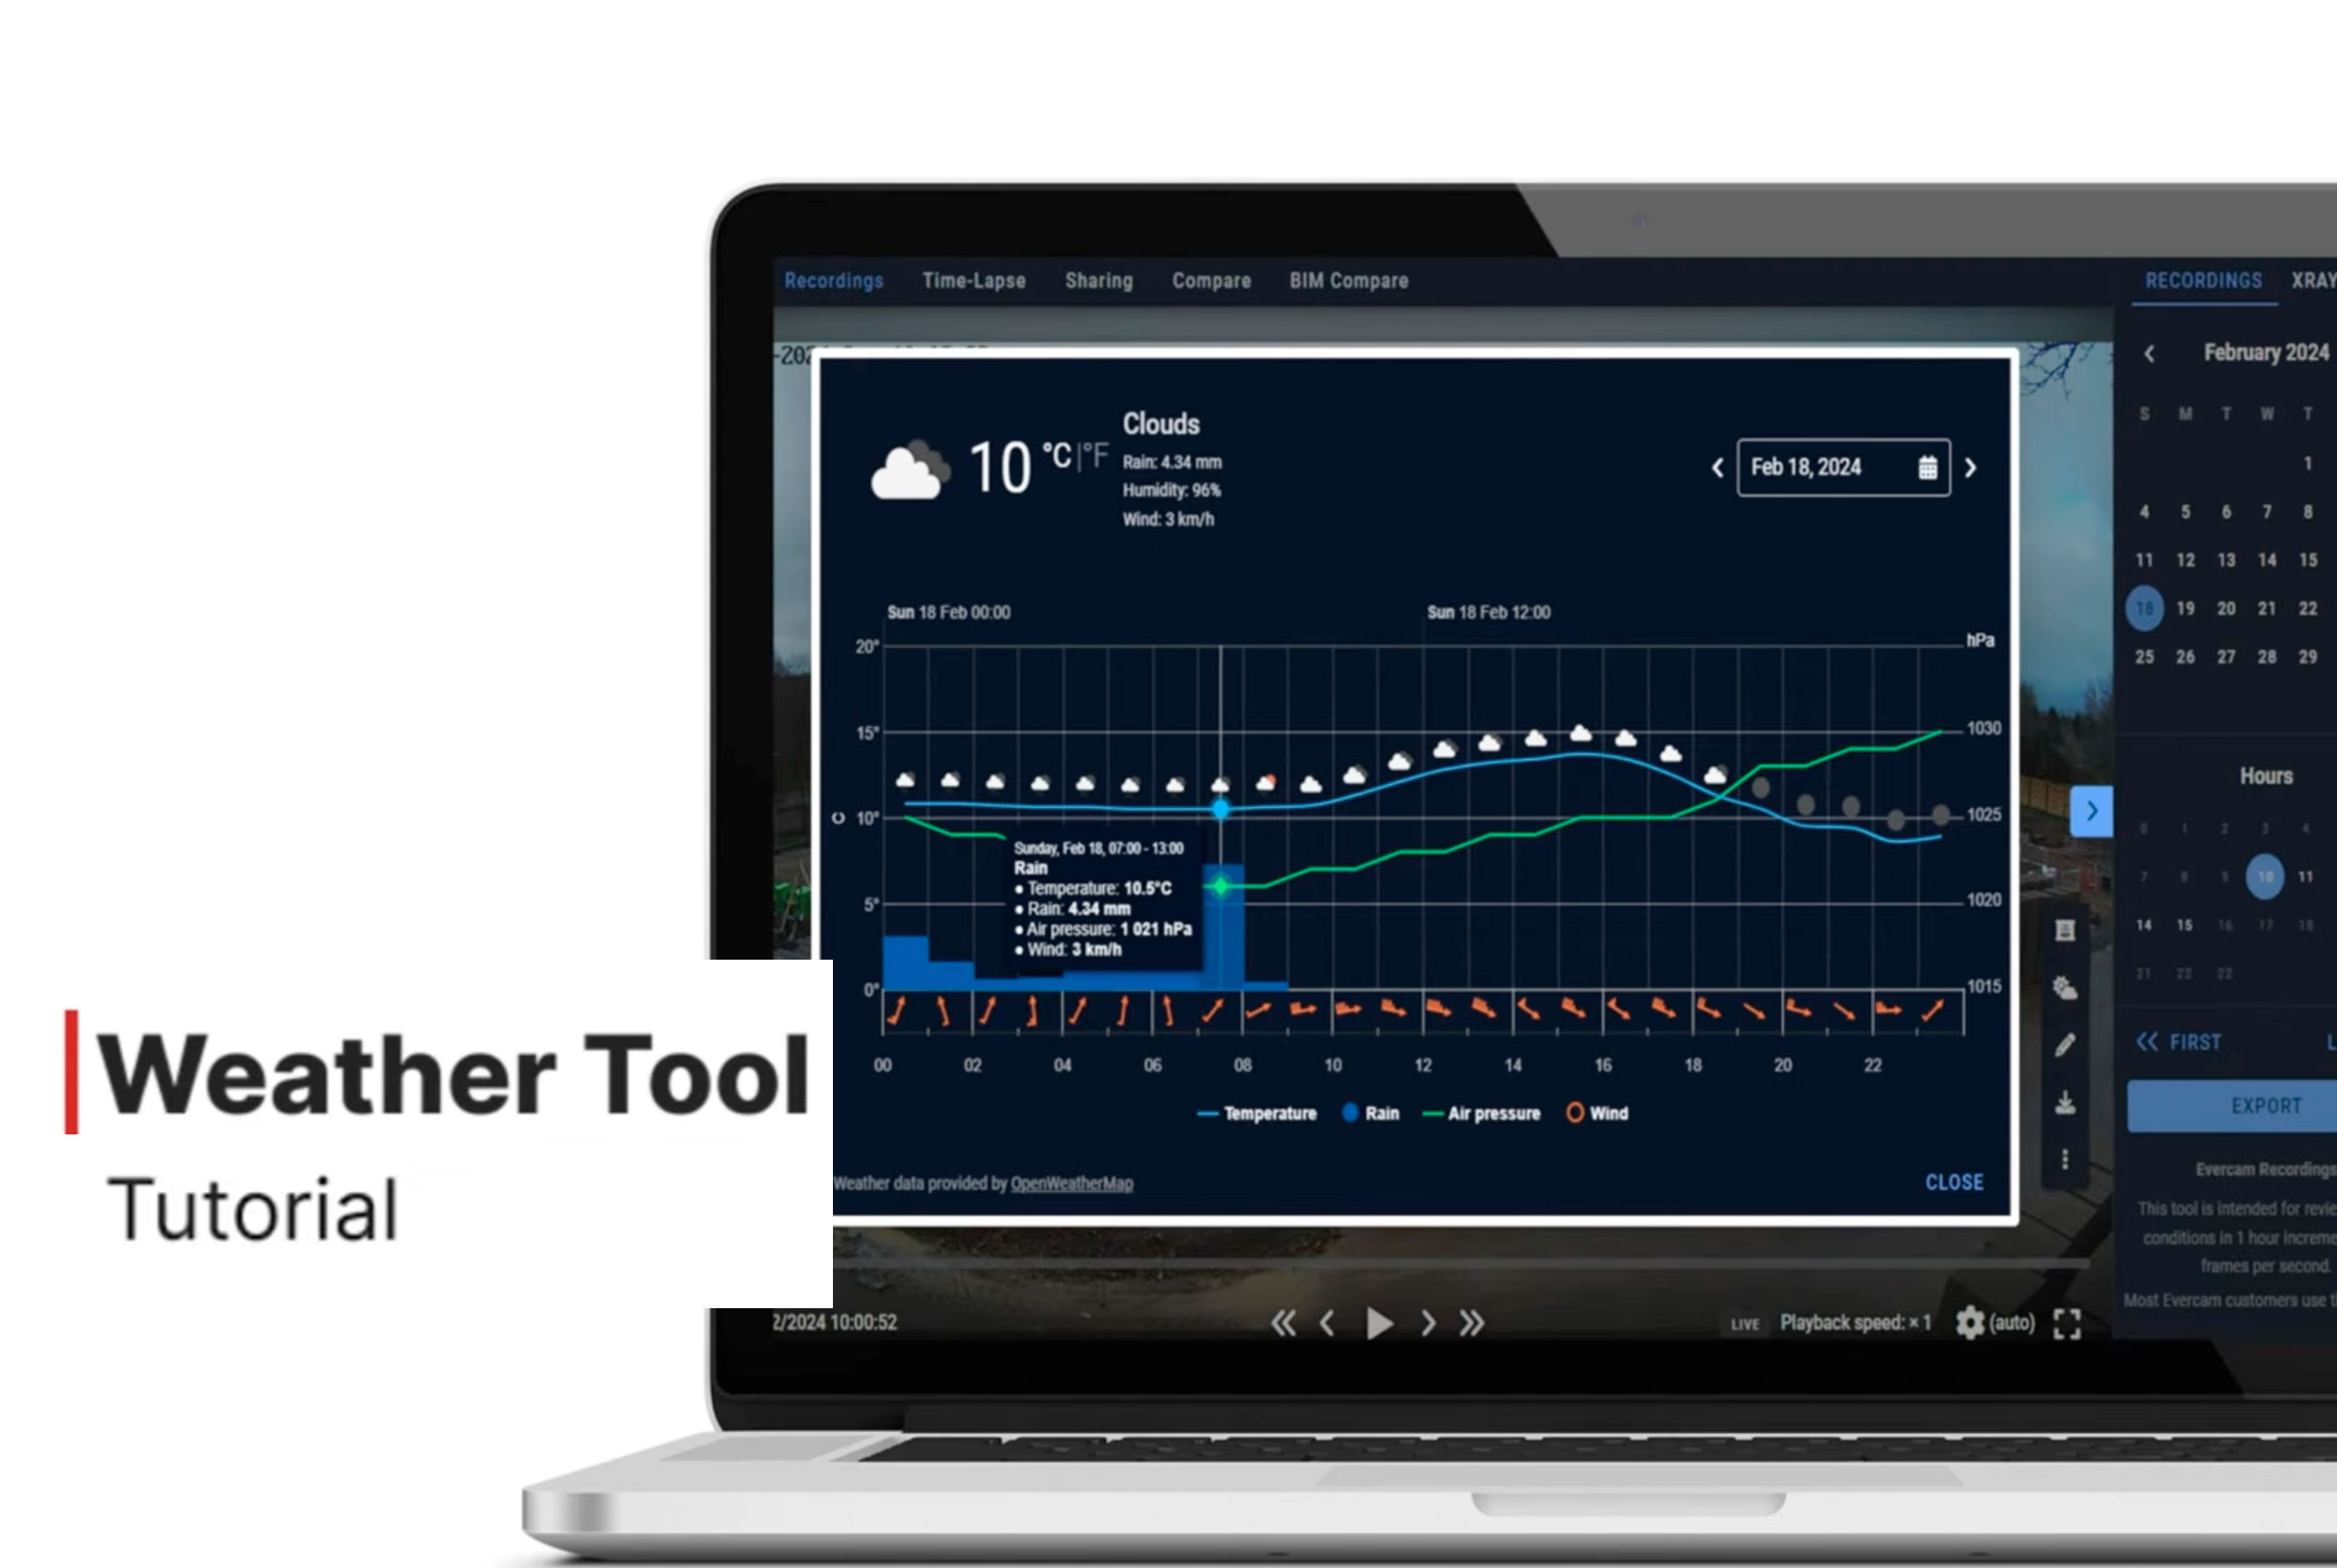
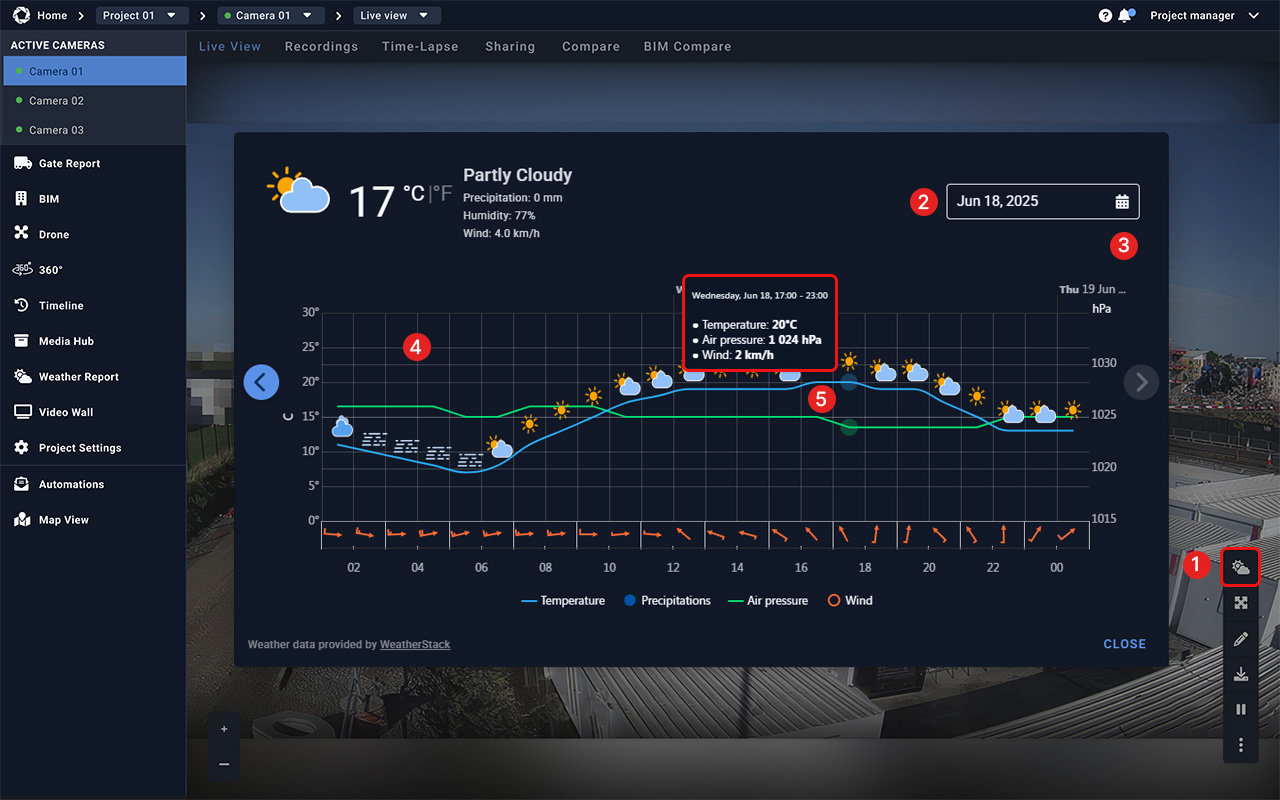
Weather
How to Use the Weather Tool
- Click the Weather icon in the bottom right corner of the screen.
- Available from the following views:
- Select a Date
- Live View
- Recordings
- Drone View
- BIM View
- Timeline
- Use the panel to select:
- Today’s conditions
- Tomorrow’s forecast
- Historical data
- Review Key Weather Metrics
- Review the following hourly data:
- Temperature (switch between °C/°F)
- Rainfall (precipitation levels)
- Wind speed & direction
- Air pressure
- Humidity
7. Use Weather Data for Smarter Decisions
8. Compare weather metrics with live or recorded site images.
9. Use timestamped conditions to document weather-related delays.
Apply insights to reschedule risky activities like concrete pouring, lifting, or exterior work.
Access the Weather Tool
Read the full guide in our User Manual.
[[cta]]
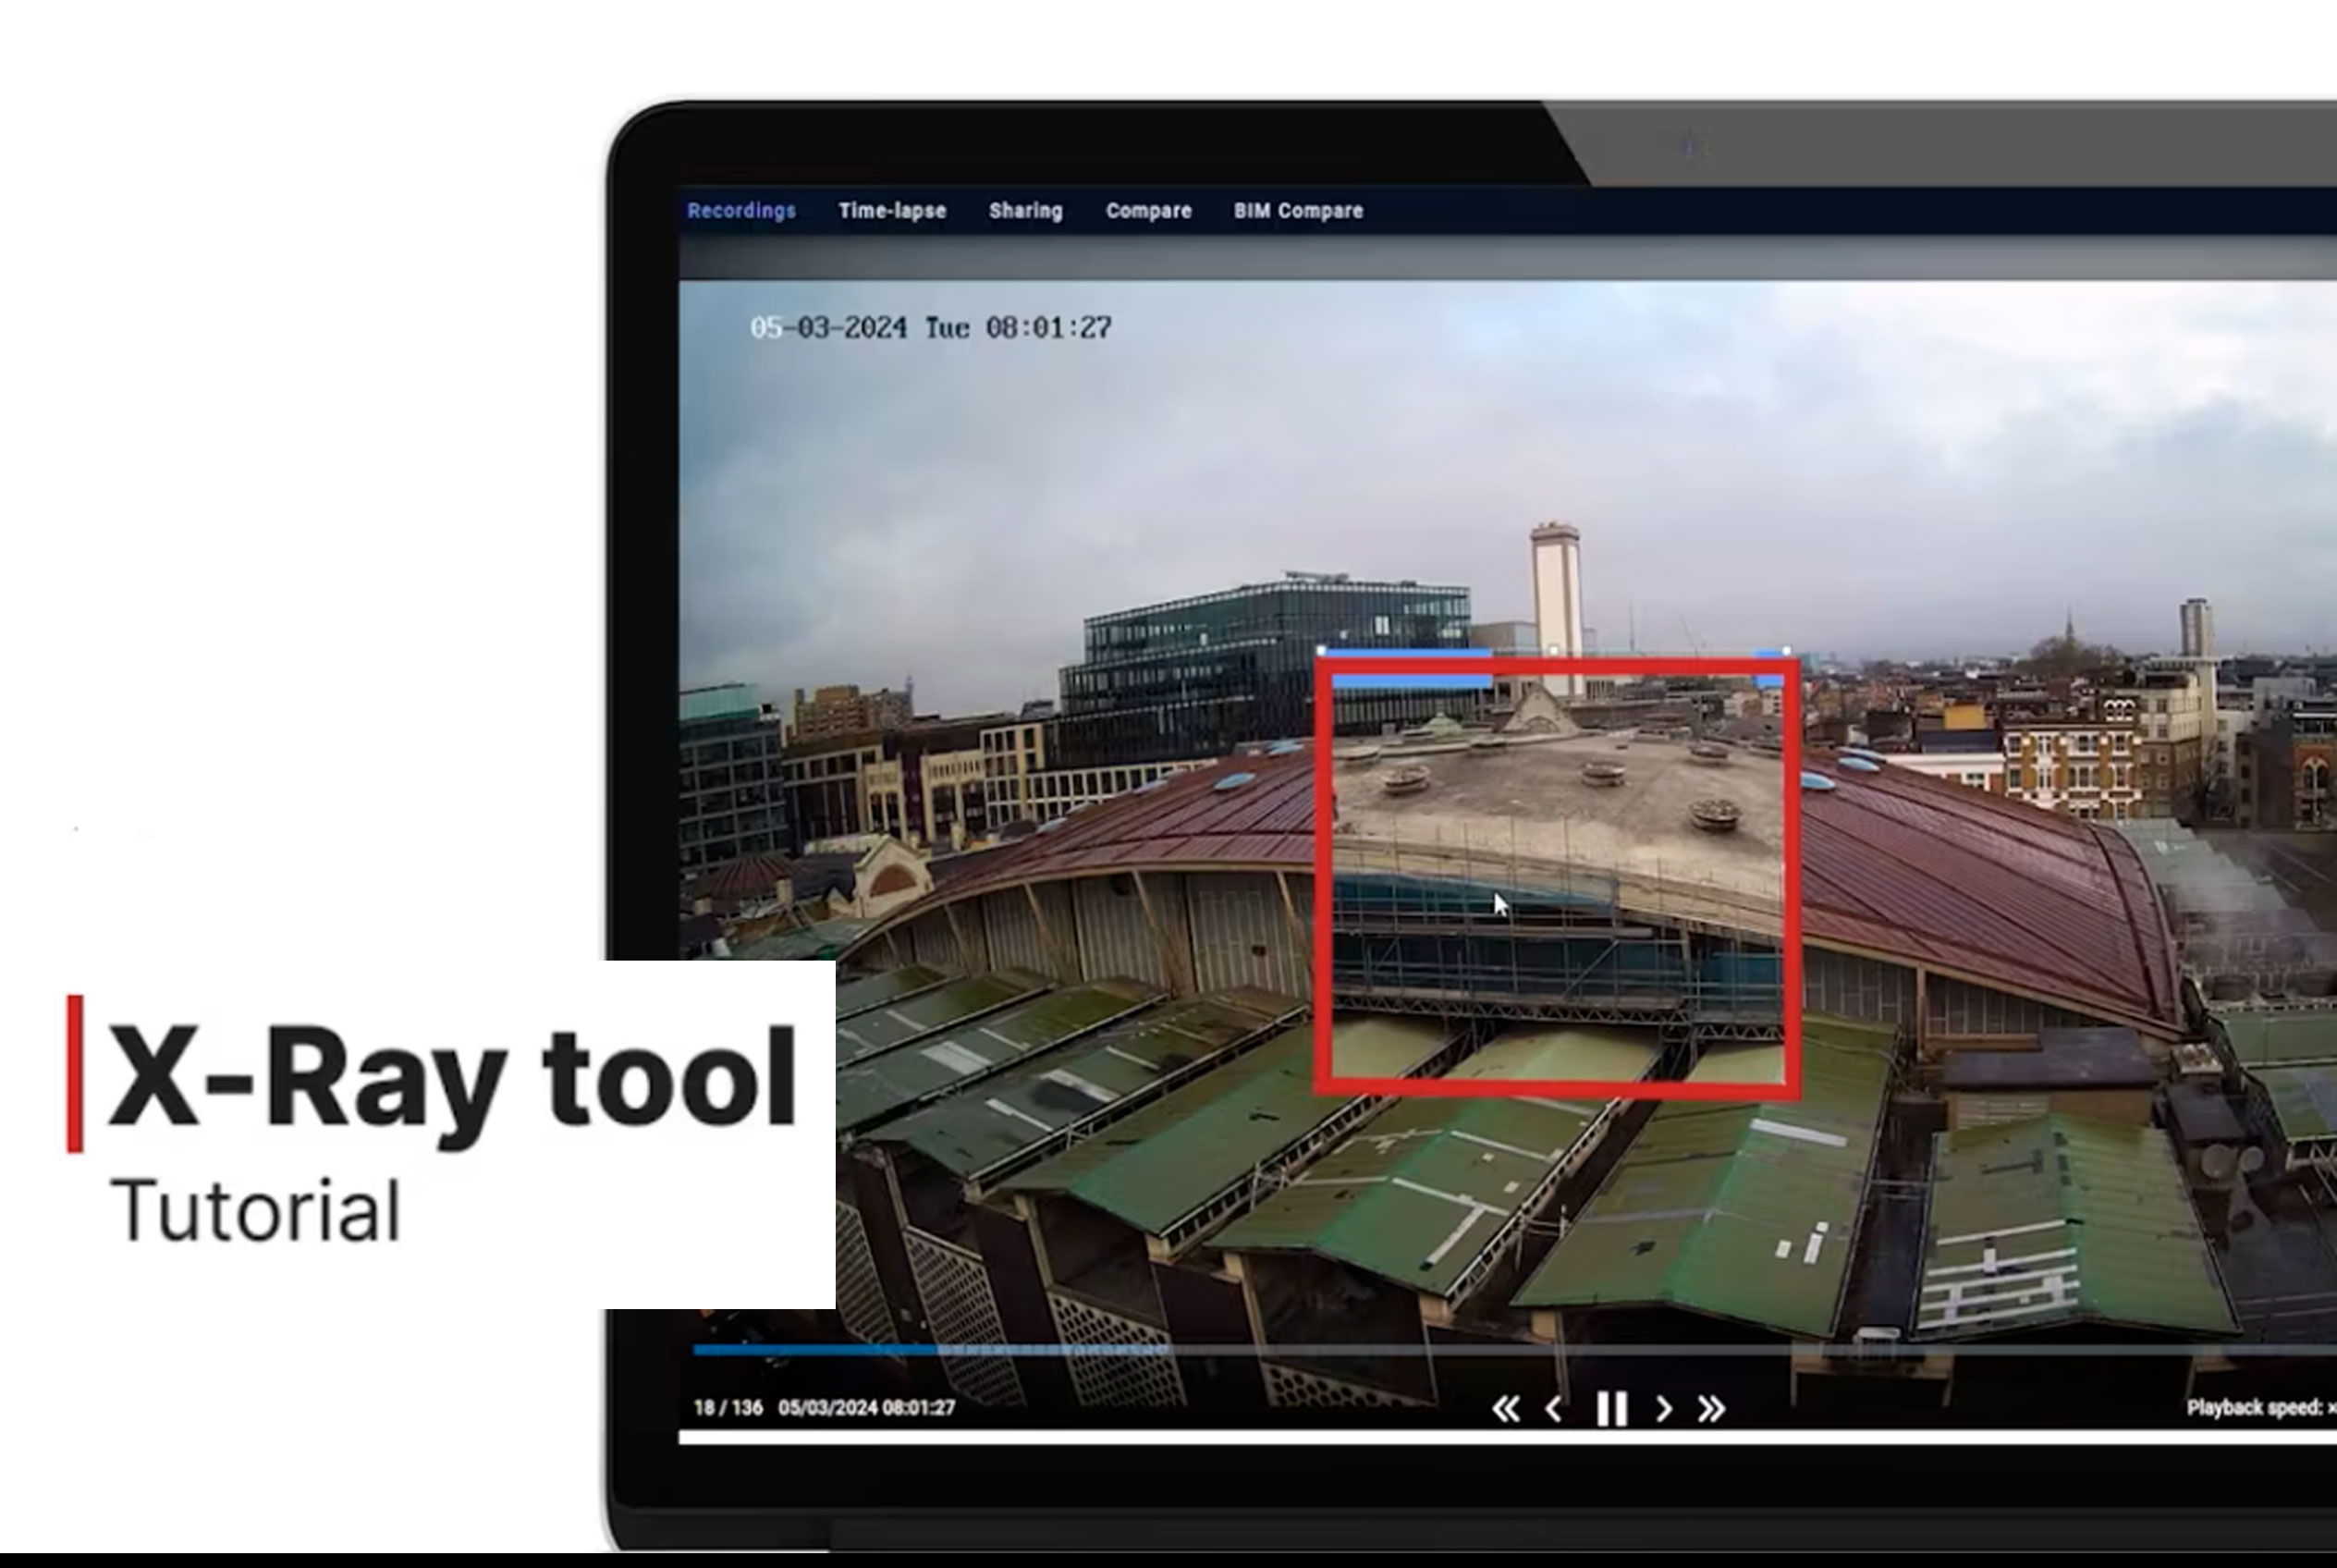
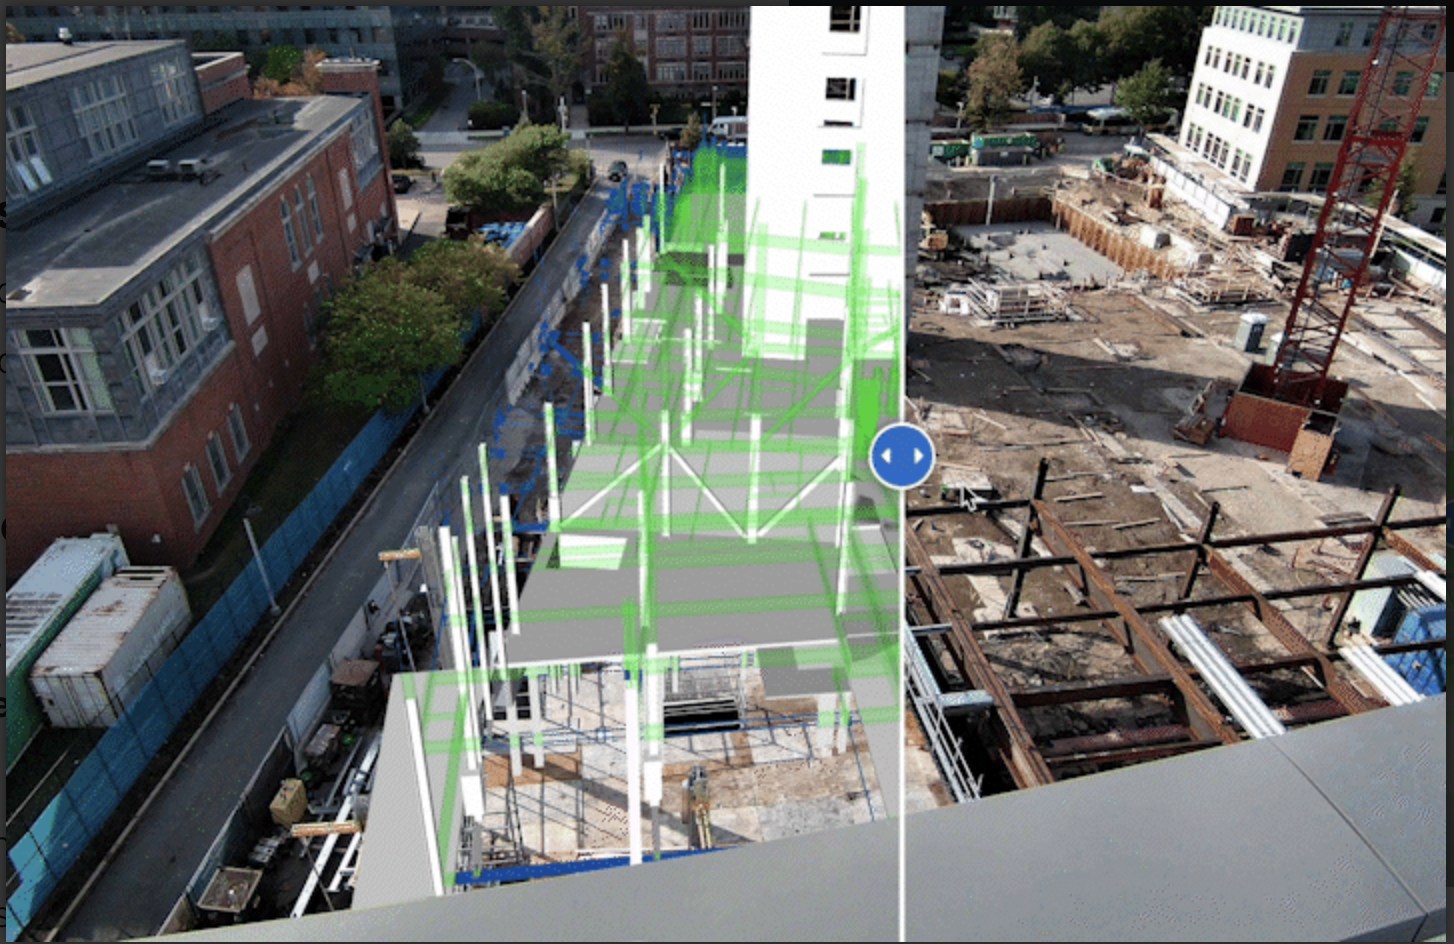
X-Ray
How to Use the X-Ray Tool
- Click the Recordings tab at the top left of your dashboard screen.
- Select the X-Ray Icon in the top right of the calendar.
- Use the calendar tool to select two dates:
- The current recording you want to compare.
- The past image to overlay.
Compare & Share
- Drag the X-Ray overlay to move it around the image.
- Resize the X-Ray area to focus on specific sections.
- Instantly see what has changed – without guesswork.
Try the X-Ray Tool Today
Find more information in our User Manual.
[[cta]]
See Your Project Clearly — Every Second, All the Time
Request a demo and see how continuous capture improves visibility, accountability, and outcomes on your next project.